Overview
This topic covers administration of document actions using the classic interface pages. Refer to Document Actions (Redwood) for administration using the new Redwood interface pages.
For addition information, refer to the following topics:
-
Commerce Actions describes action types, action tabs, and order of operations.
-
Process Actions covers administration of process actions.
-
Standard Process Transaction Actions lists Transaction (main document) actions provided in the Standard Process.
-
Standard Process Transaction Line Actions lists Transaction Line (sub document) actions provided in the Standard Process.
Administration
Standard Process actions cannot be deleted, but the action functions can be viewed, overridden, and easily returned to their default values. The Standard Process attributes and actions come with predefined functional logic that is ready for customers' use. If required, seeded logic can be overridden by administrators to incorporate their customization logic.
To view a pre-defined function in read-only mode, click View Function.
Standard Process actions come with standard settings and values for advanced modify and the modify tab. These values and settings can also be overridden and returned to the standard values by removing the override.
For Modify and Add from Catalog actions, the Standard Destination values and options can be overridden if desired. You can quickly return to the standard values and options by removing the override. To view the default values, check to Override Standard Destination option, and then click Apply.
- Navigate to the Admin home page.
- Click Process Definition in the Commerce and Documents section.
- Click on the applicable Commerce process.
- Select Actions from the Navigation drop-down for the applicable document, and then click List.
- Click Add at the bottom of the Actions List page.
- Enter a Label.
Enter a unique Variable Name.
The Variable Name field populates automatically. Variable names can only contain alpha-numeric characters and underscores. The entry can be changed before saving, but after saving the value is read-only.
- Select your desired Action Type from the drop-down.
- Click Add to save changes and open Admin Action editor or click Cancel to return to Action List without saving changes.
-
Edit the available tabs.
Option Description Label Text label that is displayed on the action button. Description (optional) Enter a description of the action. Action Icon (optional) Click Browse to specify an icon that is displayed on the transaction action button. Show Loading Dialog This option turns on or off a loading dialog on the commerce side when the user clicks on the action. The image and text for the loading dialog can be customized in the site settings.
-
Select Yes to enable loading dialog for this action.
-
Select No to disable loading dialog for this action.
Action Timeout (optional) Enter a timeout threshold in minutes.
When an Action Timeout is specified it takes precedence over the general Commerce setting. This allows the administrator to isolate performance issues on a single Commerce action.
Execute Action if Associated Integrations Timeout Select this option to specify this action will execute if an associated Integration times out. Associated integrations are specified in the Integration tab. Layout Path Specifies the layout path for this action. Click Save and Edit Layout to open on the main document layout editor. Run Validation Before Modify Select this option to set validation rules to run before Advanced Modify. If validation fails, an error message is generated and associated integrations will not occur. This prevents integrations from being triggered before validation occurs.
Always Run Pricing of All Lines Enable this option to always reprice all line items when this action is invoked, even if no changes have been made to any price attributes. Pricing is invoked between Before Formula and Formula during the modify action. Advanced modification refers to an action’s capability to modify attribute values in the current document using an advanced function when the user clicks on the action. Advanced modification is run at the end and therefore can override the value set by an attribute’s modify tab.
-
Defining an advanced modification allows you to change the values of multiple attributes at the same time when a particular action is clicked.
For example: it will return values from a Commerce Library Pricing Function, when a user clicks Save, Submit, or Update Line Items. This allows you to create the price logic once and run it on multiple actions.
-
Defining an advanced validation allows you to display an error message if the user has clicked an action, but has entered something incorrectly.
For example: you could write a BML script that has an error message reading- "Line Item 2 exceeds the maximum allowable discount."- based on your particular parameters.
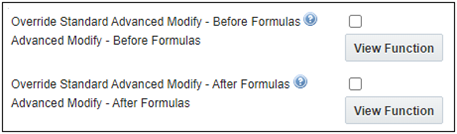
Override Standard Advanced Modify - Before Formulas This option is displayed for Standard Process actions
- To customize standard defaults, check the Override Standard Advanced Modify-Before Formulas option, and then click Apply.
- To return to the standard defaults, uncheck the Override Standard Advanced Modify-Before Formulas option, and then click Apply.
Advanced Modify - Before Formulas When a function is defined, the advanced modification will be run before the formulas created in Formula Management are used.
- No Advanced Modify - Before Formulas - Select this option to disable advanced modify functions.
- Define Advanced Modify - Before Formulas - Select this option, and then click Define Function to specify an advanced modify function.
Override Standard Advanced Modify - After Formulas This option is displayed for Standard Process actions
- To customize standard defaults, check the Override Standard Advanced Modify-After Formulas option, and then click Apply.
- To return to the standard defaults, uncheck the Override Standard Advanced Modify-After Formulas option, and then click Apply.
Advanced Modify - After Formulas When a function is defined, the advanced modification will be run after the formulas created in Formula Management are used.
- No Advanced Modify - After Formulas - Select this option to disable advanced modify functions.
- Define Advanced Modify - After Formulas - Select this option, and then click Define Function to specify an advanced modify function.
Advanced Validation Advanced validation refers to an action’s capability to validate the attribute values in the context of the current document and its associated parent/ child, when the user clicks on the action.
For example, the user can validate an attribute on a sub-document using an advanced validation function on the main document and vice-versa. Basic data type validation is always done for all attribute types.
The system supports the following types of validation settings for Commerce actions:
- Simple Validation: System checks attribute values using individual attribute validations. Default validation setting for document attributes. Simple validations can include checks for numeric values, numbers in a range, required attribute values, or any other type of check that can be set for an individual attribute.
- Define Validation Rules: Deprecated- Use Commerce Rules.System performs cross-validations in addition to simple validations. Cross-validations between attribute values can be created using the Script Editor. Example: create validation at the document level that prohibits discounts in excess of 20% when a purchase price is under $1000. This type of validation can also be created as a constraint configuration rule.
-
Save Without Validating: Turns off all checks on attribute values when the action is being performed and saves the document data. This option guarantees that an action will succeed and is useful for actions set up on timers, such as an Expiration action.
Error messages for invalid values are not displayed when Advanced Validation is set to Save without Validating for actions that modify a transaction array or line item attributes.
- Modify Without Saving or Validating: This option is similar to the "Avoid All Validation (Save)" action, only document data is not saved when the action is performed. This validation method might be selected for a Modify action set up to copy data from one set of fields to another.
Maximum Number
of CopiesOnly available for Copy Line Items action
Specifies the maximum number of copies a user can make.
If you choose a number greater than one, a pop-up appears and the user can input the desired number of copies. The FullAccess user can map the attributes that are displayed on the pop-up by selecting Display in pop-up for Copy Line Item in the Admin Column page for Line Item Columns.
Default to Quantity Only available for Copy Line Items action
If the FullAccess user selects this option, then the number of copies field in the Copy Line Item pop-up is pre-populated with the quantity of the selected line item(s). If the quantity of the selected line items is greater than the maximum number of copies specified by the FullAccess user, then the Number of Copies field is pre-populated with the maximum number of copies.
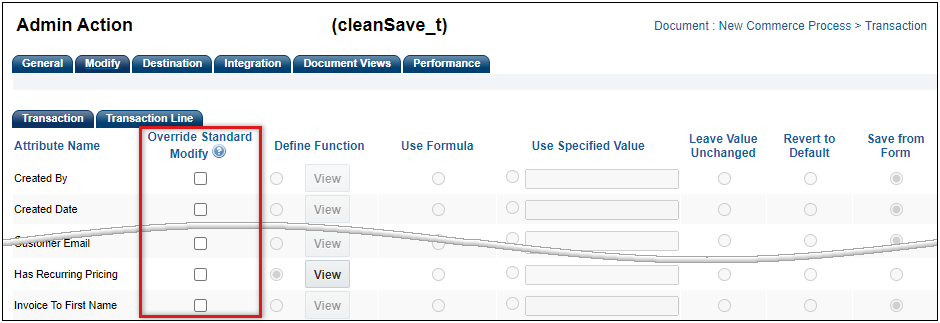
This tab is available for all 'Modify’ type actions (system-generated or user-defined). This tab controls the manner in which a transaction gets its data; it allows you to manipulate the values in the attributes by specifying behavior in this tab. The Modify tab contains a list of all attributes available in the current tab with five options for each attribute.
Option Description Override Standard Modify This option is displayed for Standard Process actions
- To customize standard defaults, check the Override Standard Modify option, and then click Apply.
- To return to the standard defaults, uncheck the Override Standard Modify option, and then click Apply.
Define Function This option implies that the user must define a function that calculates the attribute value. Click Define after selecting the radio button. Use the Script Editor to create a function that sets the attribute value. You can use this option to determine current system variables, such as the currency conversion rate or system date. Use Specified Value This option implies that the attribute will get its value specified in the corresponding field. Enter a value in the value field next to the radio button. Leave Value Unchanged It implies that the attribute will retain its current value, whether its a user input or system defined. Revert to Default This option implies that the attribute value will be reset to its default value. Save from Form This is the default option. This option implies that the attribute will always retrieve its value from the user input on the commerce side. Notes:
-
When setting modify rules for the Autofill type Commerce action, the options set on the Modify tab have a higher precedence than mapping rules set on the Mapping tab. To force the system to use mapping rules for auto-filling fields instead of modify rules, use the Leave Value Unchanged setting. If this setting is used and mapping rules are not available for a field, then the system populates the field using the attribute's default value.
-
You can configure all listed attributes the same way by choosing an option and selecting the Select All radio button at the bottom of the column.
This tab is only available for Add From Catalog, Back, and Modify type actions.
This tab contains different options depending on the combination of the type of action and type of document:
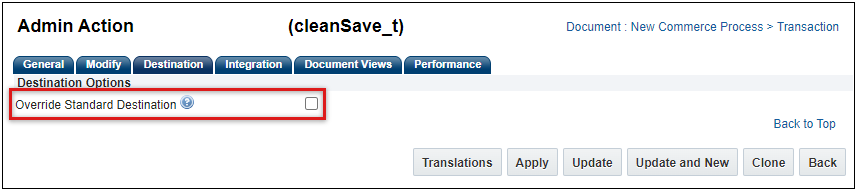
Options Description Override Standard Destination This option is displayed for Standard Process actions
Standard Process actions have predefined functional logic for destination options. If required, seeded logic can be overridden by administrators to incorporate their customization logic.
- To view or customize destination options, check the Override Standard Destination option, and then click Apply
- To return to the standard destination options, uncheck the Override Standard Destination option, and then click Apply
Add From Catalog Type Actions Simple Destination Used to hard-code a specific destination page, either a page in the catalog or the Commerce List page. Must enter the destination URL.Supports a single destination page. Define Destination Rule Used to define rules that instruct the system where to take the user based on a condition. Supports different destinations. Click Define Function. Can pass attribute values with a Reconfigure action.  Rules-Based Destination using an Advanced Function
A destination script can be used to send an Add from Catalog action to one page or another. This script appends the appropriate model name into a URL string, which is returned as the destination link. Example:
model_name="";
for a in quote_detail {
if( a._document_number == _system_current_document_number ) {
model_name=a._model_name;
}
}
if( model_name == "Big Pump" ) {
model_name = "Big%20Septic%20Tank";
}
if( model_name == "Big Septic Tank" ) {
model_name = "Big%20Pump";
}
return "acme.oracle.com/commerce/new_equipment/products/ model_configs.jsp?segment=Mega%20Pumps&product_line=Gamera%20Pumps%20and%20Tanks&model=" + model_name;
Modify and Back Type Actions Parent Page Upon clicking the action, the user will be taken to the top level page.
Example: on a Modify action called Save on the main document; the destination could be set to the parent page. Upon clicking this action, the user is taken to the top level page..
Same Page Upon clicking the action, the user will remain on the current page.
Example: on a Modify action called Save on the main document; the destination could be set to same page. Upon clicking this action, the user would remain on the current document.
Custom Destination Upon clicking the action, the user will be taken to the URL specified in this field. A valid value for this field is the relative path to any page on the Oracle CPQ application. In addition, this field may be a complete URL for a destination external to the Oracle CPQ application.
Example: The value
/commerce/buyside/commerce_list.jspwould be valid for the custom destination, as the user will be taken to their Favorites page.External Object ID Attribute Upon clicking the action, the user will be punched-in to the appropriate object on the partner site. A valid value for this field would be the variable name of the attribute which stores the partner object Id information.
Example: If a Commerce attribute with variable name
partner_opportunity_idcontained the partner opportunity ID, this attribute variable name would be in the Partner Object Id attribute field.Define Destination Rule Upon clicking the Define Function action, the user will be taken to the URL returned by running a BML function. The valid value return value for this function is a string. Any URL whose relative path is a page on the Oracle CPQ application would be a valid return value.
Example: The value
/commerce/buyside/commerce_list.jspwould be valid, as the user will be taken to their Favorites page.Rules-Based Destination using an Advanced Function
A destination script can be used to send an Add from Catalog action to one page or another. This script appends the appropriate model name into a URL string, which is returned as the destination link. Example:
model_name="";
for a in quote_detail {
if( a._document_number == _system_current_document_number ) {
model_name=a._model_name;
}
}
if( model_name == "Big Pump" ) {
model_name = "Big%20Septic%20Tank";
}
if( model_name == "Big Septic Tank" ) {
model_name = "Big%20Pump";
}
return "acme.oracle.com/commerce/new_equipment/products/ model_configs.jsp?segment=Mega%20Pumps&product_line=Gamera%20Pumps%20and%20Tanks&model=" + model_name;
Close Parent Window Upon clicking this action, the current embedded Transaction will close and the user will be taken to the parent site. Using this method provides the following benefits:
- Simplifies integration by removing dependency upon the "Return To Oracle Sales" BML script, which required administrators to specify and maintain multiple return URLs.
- Improves the user experience by retaining user context when a user is directed back to Oracle Sales from CPQ. Previously the web page was refreshed to generic return URL, and the user's navigation history was lost.
This tab is only available for Display History, Email, Export Attachment and Print type actions
These action types must be used in conjunction with an XSL template file to produce a commerce side output. Such actions can be associated with one or more XSL views. If multiple XSL views are available, users can select an XSL template from the ones available. The XSL views option enables you to support custom forms and page displays using XSL and XSL-FO.
The Email action contains a special tab called the XSL Views tab. This action type must be used in conjunction with an XSL format file that contains the email-friendly format you want to associate with that particular Email action. The XSLs displayed on this tab come from the Printer Friendly/History XSL Views section. This action can be associated with one or more XSL views. If multiple XSL views are available, users can select an email form from the ones available.
Notes:
-
When adding a new Print or Email action, a default XSL view will display in the XSL Views tab for that action; however, the default value does not take effect until the Apply or Update is selected from the Admin Action page.
-
When associating a Print action with an XSL view that outputs data as PDF, end users may have to configure a setting in Adobe Acrobat to be able to view the resulting document. The setting turns off browser display for PDF documents.
This tab is only available for Email type actions
The Email action also contains a special tab called the Email Fields tab. Email field rules instruct the system to auto-populate fields in the Email pop-up window. With the fields populated by the system, users can sent out emails quickly. The following fields can be auto-populated:
- From Address
- To Address
- CC Address
- BCC Address
- Subject
- Comments
- Attachment Name
- Additional Attachments
The Integration tab (displayed only if the site is integrated to a partner) determines the order in which data is exchanged between Oracle CPQ and a partner application. The order in which the integration XSLs are specified in this tab determines the order in which data is either sent to or received from the partner.
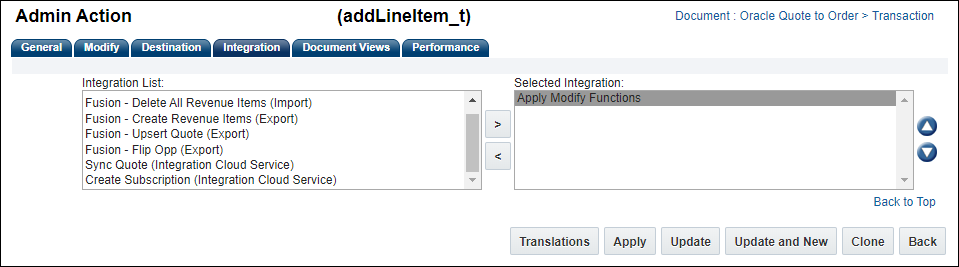 The Apply Modify Functions value in this tab cannot be removed. All integrations can be ordered around it. Also, no integration can be performed without performing a Modify tab operation.
This tab is only available for Copy Line Items action
Use this tab to specify how to populate attribute values in when line items are copied.
Option Description Override Standard Initialize This option is displayed for Standard Process actions
- To customize standard defaults, check the Override Standard Advanced Modify-After Formulas option, and then click Apply.
- To return to the standard defaults, uncheck the Override Standard Advanced After-Before Formulas option, and then click Apply.
Define Function Use this option to define an advanced function for setting an attribute's value. Use Specified Value Use this option to hard-code an attribute's value using the available text field. Revert to Default Use this option to use the default value set for the attribute itself. This option is useful for picking up the current date and time, one of the many uses you can choose this option for. Copy from Original Use this option to set the attribute's value using the value set in the original document. When this option is used, mapping settings associated with the Create Commerce action are not used
This tab is only available for Auto Fill and Select Alternate Address type actions
Available only for actions related to the accounts section. Account fields and commerce attributes are mapped in this tab. When the user selects a customer account ID and clicks on a relevant action, the mapping specified in the respective action will populate the commerce attributes with data from the corresponding accounts fields. Mapping rules are used to link data from one document to another in the same process, or from the Account database to a commerce document. Example: use mapping rules to link Account customer records to a commerce document's ’Bill To/Ship To’ fields.
Mapping rules have a higher precedence than an attribute's default value, however, they have a lower precedence than Modify rules. To force the system to use mapping rules when a user performs an Autofill or Select Address action, use the Leave Value Unchanged setting on the Modify tab.When a user performs an Autofill, Browse or Populate action, the system uses the mapping set up for the Autofill action. When a user performs a Select Address action, the system uses the mapping set up for the Select Address action.
The Document Views tab allows the FullAccess user to control the display of an action to users in different steps of the transaction. The FullAccess user can make the action active or inactive in a certain step to a particular participant profile.
-
- Select one of the following:
- Translations: Oracle CPQ content and product templates can be translated into the following languages: French, German, and Spanish.
- Apply: saves changes and remains on the page.
- Update: saves changes and returns to the Document List page.
- Update and New: saves changes and creates a new action.
- Back: returns to the Document List page without saving changes.
The new action appears in alphabetical order on the Actions List page.
- Navigate to the Action List page and perform one of the following actions:
Mark the checkbox of the desired action under the Select column and then click Clone.
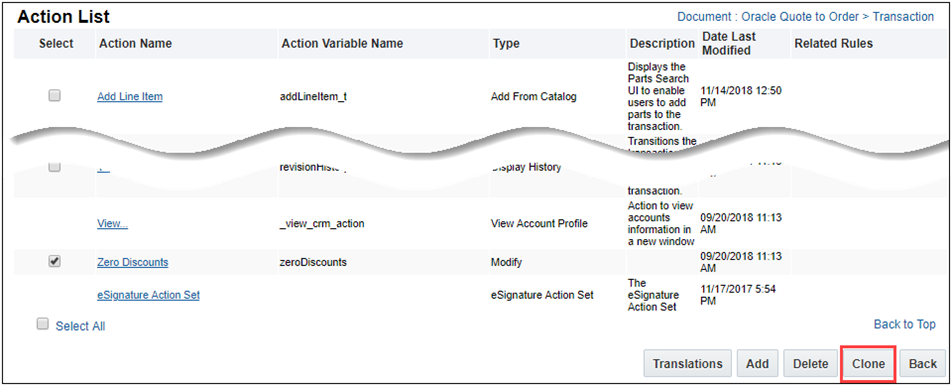 Only one Commerce action can be selected to clone at a time. Selecting multiple actions from the Admin List page results in an error message.
Click on the name of the action you wish to clone. When the Admin Action page displays, click Clone.
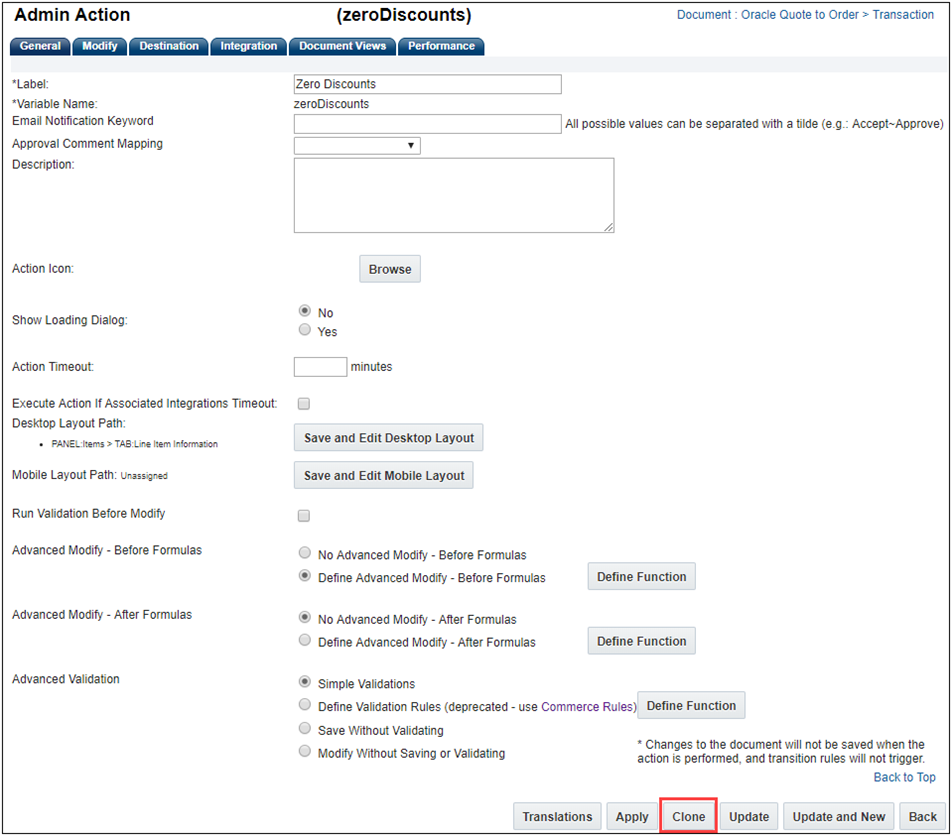
The Admin Action page for the newly cloned action displays.
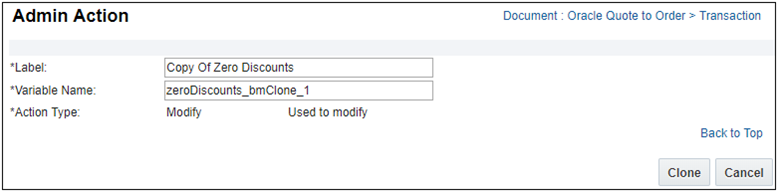
- Enter a Name in the Label field for the new cloned action.
-
Enter a unique Variable Name or accept the default variable name in the Variable Name field for the new cloned action.
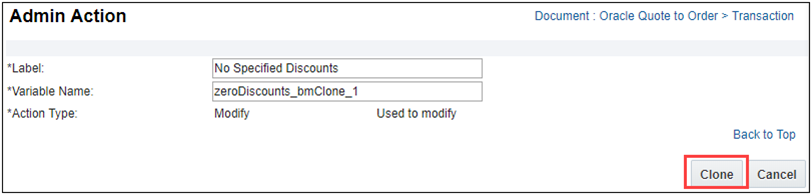
- Click Clone. The Admin Action page for the new cloned action displays.
-
Mark the checkbox of the desired action under the Select column within the Actions List page.
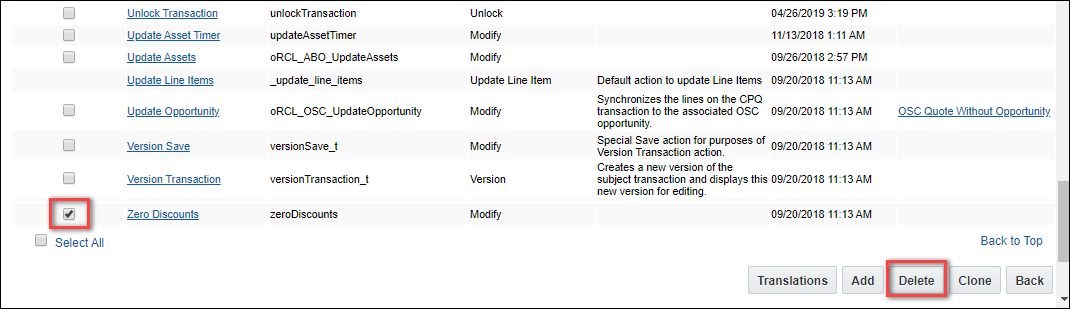
- Click Delete.
Use caution when deleting a Commerce action because it is not possible to recover the deleted data. Upon a deletion, all associated rules within the Commerce action are also deleted.
Notes:
- It is not possible to delete default, system-generated actions. For default actions created in association with document attributes, the system deletes these actions automatically when the corresponding attribute is deleted.
- Standard Process actions cannot be deleted, but the action functions can be viewed, overridden, and easily returned to their default values Most Standard Process actions can be removed from the layout if a customer does not want to use them.
- You can delete all custom actions by checking the Select All box and then clicking Delete.
![]() Generate a Commerce Action Performance Analysis
Generate a Commerce Action Performance Analysis
To generate a Commerce action performance analysis, perform the following steps:
-
Navigate to the Action List page.
Admin > Commerce and Documents > Process Definition > Documents > Actions
-
Click on the name of the applicable action.
The Admin Action page opens.
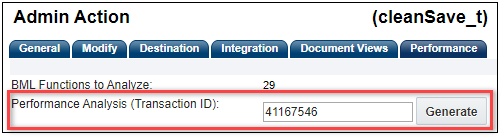
- Click on the Performance tab.
-
Enter the applicable information:
-
For main document actions, enter the Transaction ID.
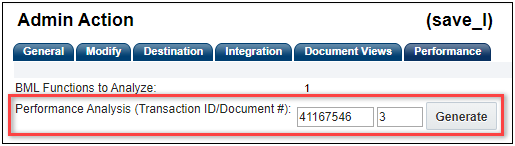
-
For sub-documents, enter the Transaction ID and Document #.
-
-
Click Generate.
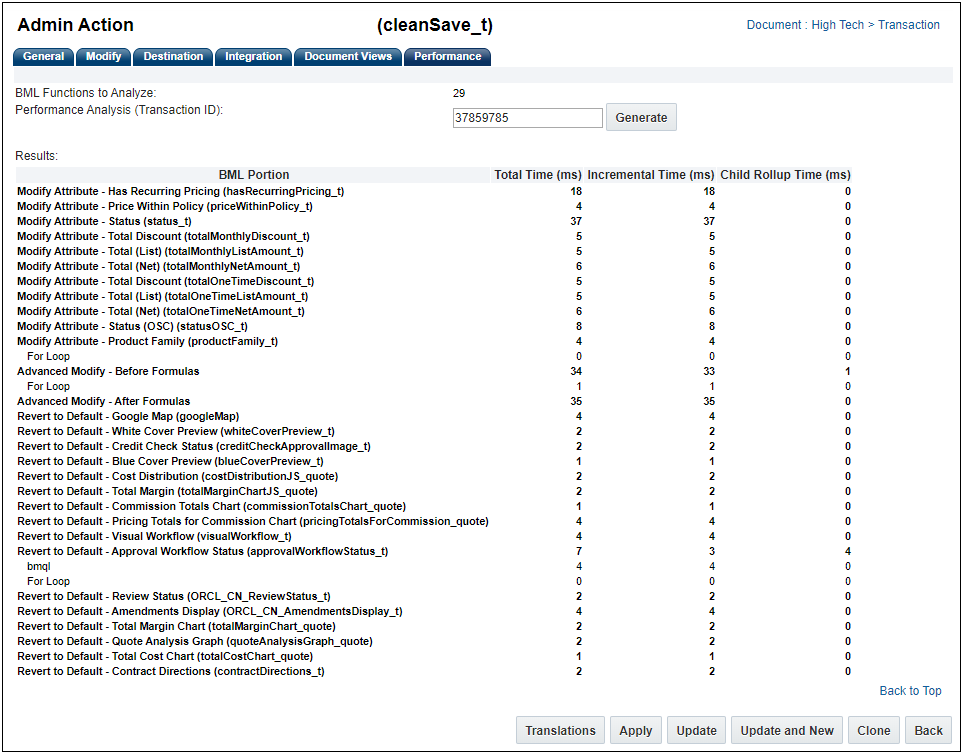
The performance analysis operation includes BML functions in Advanced Modify Before and After Formulas, Advanced Validation, Modify options, Destination options, and BML integrations. Upon execution, the Commerce action Performance tab displays the following times for associated BML loops, BMQL, URL data calls, library calls, and JSON parsing.
- Total Time: Total time taken, in milliseconds, to execute the nested BML, including any time spent executing BML items that have their own entries.
- Incremental Time: Time taken, in milliseconds, to execute the nested BML, excluding time spent executing BML items that have their own entries.
- Child Rollup Time: Total combined time taken, in milliseconds, for all BML items called from this BML item.
Notes:
- Actions that do not have BML functions will not show the Performance tab.
- The run-time breakdowns are specific to BML functions and do not reflect non-BML execution times.
- Generating a Performance Analysis does not save changes to the quote.
- The external integrations defined in the Integration tab are not executed when generating a Performance Analysis, but calls from other BML using the urldata functions will execute and may modify external systems
![]() Formulas in Reconfiguration Scenarios
Formulas in Reconfiguration Scenarios
The Reconfigure action is split into one parent (Reconfigure) and one sub-action (Reconfigure Inbound). This eliminates the need for conditionals to segregate logic.
- The parent action (Reconfigure) contains all things common to both Reconfigure actions and its own identifiers: Label, Variable Name, Description, Action Icon, Show Loading Dialog, Layout Path, and Document Views Tab.
- The sub-action (Reconfigure Inbound) only contains what is specific to it.
- This allows administrators to execute a formula per attribute on:
- Outbound paths from a Commerce Transaction.
The Formula will run immediately after the user clicks the Reconfigure action in Commerce, and before the user enters Configuration.
- Inbound paths to a Commerce Transaction.
The Formula runs after the user clicks Save in the Reconfiguration, and before the user returns to the Commerce page.
- Formula execution is consistent with the existing order of operations for inbound and outbound executions.
Notes
Notes:
- In order for any action to appear on a commerce document, it must be included in the document view.
- Commerce actions can be created, deleted, and edited one document at a time.
- User will be prevented from creating or adding Quotes from Configuration to Commerce if mandatory items are missing.
Custom Variable Name Conventions Oracle CPQ appends the "_c" suffix to custom variable names to provide more consistency for integrations with Oracle Sales.
Customers can submit a Service Request (SR) on My Oracle Support to disable the "_c" suffix on variable names for custom Commerce entities
- When the "_c" is disabled, the "_c" variable name suffix will not be required for newly created custom Commerce entities.
- Disabling the "_c" variable name suffix for custom Commerce entities will not change existing variable names.
- The "_c" suffix setting will not impact existing variable names when cloning a Commerce process or migrating Commerce items. Target variable names will be the same as the variable names from the source Commerce process.


