Migration Packages
Overview
Migration packages allow admins to create groups of objects to be quickly referenced for repeated migrations. Packages can also be downloaded as ZIP files and passed along to other admins to upload to another site. The Oracle CPQ Team and its Partners may also use packages to create and distribute groups of objects to customers to implement certain functionality on an Oracle CPQ site.
Migrating or importing a package to a site will modify objects on the target site according to the state of the objects in the package.
- If an object in a package does not exist on the target site, it will be added to the site on import.
- If an object in a package already exists on the target site, it will be modified on the site on import.
Similar to migration, objects in a package will be compared to objects on the target site and the results of the comparison will be reflected by the standard Migration Center icons, such as Doesn’t exist on the source and Doesn’t match the source.
 Views
Views
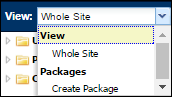
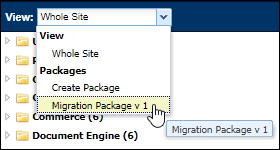
The View drop-down, in the upper left-hand corner of the Migration Center page, is part of Package administration. The menu is divided into View and Packages. The menu will default to Whole Site when first opening the Migration Center.
Whole Site View
In the Whole Site view, an admin can see a tree of the current site’s content in the Content pane, as well as expand lower level content in the Details pane.
Packages View
The Packages section will always have the Create Package option listed at the top, followed by an alphabetical list of existing packages.
- Select Create Package to submit details for a new package and then switch to the view for the new package.
- Select the name of an existing package to switch to that package’s view.
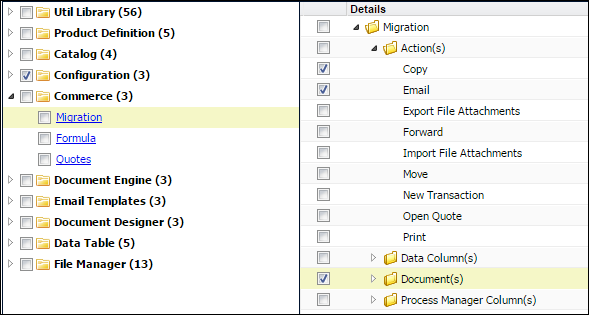
The Package view also uses both the Content and the Details panes for the content tree and low level content, respectively. The checkboxes are used to select items to be included in the package currently being viewed. In the Package view, elements which are checked reflect elements included in the package.
When a high level Commerce object in the Content pane is selected to be included in a package, the low level Commerce checkboxes in the Details pane will not appear checked. However, those objects are in the package.
Icons in the Package View
Icons in the Migration Center header bar, outlined in red below, appear when the admin is viewing a package.


|
Package Information
|
Package Information opens a dialog box to display and edit all high level details entered when a package was created.
|
|

|
Download Package
|
Download Package prepares a package ZIP file to be downloaded to the user’s local file directory. The Status of the download will appear in the bottom left of the Migration Center.
Once the download is complete, the user can click the package name link within the Status area or the Migration Logs page. Clicking the name opens a standard browser prompt to open the package ZIP file or save it to the user’s local file directory.
|
|

|
Save Package
|
Save Package saves all changes to the current package. The version number will auto-increment. This button is disabled until changes have been made to the package.
|

|
Version Package |
Version Package saves all changes as a new version of the current package. This button is disabled until changes have been made to the package. |
|

|
Delete Package
|
Delete Package deletes the current package. The user will receive a pop-up to confirm the delete.
|
Migration Status Icons
The following icons indicate the status of migration objects.
|

|
Cross Process Migration
|
|

|
Differences exist between
the target and source sites
|
|

|
Item to be added to the
target site from the source site
|
|

|
Item exists on the target
site, but does not exist on the source site
|
|

|
The item on the target and
source sites is the same
|
|

|
The item is not
supported for Cross Process Migration
|
Cross Process Migration
Cross Process Migration removes the restriction of only importing data into a common process. This feature allows an administrator to perform a granular migration of data from a package into another process on the target site. The administrator importing the package on the target site identifies the target process for the migration.
The following Commerce elements can be migrated using a Cross Process Migration:
- Granular elements of a Commerce process
- Email Designer Templates
- Document Designer Templates
- Util Libraries, Product Definition, Catalog, Configuration, Data Tables, and File Manager are also permitted, as they are not part of a Commerce process.
This feature does NOT support the following functions:
- Cross Process Migration of Document Engine Documents
- Migration to a different Commerce process using "Import from Source" or "Connect to Destination" migration modes
-
Simultaneous Cross Process Migration to multiple Commerce processes
Note: Packages can be migrated to multiple processes if installed one at a time.
-
Complete replacement of an existing target Commerce process using Cross Process Migration
Note: Granular data elements from a Commerce process must be selected and migrated.
- Migration across Commerce processes where either the source or the target site contain more than one main document and one sub-document
-
Migration of non-granular Commerce objects across processes (i.e. layouts and complex conditionals)
- Granular objects from multiple Commerce processes combined into one Cross Process Migration package, this includes Document Designer documents from multiple processes.
-
Creation of a new target site Commerce process during Cross Process Migration
Note: Migration of granular data into a pre-existing Commerce process on the target site is allowed.
An administrator performs the following steps to complete a Cross Process Migration:
- Upload a migration package to the target site
- Select a target Commerce process
- Select the source process to view granular differences
- Select applicable elements
- Initiate the migration
Cross Process Migration Option
If the migration package contains eligible Cross Process Migration elements, the administrator will be presented with an option to select a target Commerce process upon import. The following image shows the eligible target Commerce processes for the uploaded package.
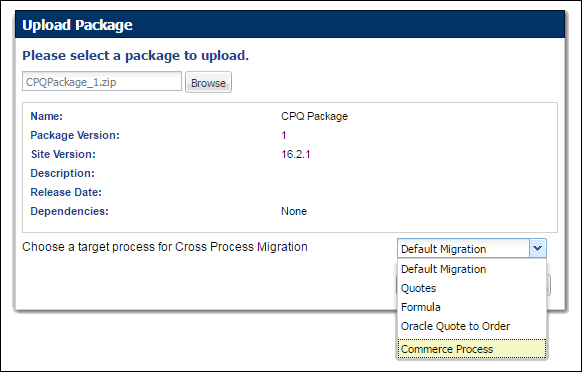
When a target Commerce process is selected during Cross Process Migration:
- The selected granular elements are migrated to the chosen target process.
- A complete process migration cannot be performed because some elements are not eligible for Cross Process Migration.
- When "Default Migration" is selected, a standard package migration is performed.
- The standard migration interface appears when the migration package does NOT contain any Cross Process Migration elements.
- Target Commerce processes are NOT listed for processes with multiple main sub-documents or new Commerce processes on the target site.
Non-Commerce process entities can also be migrated during Cross Process Migration. For example: Util Libraries, Product Definition, Catalog, Configuration, Data Tables, and File Manager elements.
High Level and Low Level Differences
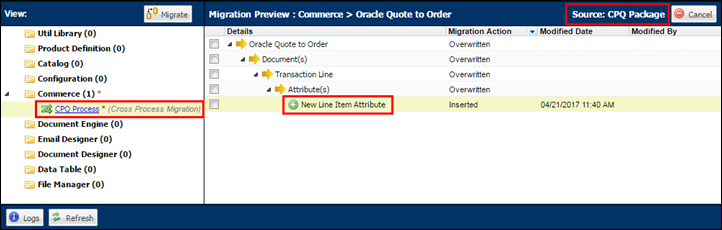
After selecting the target process, the Cross Process Migration will identify and display differences between the source and target processes. As shown in the following image:
- When an item is not supported for Cross Process Migration, it is proceeded by the red "x" icon in the high-level view, and is not shown in the low-level granular view.
-
Document Designer and Email Designer templates can be migrated even when there are not any matching templates in the target Commerce process.
Note: Cross Process Migration may overwrite target Commerce process templates.
When a Cross Process Migration is performed:
- If a low-level granular view is not opened, all high and low level objects are migrated for the selected high-level objects.
- When a low-level granular view is opened and individual items are selected, only the selected granular objects are migrated along with any other selected high-level objects.
- A low-level granular view can be opened for non-Commerce process objects, but only high-level objects can be selected.
Forward Version Package Migration
Migration packages allow administrators to create collections of components for repeated migrations that can be downloaded and uploaded to another site. Oracle also uses migration packages to distribute collections of components to customers to implement certain functionality on an Oracle CPQ site. In prior releases, migration packages could only be uploaded to sites on the same major release. Oracle CPQ 19D introduces Forward Version Package Migration which enables migration packages from 19A and forward to be uploaded to the latest site version.
When an administrator uploads a 19A, 19B, or 19C migration package to a 19D site, the package is transformed to be compatible with 19D. Migration packages with the same major site version bypass the transformation service and are uploaded directly to the site.
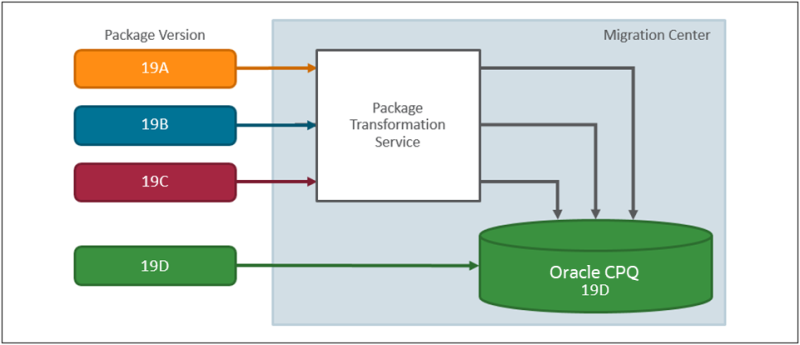
Going forward, Oracle CPQ will support migration from 19A through the current site version. For example, when Oracle CPQ 20A is released administrators will be able to upload migration packages from 19A through 20A.
Notes:
- Forward Version Package Migration does not support migration packages prior to Oracle CPQ 19A.
- Migration packages are not backwards compatible. For example, a 19C migration package can't be migrated to a 19B site.
- Forward Version Migration is only available for migration packages. Forward Version Migration is not supported for site migration modes, such as Import From Source and Connect To Destination.
- Administrators cannot upload a package when other migration tasks are in progress (e.g. revert to snapshot, creation of snapshot, or a migration).
Administration
Packages can be created in Offline mode or Connect to Destination mode. When creating a package, it will be created on the source site (the site that the admin is using the Migration Center within), regardless of what mode is selected.
Create a Migration Package
To create a new migration package, perform the following steps:
-
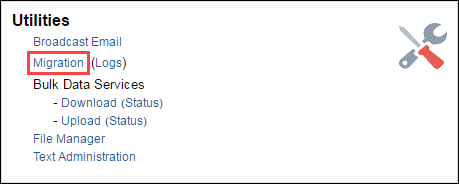
Navigate to the Migration Center.
Admin > Utilities > Migration
-
Select Create Package from the View drop-down.
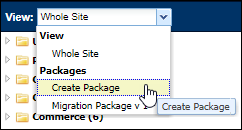
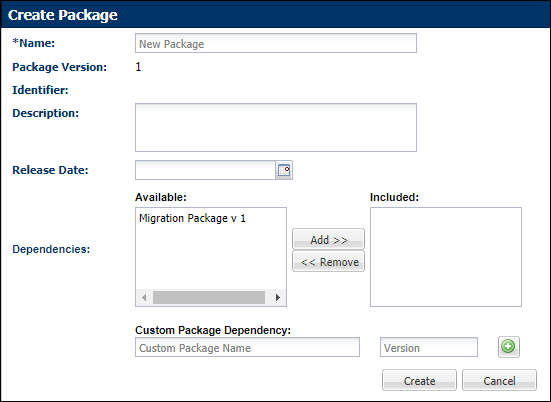
The Create Package dialog box appears.
-
Enter the Name.
The name field cannot be edited once a package has been created. The name and package version will be concatenated to generate the identifier.
-
(Optional) Enter a Description and Release Date.
This data will only display when viewing the Package Information dialog box or when importing a package.
- (Optional) Add Dependencies to indicate that the package requires prior installation of other packages to function.
- Select required packages from the Available list and click Add >>, or
- Enter the package name and version in the Custom Package Dependency fields and click the "Add" icon .
- Click Create.
-
Select the checkboxes of the desired objects in the Contents pane or the Details pane.
- Click the "Save Package" icon .
Edit a Migration Package
To edit an existing migration package or create new version, perform the following steps:
-
Navigate to the Migration Center.
Admin > Utilities > Migration
-
Select an existing package from the View drop-down.
-
To update the package, select or deselect the checkboxes of the desired objects in the Contents pane or the Details pane.
-
Click the "Save Package" icon .
Version a Migration Package
To edit an existing migration package or create new version, perform the following steps:
-
Navigate to the Migration Center.
Admin > Utilities > Migration
-
Select an existing package from the View drop-down.
-
Click the "Version Package" icon .
The version number auto-increments to the next available sequential number.
-
To update the package, select or deselect the checkboxes of the desired objects in the Contents pane or the Details pane.
- Click the "Save Package" icon .
Migrate a Package
To migrate a package to a target site:
- Click Admin to go to the Admin Home Page.
-
Click Migration under Utilities.
The Migration Center appears.
-
Select Import From Source from the Select A Mode drop-down in the top-right corner.
The Login to Source Site dialog box appears.
- Enter the base URL of the source site into the Source Site field. Do not include anything after the “.com” of the URL.
- Enter the username and password of the source site’s Application Administrator or a FullAccess user with permission to create/modify users on the source site into the Username and Password fields, respectively.
- Click Connect.
-
From the View drop-down, select the name of the package the must be migrated.
By default, all objects in the package are selected. You can choose to migrate the entire package, or you can deselect certain objects within the package before migrating.
-
Once the correct objects within the package are selected, click Migrate.
The Migration pop-up appears.
-
Optionally enter a description of the migration. This will be visible in the migration log for the migration.
- Optionally select Send Notification to send an email notification to the email address provided in the profile of the administrator who initiated the migration and additional specified email addresses.
- Enter the email addresses of any additional individuals who are to receive the status notification.
Separate each email address with a semi-colon. - When the migration completes, a status notification is sent to each email address specified in the Migration dialog.
The email indicates the success or failure of the migration.
-
Optionally select Include Snapshot to have the system take a snapshot of the target site immediately before performing the migration. For more information on Snapshots, see the Rollbacks and Snapshots topic.
-
Click Migrate to perform the migration.
A panel will appear in at the bottom of the Content pane to show the status of the migration.
-
When the migration is complete, optionally click Logs in the Admin Action Bar to view the log for the migration.
Import a Package
Importing a previously downloaded package (a ZIP file) has the same effect as executing a migration, where the package is the source and the current site is the target site. Each object within the package will either update the corresponding object on the target site if it already exists, or be added to the target site if it does not already exist. As such, the success of a package Import relies on the same conditions as the success of a migration.
To import a package:
- Click Admin to go to the Admin Home Page.
-
Click Migration under Utilities.
The Migration Center appears
-
Select Import Packages from the Select A Mode drop-down in the top-right corner.
The Upload Package dialog box appears.
- Click Browse.
- Navigate to the previously downloaded package to be imported and select the ZIP file.
- Click Open (button may vary depending on what browser you are using).
-
Click Upload.
By default, all objects in the package are selected. You can choose to import the entire package, or you can deselect certain objects within the package before importing.
- Click Migrate.
-
Click Migrate to perform the import.
A panel will appear in at the bottom of the Content pane to show the status of the import.
- When the import is complete, optionally click Logs in the Admin Action Bar to view the log for the import.
If the migration is successful, the package has been imported and will appear in the list of packages on the current site. If the migration is not successful, the package import is not complete and none of the objects in the package will be added or modified on the current site.
Notes:
- If a package with the same Name and Version combination already exists on the site, the packages will be recognized as being the same, even if they don’t contain the same objects.
- In this case, a dialog box appears to ask if the existing package should be overwritten. If the admin then selects Yes, and the import is successful, the uploaded package will replace the existing package, and the objects within the uploaded package will be modified on the site according to their state in the uploaded package.
Importing a Migration Package using FTP Automation
Migration packages are administrator-defined packages of components that can easily be moved from site to site without the administrator having to reselect components before each migration. Migration packages and individual components of a migration package can be imported into Oracle CPQ using the Migration Center or using FTP Automation data transfer.
To import a migration package using FTP, perform the following steps:
- If you haven't done so already, contact My Oracle Support for the creation an FTP profile and its corresponding "automated" folder on the FTP server.
-
Prepare an XML controller file for the migration package ZIP file. The controller filename must include the prefix upload_list.
The upload_list.xml file lists the migration ZIP file. The following shows the XML format for the migration package upload_list.xml file.
<?xml version="1.0" encoding="UTF-8
<files>
  <file>
    <name>migrationpackagefilename.zip</name>
    <type>REGULAR</type>
  </file>
</files>
- Upload the migration package ZIP file referenced in the migration package
upload_list.xml controller file.
- Upload the migration package
upload_list.xml controller file.
- Navigate to the Bulk Data Upload Status page to view the migration package status.
Admin Home > Utilities > Bulk Data Services -Upload(Status)
When uploading a migration package via FTP Automation, the following default values are set (and not able to be changed by an administator) for the migration:
- The migration package Description is set to Automatic Bulk Upload of migration package
- The Send Notification is not set to send email notifications
- The Include Snapshot is not set to take a snapshot of the target site immediately before performing the migration
- The Target Process is set to Default Migration where a standard package migration is performed
Notes
-
Commerce components cannot be deleted from a target site when migrated individually, apart from the entire Commerce Process—objects can only be deleted in a full migration of a Commerce Process.
For example, if a Commerce Main Document attribute exists on the target site but does not exist on a source site, that attribute will not be deleted from the target site if a Main Document's attributes are selected and then migrated.
-
After migrating individual components within a Commerce Process, differences calculated between the source and target site within the Content pane may show the sites to be different, even if all the differences within the Details pane show the sites to be the same.
In order to completely sync a Commerce Process between two sites, perform a full migration of the Commerce Process using the Content pane.
- Administrators should use caution when using migration packages that contain Configuration layouts and rules. All Product Family attributes are deleted from the target Configuration if a source migration package that contains Configuration layouts or rules without All Product Family references is migrated to a Configuration with All Product Family references. This will cause deployment and Configuration Flow errors for Configurations that reference the deleted All Product Family attribute.
- If necessary dependencies are not included in the migration, the migration may fail.
-
Dependent Packages need to be installed first in the target system before installing the migration package in order to ensure all the data is migrated as desired. The Dependencies field in the Create Package UI does note that the packages in the Include list be available in the target system prior to installing the package; however, this validation is not enforced. If you don't have the dependent packages in the target system, it will not stop you from installing the package.
Notes:
- Oracle CPQ does not recommend migrating between blank and Standard Processes due to dependencies and validation issues. The following methods are recommended:
- The preferred method is to perform granular migration of only attributes and actions that don't exist in the Standard Process.
- The source attributes and actions should not have any customizations or dependencies with other attributes, actions, or rules.
- All customizations need to be manually added to the target Standard Process.
- The second and more secure option is to manually create everything from scratch in the Standard Process.
- Packages cannot contain other packages.
- A package cannot be imported or downloaded while a migration is in progress, a Rollback is progress, or a Snapshot is being applied.
Related Topics
See Also