Overview
What are they?
Pricing rules are used to calculate price based on how a product is configured. Pricing rules can be based on a combination of one or more configured values. Like most rules, a pricing rule also has a condition and an action. The action determines the price of the model being configured.
How do they work?
Displaying the price to the user is the default setting, though doing so is optional. If the price should be shown to the user can be determined by an Advanced Function. If the function returns true then the price is displayed. If the function returns false, then the price is not displayed. Including the price in the total configured price is also optional. The default value is true, which indicates to the system that the price should be included in the total configured price. An advanced function can modify a default value if necessary.
Administration
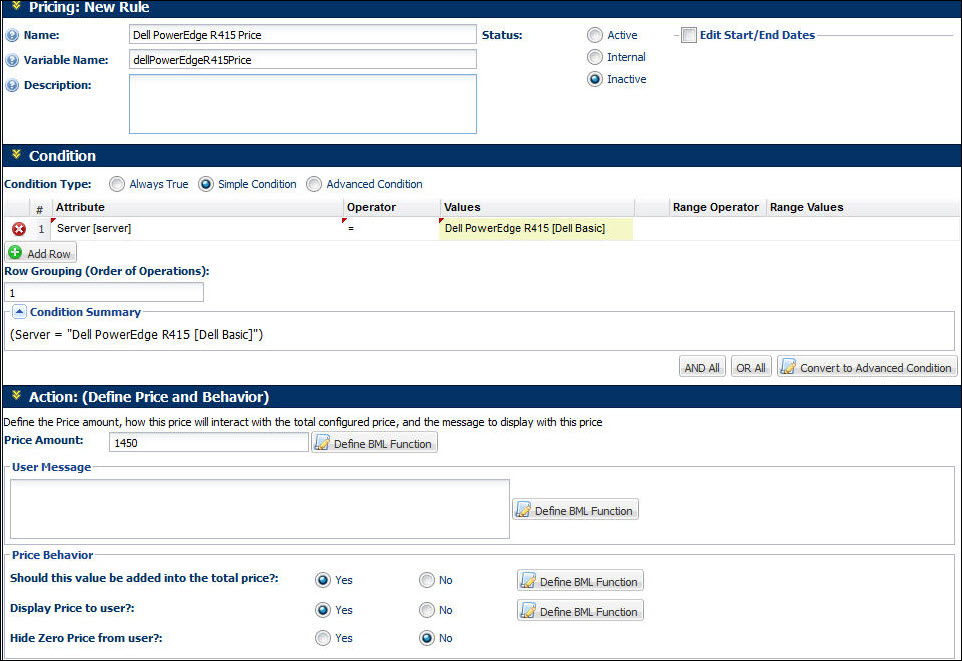
Example: You need to set the price for a Dell PowerEdge R415 Server. The price is $1,450.00.
 Navigate to the Pricing: Rules List page.
- Click Admin to go to the Admin Home Page.
Click Catalog Definition in the Products section.
The Supported Products page opens.
Confirm that Product Families is listed in the Navigation column, and click List.
The Supported Product Families page opens.
For the Product Family for which you want to create a Pricing rule, select Prices in the Navigation column and click List.
The Pricing: Rules List page opens
- Click Add to create a new rule.
-
Enter the rule
 Properties.
This section is where you will enter basic details about the rule. For example, the name, status and where it will be applied.

Label Description Name Enter the name of the rule. This is required. Variable Name Enter a variable name for the rule. The Variable Name field populates automatically. Variable names can only contain alpha-numeric characters and underscores. The entry can be changed before saving, but after saving the value is read-only.This is required. Description Enter a description, if desired. Status Determine the status of the rule:
- Active: Rule is fired when the condition is met.
- Internal: Rule is active only for FullAccess users; it is inactive for all other users.
- Inactive: Rule is not fired, even if the condition is met.
Edit Start/End Dates Select the box to open a date selector to set how long the rule will remain in the chosen status. If no duration is selected, the rule will remain on the selected status until you, or another FullAccess user, changes it. AJAX Enabled Upon checking this box, you are enabling AJAX functionality for the rule. This means that the rule will run without refreshing the page or requiring an action be performed.
- Prior to 19B, AJAX functionality is only available for Hiding and Constraint rules.
-
Beginning in Oracle CPQ 19B, Recommendation Rules can be AJAX enabled for JET Configuration UIs. AJAX functionality is only provided for JET Configuration UIs, this functionality is not available for legacy Configuration UIs.
- Select the Condition Type.
- Define the Price Amount by entering a static value.
- Enter a User Message, which will be displayed with the price.
-
Define the Price Behavior by choosing Yes or No for the following options:

- Should this value be added to the total price?
Use Cases
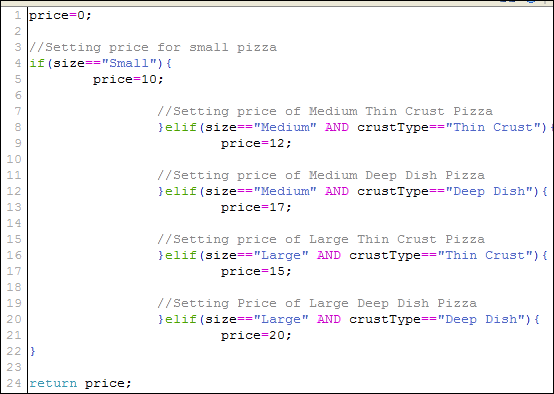
Scenario: You will be setting the prices for the pizzas based on their size and crust type. You will also need to create a user message that explains to the user exactly what they are ordering. According to the menu, you have the following options and prices:
| Size | Crust Type | Price |
|---|---|---|
| Small | Thin Crust | $9.00 |
| Medium | Thin Crust | $12.00 |
| Large | Thin Crust | $15.00 |
| Medium | Deep Dish | $17.00 |
| Large | Deep Dish | $20.00 |
 Navigate to the Pricing: Rules List page.
- Click Admin to go to the Admin Home Page.
Click Catalog Definition in the Products section.
The Supported Products page opens.
Confirm that Product Families is listed in the Navigation column, and click List.
The Supported Product Families page opens.
For the Product Family for which you want to create a Pricing rule, select Prices in the Navigation column and click List.
The Pricing: Rules List page opens
- Click Add to create a new rule.
-
Enter the rule
 Properties.
 - Active: Rule is fired when the condition is met.
- Internal: Rule is active only for FullAccess users; it is inactive for all other users.
- Inactive: Rule is not fired, even if the condition is met.
- Prior to 19B, AJAX functionality is only available for Hiding and Constraint rules.
-
Beginning in Oracle CPQ 19B, Recommendation Rules can be AJAX enabled for JET Configuration UIs. AJAX functionality is only provided for JET Configuration UIs, this functionality is not available for legacy Configuration UIs.
-
Select the Condition Type
This rule can run all of the time, so you should select Always True. - Define the Price Amount. Since you are creating a rule for multiple items, you will need to create an Advanced Function by clicking Define BML Function.
-
Choose the Attributes you will use the script by clicking Add Attributes in the Function Editor.
In this case, we'll select Size and Crust Type.
- Begin to write the pricing script in BML.
-
You will need to first assign a variable to zero. Try price = 0 ;

- Set up the User Message that the buyer will see when they see the Price. Click Define BML.
- Select the necessary attributes. They should be the same as found in Step 6.
- Create an empty string variable to hold your user message string.
-
Write the user message to be returned.

This section is where you will enter basic details about the rule. For example, the name, status and where it will be applied.

| Label | Description |
|---|---|
| Name | Enter the name of the rule. This is required. |
| Variable Name | Enter a variable name for the rule. The Variable Name field populates automatically. Variable names can only contain alpha-numeric characters and underscores. The entry can be changed before saving, but after saving the value is read-only.This is required. |
| Description | Enter a description, if desired. |
| Status |
Determine the status of the rule: |
| Edit Start/End Dates | Select the box to open a date selector to set how long the rule will remain in the chosen status. If no duration is selected, the rule will remain on the selected status until you, or another FullAccess user, changes it. |
| AJAX Enabled |
Upon checking this box, you are enabling AJAX functionality for the rule. This means that the rule will run without refreshing the page or requiring an action be performed. |
Before implementing Negative Pricing, review your requirements to ensure that this is absolutely necessary. Ideally, this situation should be avoided. Business functional requirements that make Negative Pricing appealing:
- Trade-ins: A previously ordered item is swapped for another.
- Upgrades: A previously ordered item is exchanged for a newer model.
- Renewals: A previously ordered item is upgraded when renewed.
| Recommended Solutions | Actions |
|---|---|
| Set values of items with a negative price to $0 |
A new Commerce line-level float field must be created to support this price, because the |
| Hide Recommended Item prices in Config | Use a pricing rule to show the Configuration grand total price, not just the negative price. |
| Store the negative price in a data structure or Attribute |
Do one of the following:
|
| Alternate display | If an Array is used to store item prices, it could be made visible in the Configuration Flow, so users can see the price per item. |
Notes
Notes:
-
There are several pricing methods that update pricing attribute values, for more information refer to Pricing Overview.
- During reconfiguration, pricing rules are always evaluated, regardless of whether the condition attributes are in the flows.
- In the getPrice() SOAP call, the Hide Zero Price behavior is replicated by using the attribute bm:hideZeroPrice.


