Product and Model Attribute Groups
Overview
Groups enable you to organize product attributes and how they appear in the Product Line Administration page. This is especially helpful when a Product Family contains a lot of attributes. You can also specify the order that groups appear on a page.
New Product Line attributes and Model attributes are always created in the default "General" group.
Administration
 Adding a Product Attribute Group
- Navigate to the Add Product Attribute Group page.
- Click Admin to go to the Admin Home Page.
Click Product Definition in the Products section.
The Product Family List page opens.
For the Product Family for which you want to add a product attribute group, ensure Product Line Attributes is selected in the Navigation column, and click List.
The Product Line Attribute List page opens.
Click Groups.
The Product Attribute Group List page opens.
Click Add.
The Add Product Attribute Group page opens.

-
Complete the Label and Variable Name fields.
The Variable Name field populates automatically. Variable names can only contain alpha-numeric characters and underscores. The entry can be changed before saving, but after saving the value is read-only.
-
Click Add.
The Product Attribute Group List page opens.

In the screen shot, notice that in the far right Contents column, the General group contains 3 items and the "Test Group" group doesn't contain any items. New groups do not contain any attributes, so you will need to add them. For more information, see the section Moving an Attribute to a Product Attribute Group, below.
Moving an Attribute to a Product Attribute Group
-
Navigate to the Product Attribute Group List page.
- Click Admin to go to the Admin Home Page.
-
Click Product Definition in the Products section.
The Product Family List page opens.
-
For the Product Family for which you want to add attributes to a product group, ensure Product Line Attributes is selected in the Navigation column, and click List.
The Product Line Attribute List page opens.
-
Click Groups.
The Product Attribute Group List page opens.
-
For an existing group, click List (x items) in the Contents column.
The Product Attribute Group Contents page opens.
Existing attributes in the group are listed.
- Use Select/Select All to select the attributes you wish to add to your new group.
-
Choose your group from the Move To drop-down and click Move.
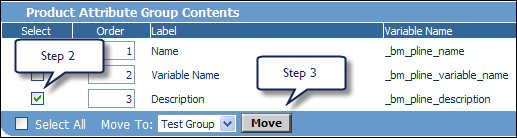
Move only appears if there is more than one group.
-
Click Back.
The Product Attribute Group List page opens.
The new group that didn't have any items now has a link to the attributes it contains.
Adding a Model Attribute Group
- Navigate to the Add Product Attribute Group page.
- Click Admin to go to the Admin Home Page.
Click Product Definition in the Products section.
The Product Family List page opens.
For the Product Family for which you want to add a model attribute group, ensure Model Attributes is selected in the Navigation column, and click List.
The Product Line Attribute List page opens.
Click Groups.
The Product Attribute Group List page opens.
Click Add.
The Add Product Attribute Group page opens.
-
Complete the Label and Variable Name fields.
The Variable Name field populates automatically. Variable names can only contain alpha-numeric characters and underscores. The entry can be changed before saving, but after saving the value is read-only.
-
Click Add.
The Product Attribute Group List page opens.
In the screen shot, notice that in the far right Contents column, the General group contains 3 items and the "Test Group" group doesn't contain any items. New groups do not contain any attributes, so you will need to add them. For more information, see the section Moving an Attribute to a Model Attribute Group, below.
Moving an Attribute to a Model Attribute Group
-
Navigate to the Product Attribute Group List page.
- Click Admin to go to the Admin Home Page.
-
Click Product Definition in the Products section.
The Product Family List page opens.
-
For the Product Family for which you want to add attributes to a model group, ensure Model Attributes is selected in the Navigation column, and click List.
The Product Line Attribute List page opens.
-
Click Groups.
The Product Attribute Group List page opens.
-
For an existing group, click List (x items) in the Contents column.
The Product Attribute Group Contents page opens.
Existing attributes in the group are listed.
- Use Select/Select All to select the attributes you wish to add to your new group.
-
Choose your group from the Move To drop-down and click Move.
Move only appears if there is more than one group.
-
Click Back.
The Product Attribute Group List page opens.
The new group that didn't have any items now has a link to the attributes it contains.
Ordering Attributes within a Group for the Product Line Administration Page
- Navigate to the Product Attribute Group Contents page.
- Click Admin to go to the Admin Home Page.
Click Product Definition in the Products section.
The Product Family List page opens.
For the Product Family for which you want to add a product attribute group, ensure Product Line Attributes is selected in the Navigation column, and click List.
The Product Line Attribute List page opens.
Click Groups.
The Product Attribute Group List page opens.
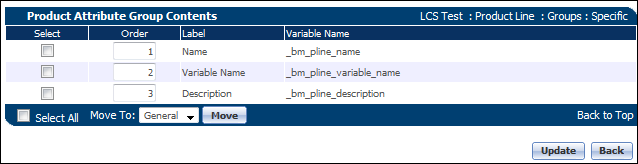
For the product attribute group in which you want to change the order the attributes appear, click the link in the Contents column.
The Product Attribute Group Contents page opens.
-
In the Order column, change the numbers to reflect the order you want the attributes to appear in within their group, on the Product Line Administration page.
- Click Update.
- Deploy the changes. For more information about deployment, see the topic Setting Up Product Families.
-
Navigate to the Product Line Administration List page.
- Click Admin to go to the Admin Home Page.
-
Click Catalog Definition in the Products section.
The Supported Products page opens.
-
Confirm that Product Families is listed in the Navigation column, and click List.
The Supported Product Families page opens.
-
Confirm that Product Lines is selected in the Navigation drop-down and click List.
The Product Line Administration List page opens.
-
For an existing Product Line, click its Name to edit it.
The Product Line Administration page opens.
The product attributes appear (within the groups) in the order you specified in step 2 above.
Ordering Groups for the Product Line Administration Page
-
Navigate to the Product Attribute Group List page.
- Click Admin to go to the Admin Home Page.
-
Click Product Definition in the Products section.
The Product Family List page opens.
-
For the Product Family for which you want to order groups, ensure Product Line Attributes or Model Attributes is selected in the Navigation column, and click List.
The Product Line Attribute List page opens.
-
Click Groups.
The Product Attribute Group List page opens.
-
In the Groups column, change the numbers to reflect the order you want the groups to appear in on the Product Line Administration page.
- Click Update.
- Deploy the changes. For more information about deployment, see the topic Setting Up Product Families.
-
Navigate to the Product Line Administration List page.
- Click Admin to go to the Admin Home Page.
-
Click Catalog Definition in the Products section.
The Supported Products page opens.
-
Confirm that Product Families is listed in the Navigation column, and click List.
The Supported Product Families page opens.
-
Confirm that Product Lines is selected in the Navigation drop-down and click List.
The Product Line Administration List page opens.
-
For an existing Product Line, click its Name to edit it.
The Product Line Administration page opens.
The product attribute groups appear in the order you specified in step 2 above.
Notes
Deploy the Product Family to make the following changes visible:
- New groups
- Group and name edits
- Group order changes
- Attribute moves
For more information about deployment, see the topic Setting Up Product Families.
After moving an attribute, the "moved from" group remains visible.
To verify that the attributes moved to the destination group, return to the Attribute Group List page and click List (x items) in the Contents column.
Related Topics
See Also


