Printer-Friendly and History XSL Views
Overview
Printer Friendly/ History XSL views allow you to control the display of a transaction depending on the XSL template you select. You can create multiple XSL templates in this section to produce different types of printer friendly proposal formats or transaction history outputs.
These XSL templates can be predefined in the actions used to generate the printer friendly proposal or history output. Alternately, you can allow the user to select templates at run time to generate varied outputs.
You can generate output as XML, RTF, PDF, XLS, HTML, or DOCX.
 Sample Workflow
Administration
Managing Printer-Friendly/History XSL Views
The Printer-Friendly/History XSL View page shows a list of XSLs that currently exist. Using this page, you can perform the following actions:
- Delete XSLs: Select all or a required XSL View Name that you want to delete using the Select All or Select options, and click Delete to delete it.
- Re-order the XSL Views: Modify the numeric value of the Order field. Click Apply to save and view the change made.
- Update an XSL View: Click an XSL View name to edit or update an XSL View. You can also enter a Transaction ID and preview the XSL output from here.
- Manage Translations: Click the Translations button to enter translated text for the XSL View Names and Descriptions.
- Add a Printer-Friendly/History XSL View
Adding a Printer-Friendly/History XSL View
-
Click Admin to go to the Admin Home Page.
-
Click Process Definition under Commerce and Documents.
The Processes page opens.
-
For the Commerce process to which you want to add the Printer-Friendly XSL converter, select Printer Friendly/XSL Views in the Navigation column for the Quote/Transaction and click List.
The Printer Friendly / History XSL Views page opens.
-
Click Add.
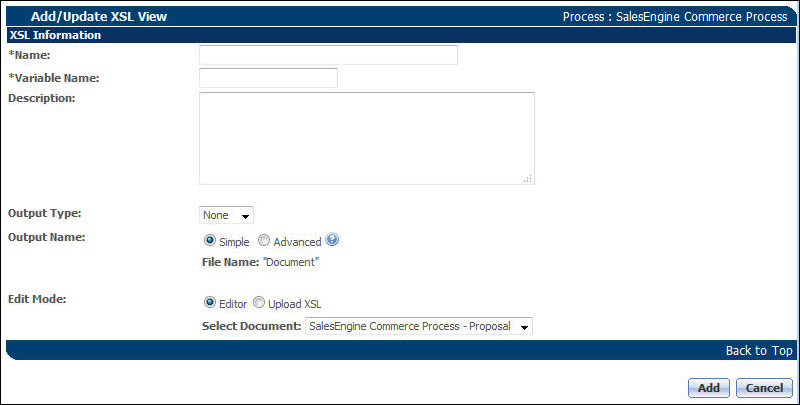
The Add/Update XSL View page opens.
-
Enter a Name.
When you leave the Name field, the Variable Name field automatically populates. You can change the Variable Name if you want to.
The name you enter here is shown in this page and other administration pages, but is not shown to the end user.
- Select an Output Type:. The options are:
For a Document Engine document template, .RTF, .DOCX, and .PDF are the recommended outputs.
- If you select PDF, the Is PDF Read-Only: option appears. Check the box to make the generated PDF read-only.
- Select an Output Name:.
- Select Simple if you want the output document to always have the name Document.
- Select Advanced and then select an attribute whose value will dynamically name the output.
This option is available on any user-created document that is generated through XSL Views. Administrators can only apply this feature on Quote-level Text Attributes.
Example Use Case: Sales users can distinguish documents by their file name, if each file name has the Quote Number in it.
- Select an Edit Mode:
- Editor: Select this option if you are using the Document Engine. From the list of deployed documents, choose the one that you want to link to the XSL view.
Upload XSL: Select this option to upload a custom XSL file.
Click Browse to select a file from your local system, using the File Upload dialog box.
If you upload a custom XSL file, it must be written in the same XML version as the other XML files in Commerce.
-
Click Add or Update to save the XSL view.
Adding a document and a Printer-Friendly XSL view will NOT make your document available to an end user. Create a Print action and link it with the XSL View that you have created here.
For more information on using Document Engine document templates, see the topic Document Engine Steps.
Editing Printer-Friendly XSL Views
The XSL view modified on this page can be used to format print forms, email forms, and change history logs.
- Edit any of the options under the Adding a Printer-Friendly XSL View steps.
- Click Display file to preview the XSL file.
-
Enter a Transaction ID to preview how the XSL file formats the actual data for Document, History, Document XML, and History XML.
For more information, see the topic Finding the Transaction ID.
- Click Apply to apply the changes made and refresh the page. Click Update to update the changes made and go back to the page for managing printer friendly and history XSL views. Click Back to go back without saving.
DOCX Documents
DOCX documents are not available for use on iPad. It is possible to view RTF files if the file has been emailed to someone via an e-mail action. The steps below use the build-in mail application, Mail, which is standard on the iPad.
Disclaimer: This is what we tested with. We are not responsible for the functionality of any 3rd party application.
- Go to the App Store and download the free app doctape
- Go to Mail and open the e-mail containing the document you wish to view
- Press and hold the attachment icon until a box pops up containing the options Quick Look and Open in “doctape”.
- Select Open in “doctape”. The app will upload the attachment then take you to a list of all documents opened through doctape. The one you just uploaded will be at the top.
- Select the document you want to open by pressing its icon
- In the Mail app, click the attachment or select Quick Look through the pop-up options. A new screen will open but it will just be a blank white page
- If this happens, click the Action button in the upper-right corner (it looks like a box with a curved arrow pointing to the right) and select Open in “doctape”.
- Free apps that were tested and found to be incompatible:
- OliveOfficeBasicHD
- FileApp
- PlainText
- SimpleNote
Notes
Custom Variable Name Conventions
In Oracle CPQ 23D, CPQ adopted Oracle CX Sales variable naming conventions for custom items. When an administrator creates a new custom Commerce item, the "_c" suffix is appended to the variable name. The new naming convention for custom variable names provides more consistency for integrations with Oracle Sales.
Beginning in Oracle CPQ 24C, customers can submit a service request to disable the "_c" suffix on variable names for custom Commerce entities (Actions, Analytics, Attributes, Data Columns, Integrations, Library Functions, Rules, Steps, etc.). The "_c" suffix is enabled by default for standard and legacy Commerce processes.
- Customers can submit a Service Request (SR) on My Oracle Support to disable the "_c" suffix on variable names for custom Commerce entities
- When the "_c" is disabled, the "_c" variable name suffix will not be required for newly created custom Commerce entities.
- Disabling the "_c" variable name suffix for custom Commerce entities will not change existing variable names.
- The "_c" suffix setting will not impact existing variable names when cloning a Commerce process or migrating Commerce items. Target variable names will be the same as the variable names from the source Commerce process.
Related Topics
See Also


