Overview
Customize the home page of the web site using HTML and JavaScript or XSL. A FullAccess user can set up the web page in conjunction with the Home Page Flows that are made available in the Page Templates and User Interface section.
Typically, the home page serves as a portal to product selectors, model configurators, parts search, company information, general product documentation, and/or external links.
You can restrict part and catalog access to users based on different criteria. You can also set up punch-ins, a home page view with pre-set criteria.
Administration
![]() Navigating to the Home Page Set Up page
Navigating to the Home Page Set Up page
- Click Admin to go to the Admin Home Page.
-
Click Home Page in the Style and Templates section.
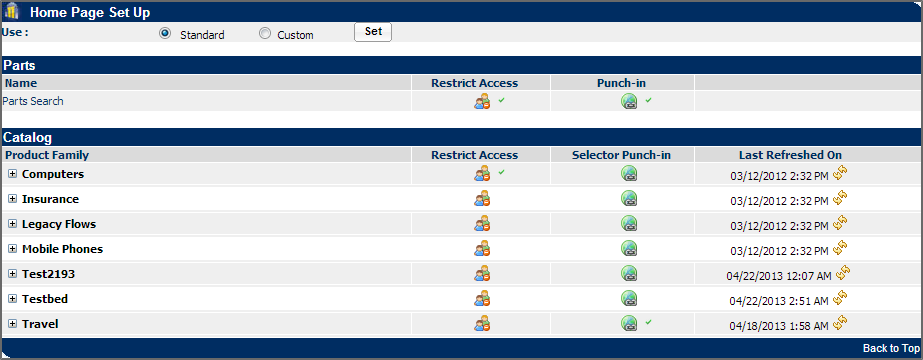
The Home Page Set Up page opens.

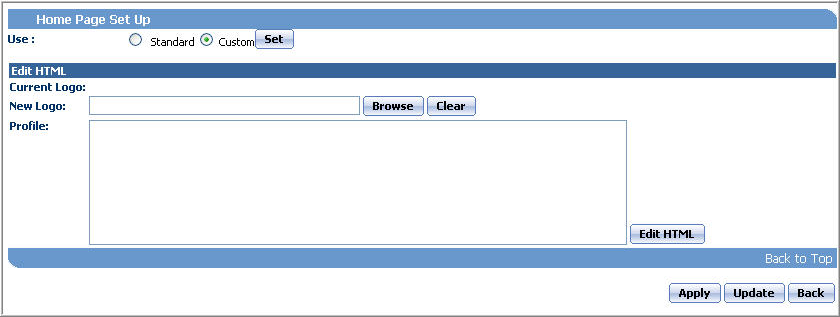
- For Use, select either Standard or Custom and then click Set.
Types of Home Pages
Use a default XSL Home Page to display your products and parts. You can change what is displayed on the home page based on the user.
-
Click the Restrict Access icon for a part.
The Select Attributes page opens in a new window.
- Select attributes to define a new rule. The available attributes are:
- _user_company
- _user_currency
- _user_email
- _user_login
- _user_groups
- _user_language
- _user_number_format
- _user_type
- _company_type
- _user_number_format_str
- _user_type_str
- _company_type_str
-
After selecting the desired attributes, click Rule Editor.
The Restrict Access Rule Editor page opens. See the section Using the Restrict Access Rule Editor Page, below.
-
Click the Punch-in icon for a part.
The Part Detail Punch-ins List page opens in a new window.
- Click New to create a new custom punch-in.
- Click a Product Family or Product Lines name to display the list of Product Lines.
-
Click the Restrict Access icon for a Product Family or Product Line.
The Select Attributes page opens in a new window.
-
After selecting the desired attributes, click Rule Editor.
The Restrict Access Rule Editor page opens. See the section Using the Restrict Access Rule Editor Page, below.
-
Click the Punch-in Selector icon for a Product Family or Product Line.
The Selector Punch-ins List page opens in a new window.
-
Click New to create a new custom punch-in.
You will not be able to add a new punch-in if there are no associated Search Groups available.
-
Click the Last Refreshed On icon to see the date on which the catalog data was last refreshed for a product family.
Click this icon to create/update/delete default punch-in links corresponding to the latest catalog data.
-
Click the Model Punch-in icon.
The Model Punch-ins List page opens in a new window.
-
Simple Conditions
Specify values for the selected attributes to create a simple conditions rule.
-
Advanced Function
Click Define Function to define the script to create an advanced rule.
The BML Editor page opens in a new window.
Action Description Check Check for errors. Run See console output for the print statements in the script. Save Save changes made. Save and Close Save content and close window. Close Close the window without saving the changes made. Always Deny User Access Denies access to product families, product lines, or parts searches for all users. These actions can be performed once you have entered/modified the script.
- Click the Variable Name to display the name in the Function Script area, where you can enter or modify the script.
- Click an Operator icon to display it in the Function Script area.
- Click Editor Help to display the BML Editor Information page in a new window.
-
Select the desired function from the Functions drop-down.
A brief definition and the syntax for the selected function are displayed.
Click Add to display the selected function in the Function Script area.
-
Always Restrict Access
In the Attribute Name section, select the Operator and Value for each attribute for which you want to always restrict access.
Click Reselect to select different attributes.
- Click Clear to remove the currently displayed logo.
- Click Browse to search for and select a new logo.
- The File Manager - Browse dialog box appears.
- In the Folder drop-down, select the folder containing the new logo.
- Modify the Profile by editing the HTML content. You can edit the content in the text field or click Edit HTML.
- Change the look of the home page using text and images, creating rollover images, and so on.
-
Click Preview, from the Content HTML Editor page, to see how your home page content looks before applying and updating changes.

- Use an external editor, such as Dreamweaver or Notepad ++, to create your HTML content; then, copy/paste your file directly into the text area.
- Keep your user in mind. Ensure that they can easily navigate within the page.
- When creating your HTML Home Page, keep in mind that your Header & Footer HTML will also be displayed on your Home Page. For more information, see the topic Header & Footer.


