Overview
Creating a mobile Commerce layout gives sales users the ability to create, modify, and submit transactions on the go from a mobile device. Mobile Commerce functionality includes:
- The ability to create and configure mobile Commerce layouts based on existing desktop layouts
- Mobile support for DocuSign integration functionality, allowing users to send documents for electronic signature on a mobile device
When used in conjunction with a mobile Configuration layout, a mobile Commerce layout completes an end-to-end tablet-optimized experience; from product configuration through pricing, approvals, and document generation.
User Interface
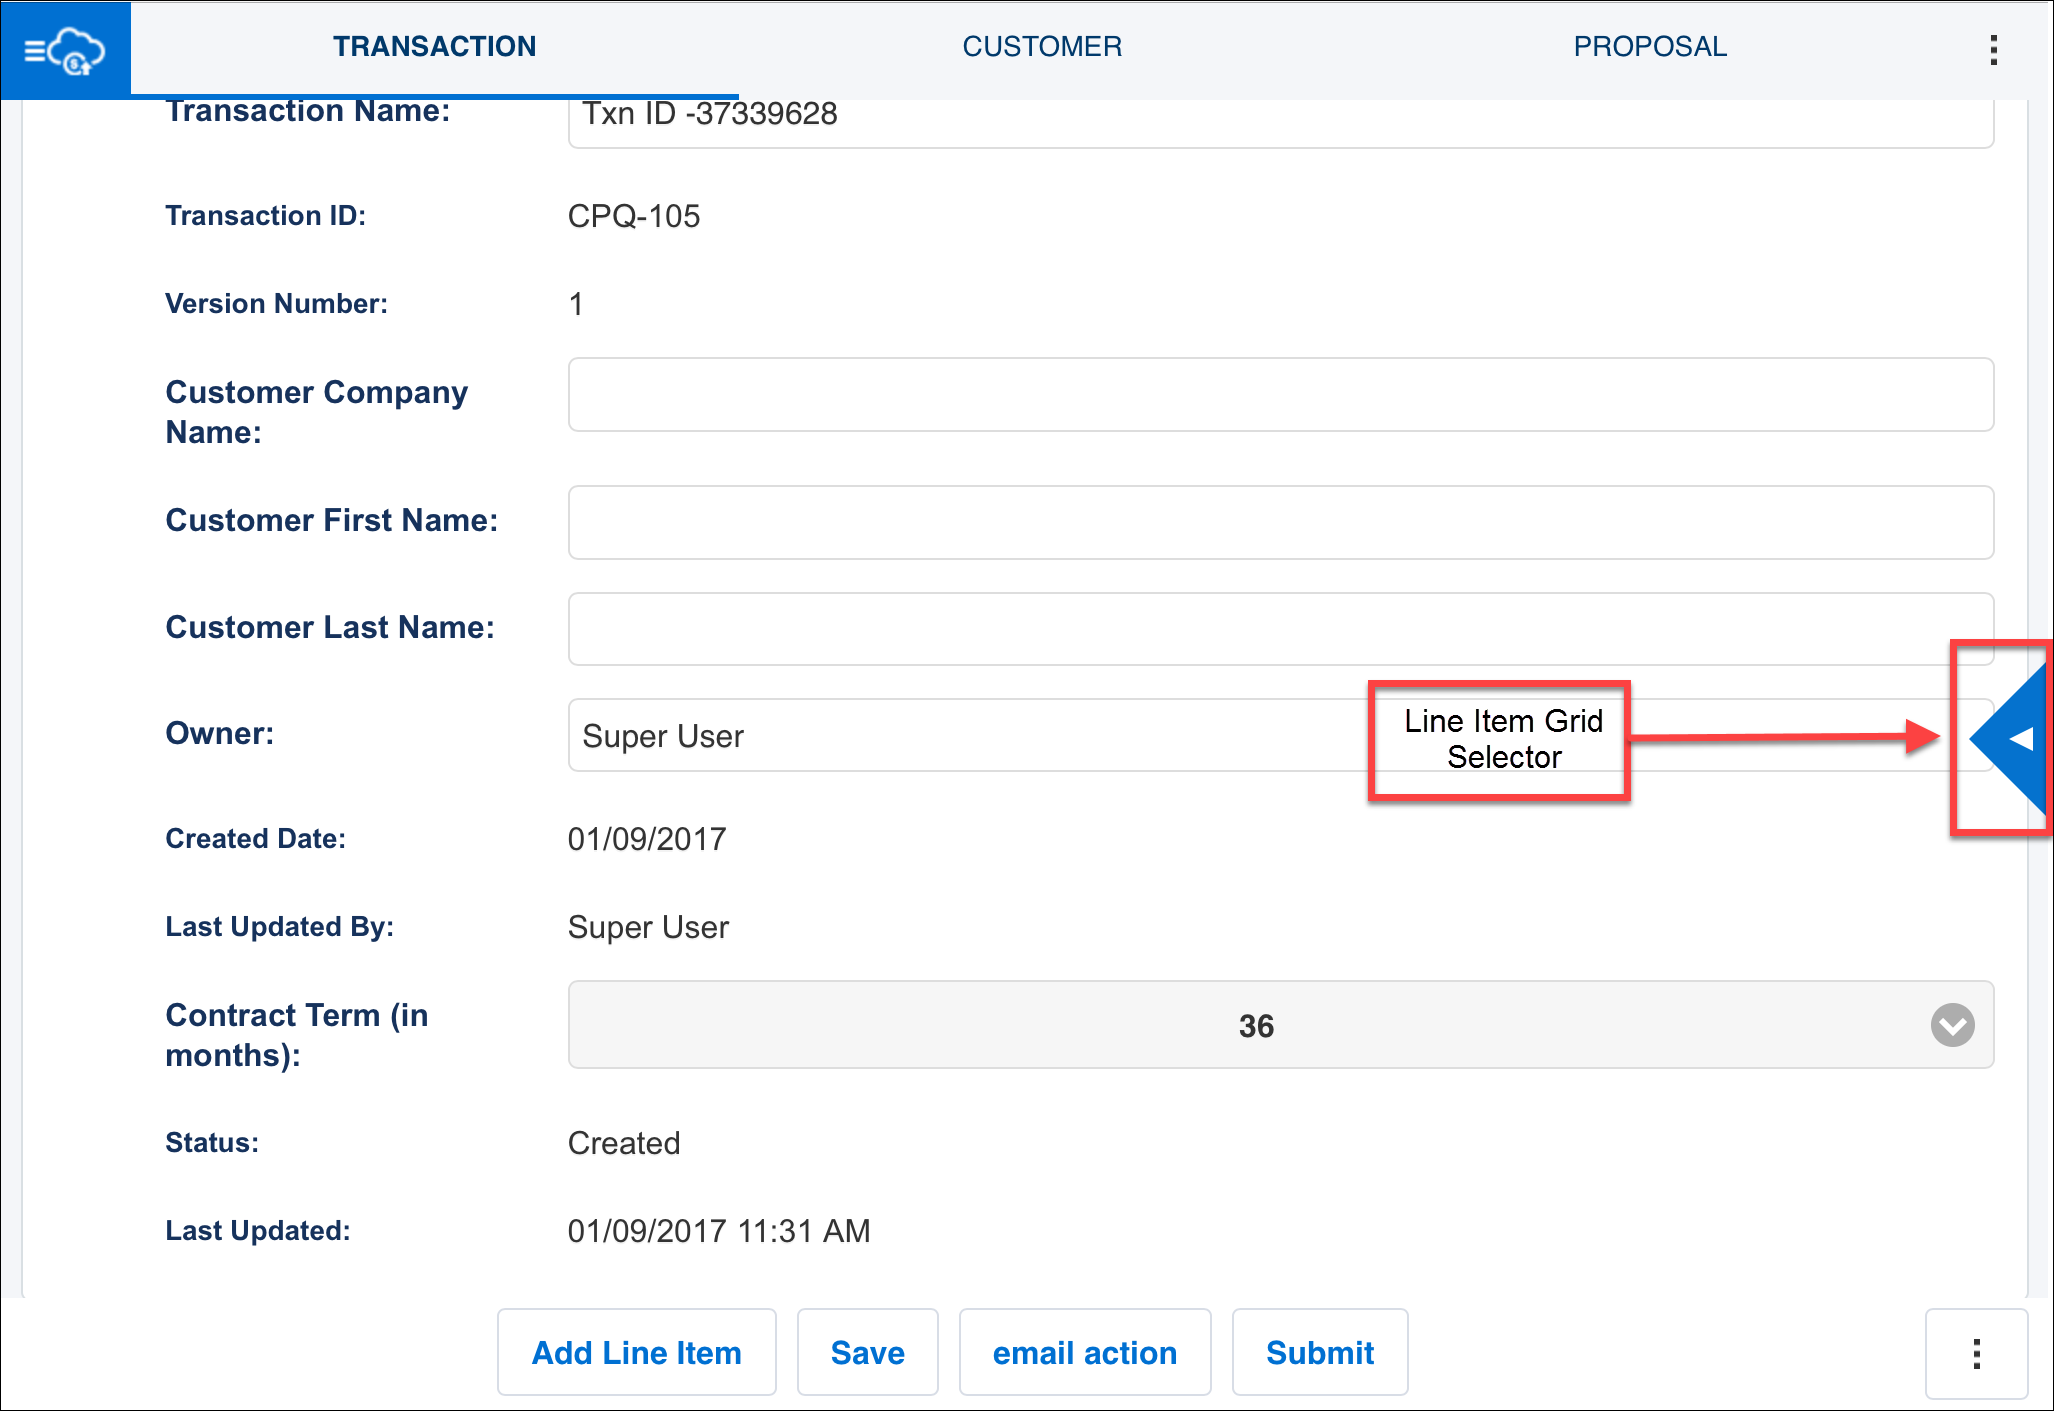
After a mobile Commerce layout has been created, users on a mobile device will see the following structure when within Commerce:
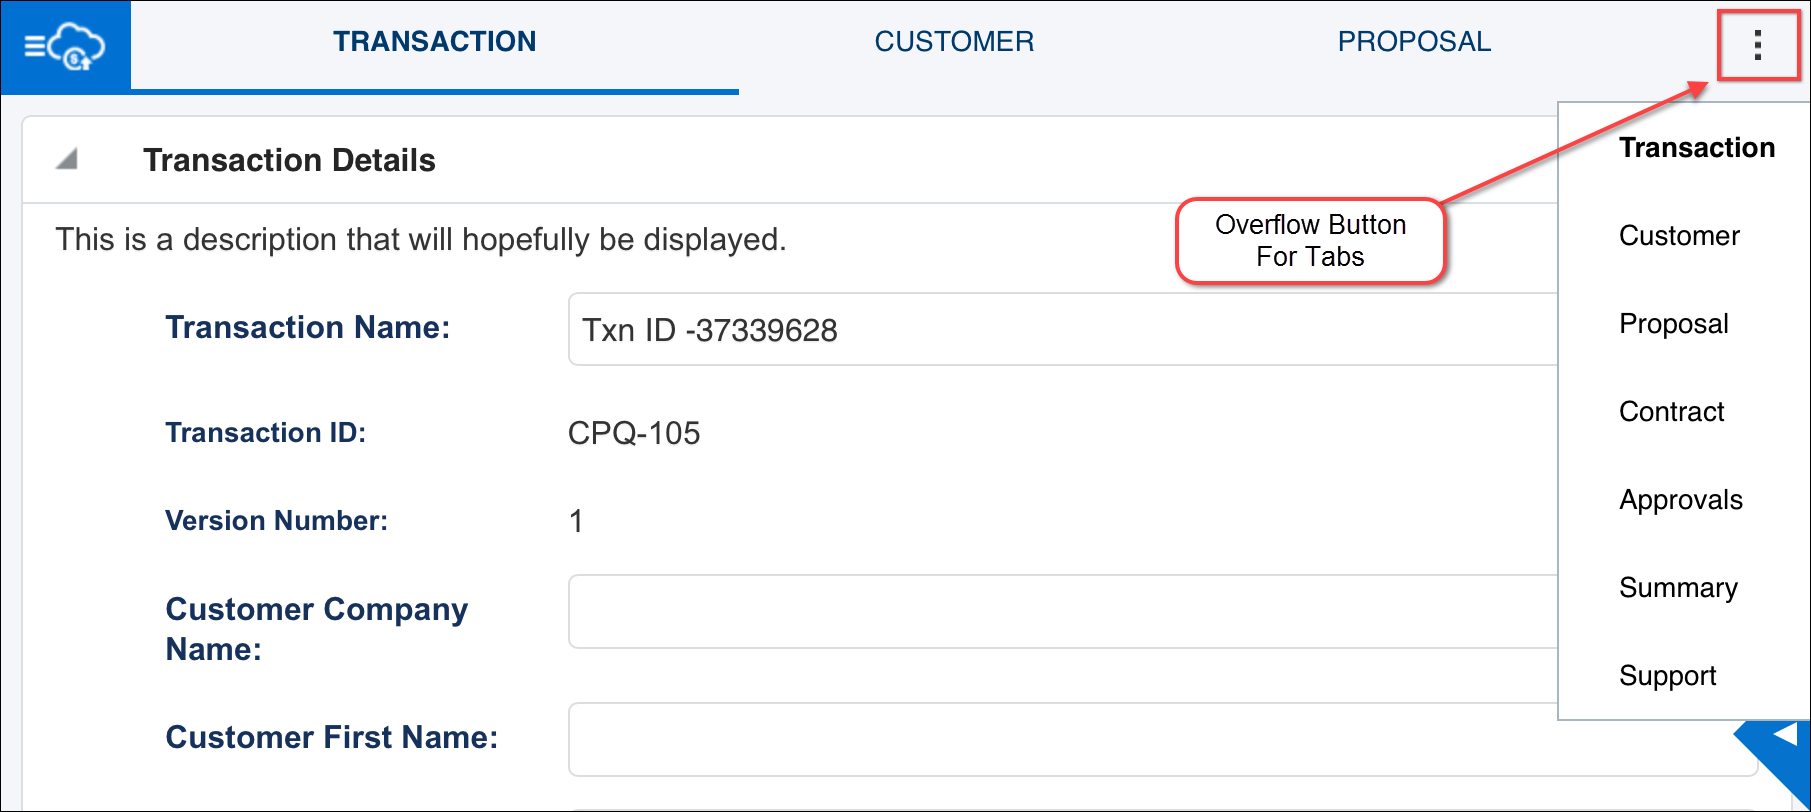
- Tabs appear in the top panel. Only the content of the selected tab is loaded; each tab loads as it is opened.
-
If there are multiple tabs displayed, tap the Overflow button to see the other tabs.
-
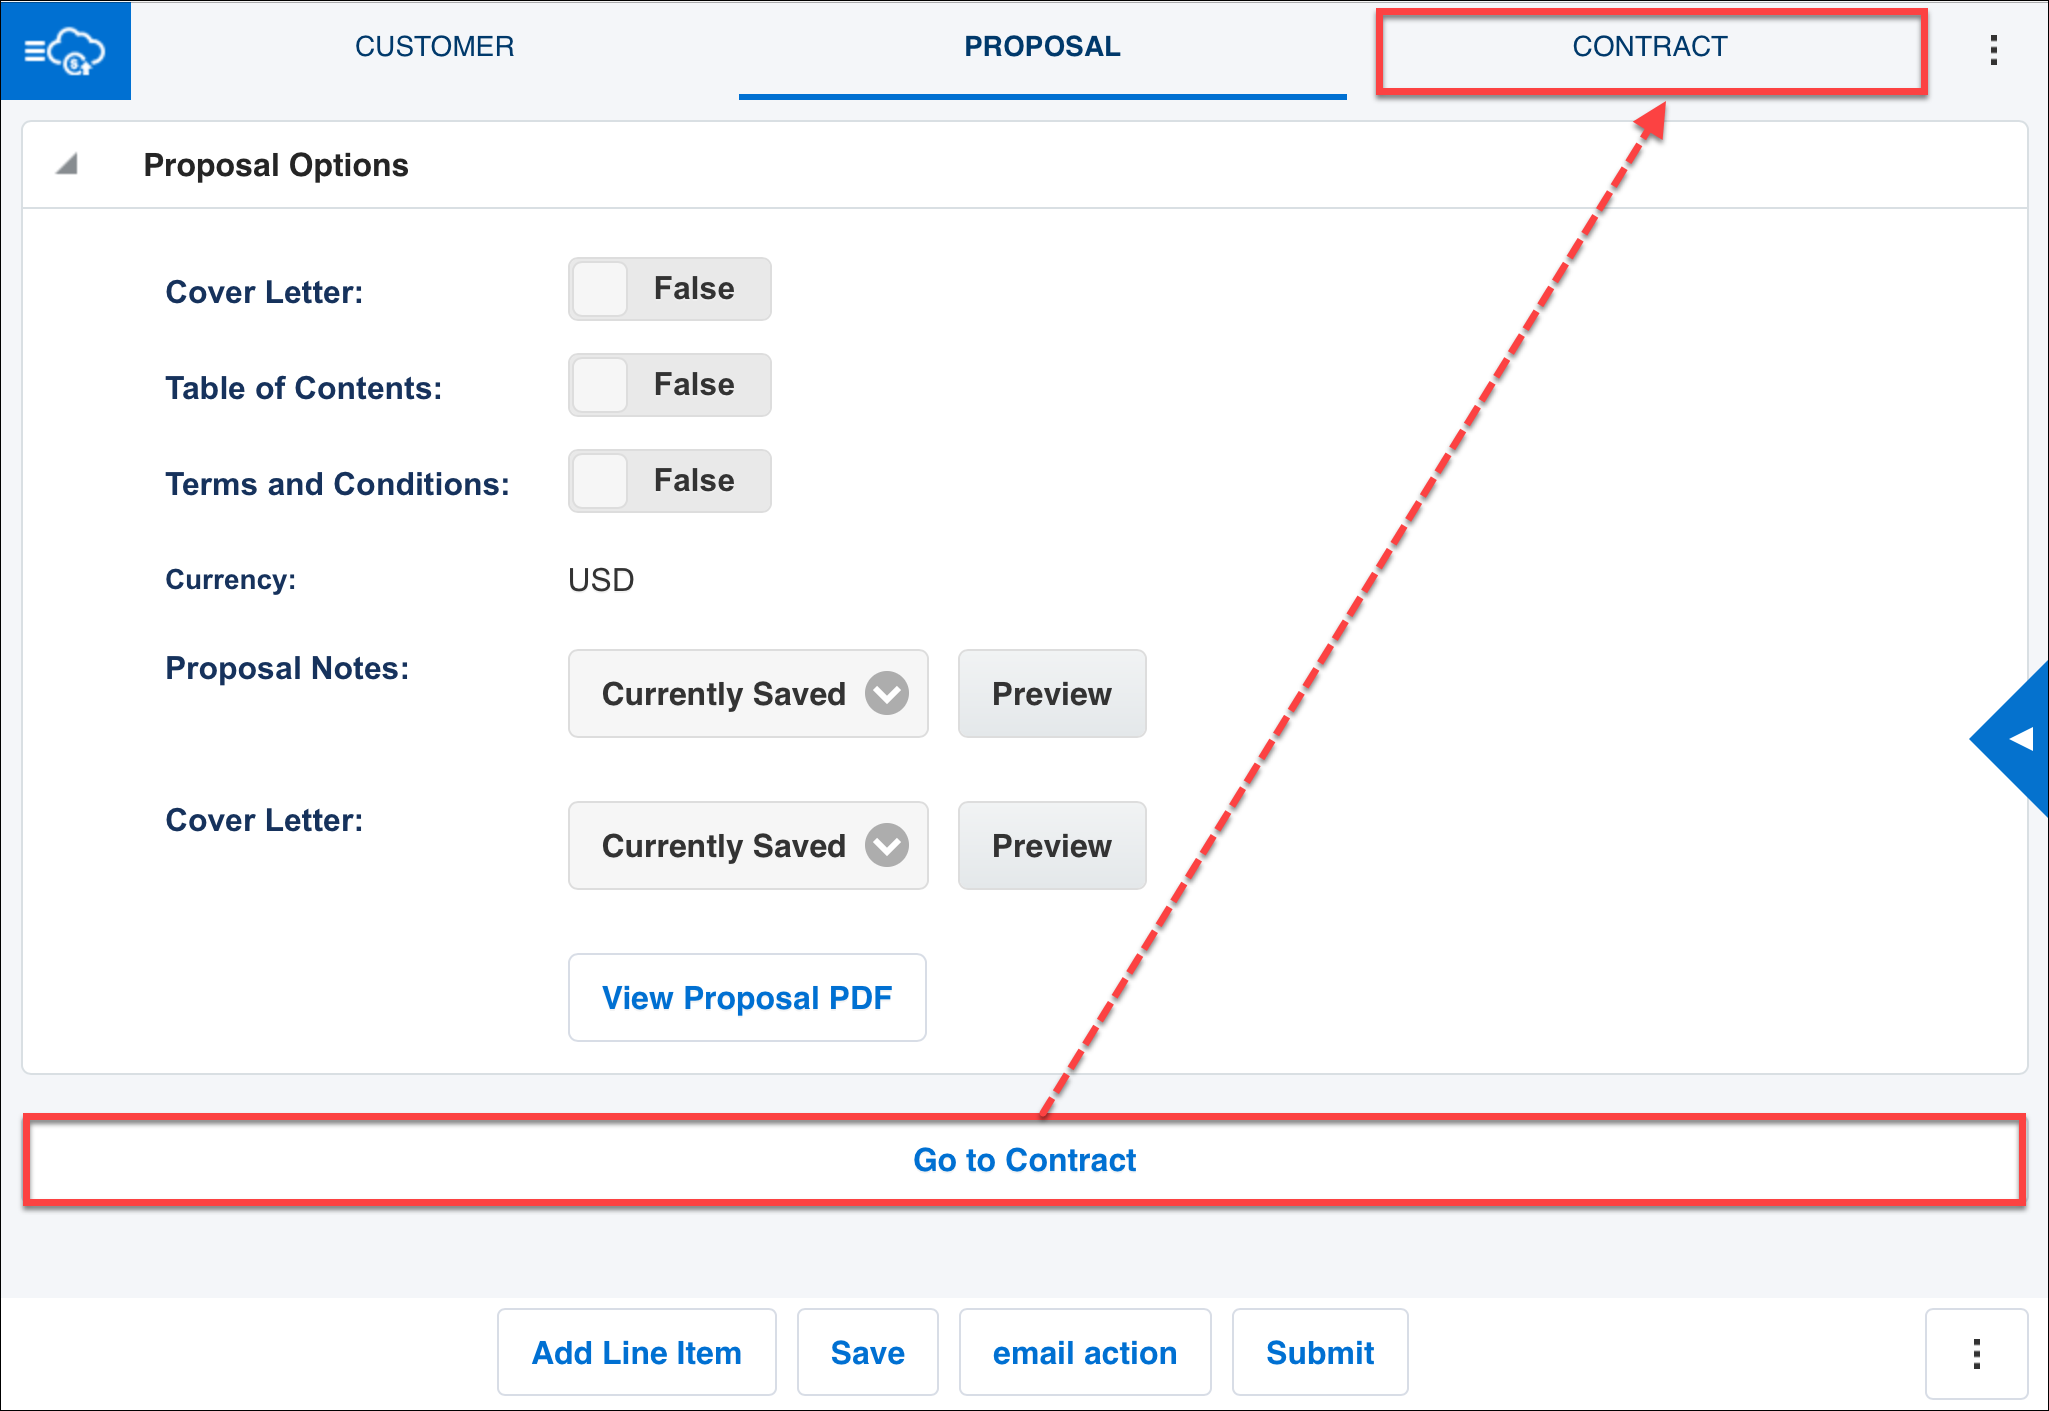
A button at the bottom of each tab allows users to navigate to the next tab. You may have to scroll down before you see the button.
- A footer bar, always visible at the bottom of the screen, contains applicable Quote page actions.
The number of buttons that display is based on the width of the screen in the current orientation. Use the Overflow button
to access the action buttons not shown in the footer.

- Error messages for Constraint rules, required attributes, and invalid values, display directly below the attribute in error.
Additional information about the error appears on the left side of the footer bar.
- The Line Item Grid is in the collapsible sidebar on the right-hand side of the screen.
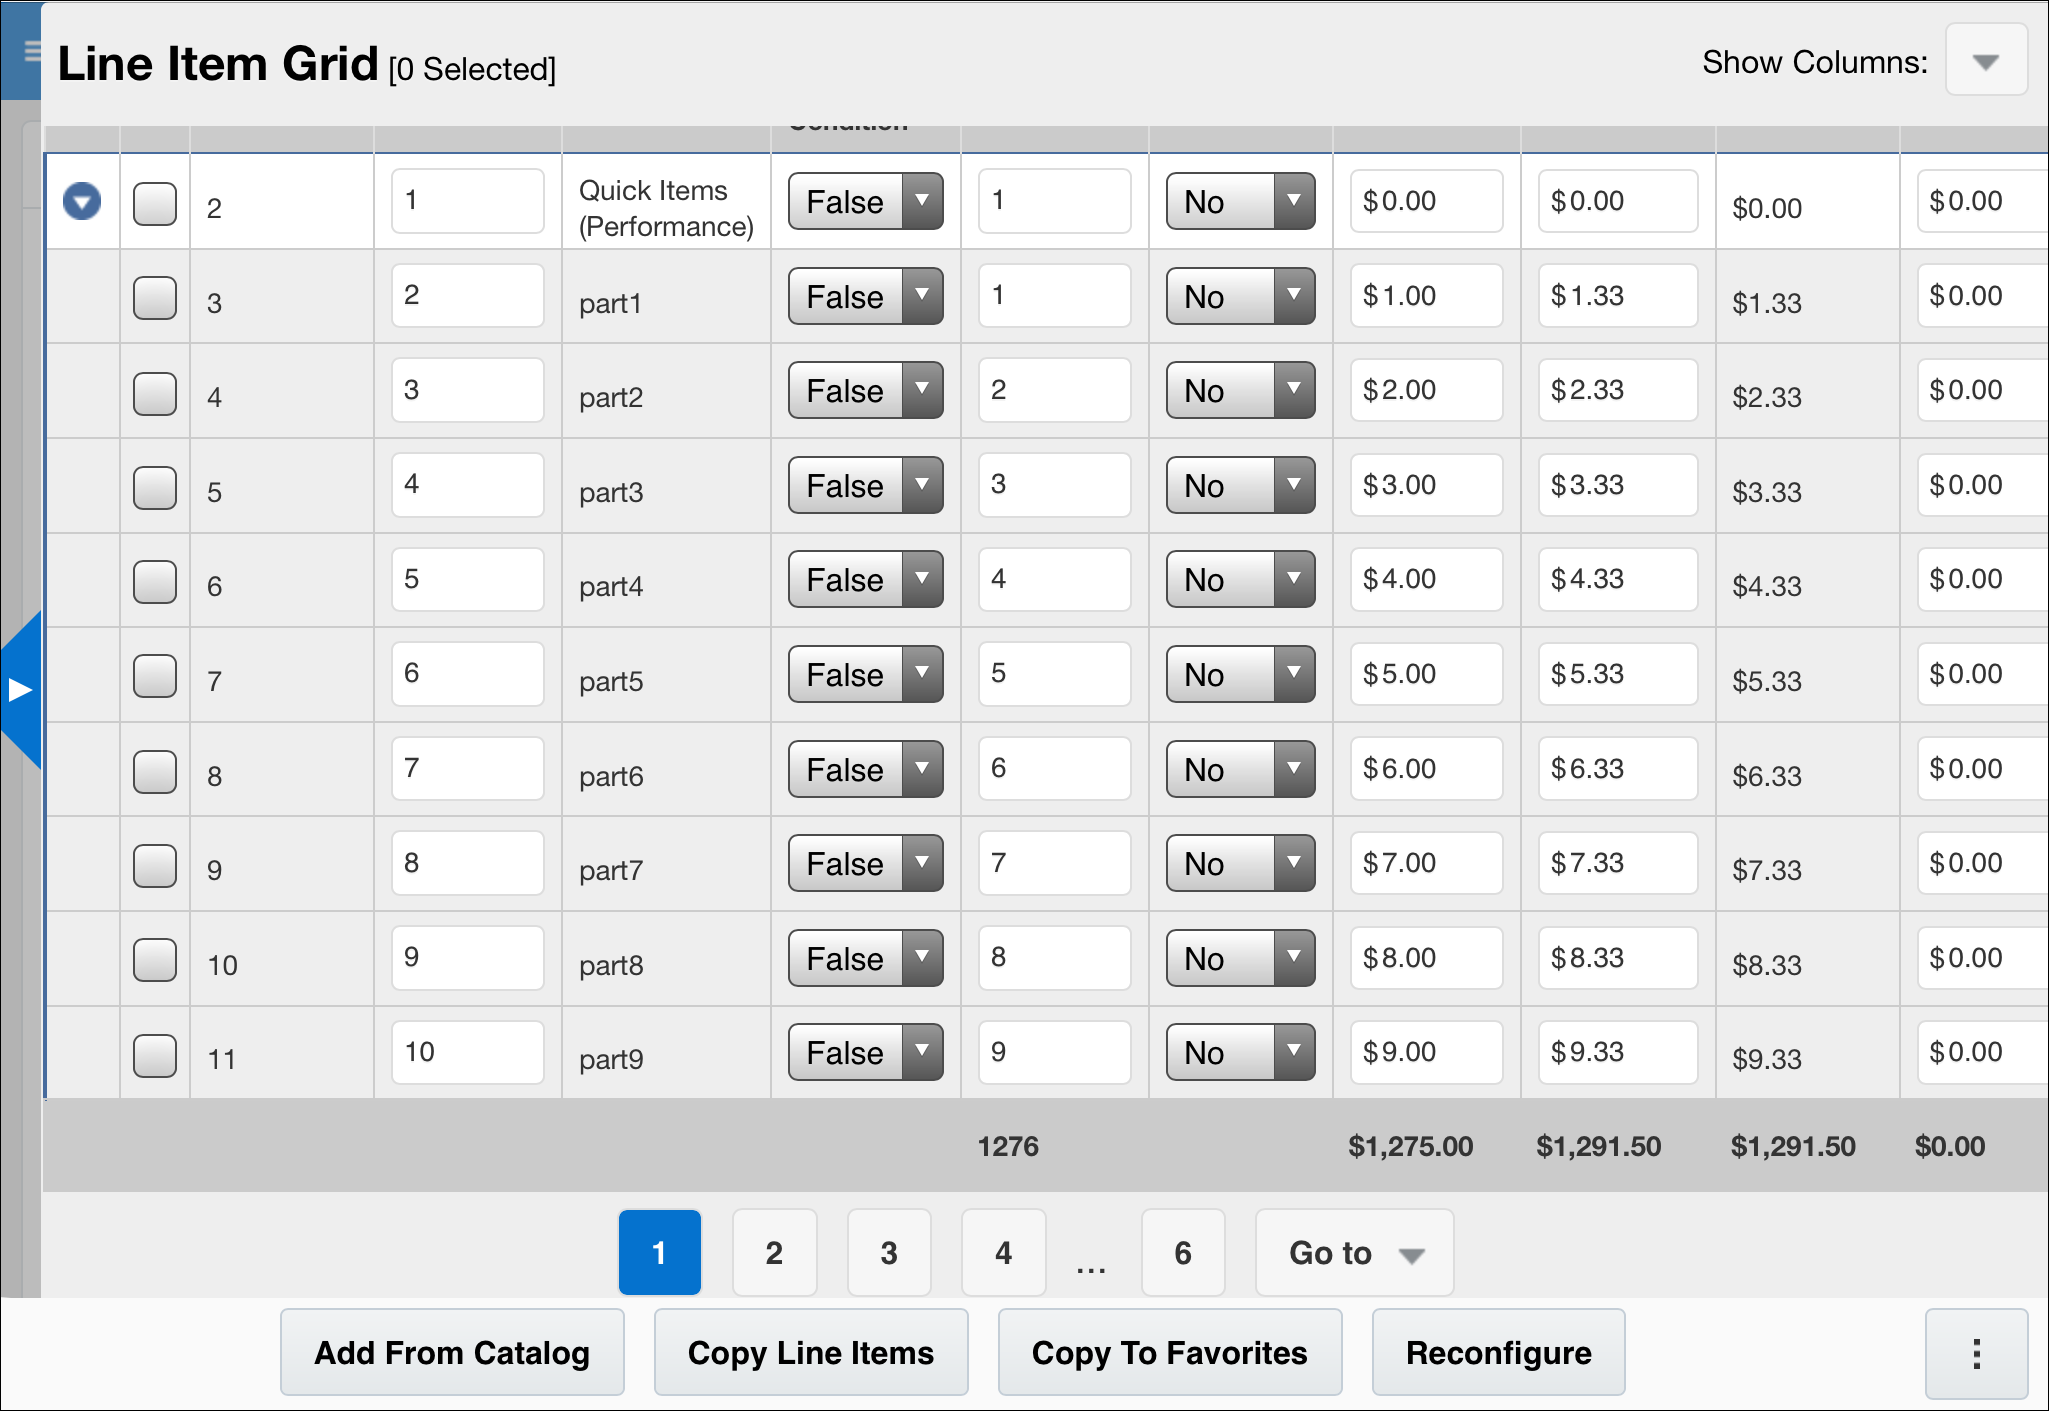
- When the Line Item Grid sidebar is expanded, Quote page actions are hidden and Line Item Grid page actions appear in the footer bar.
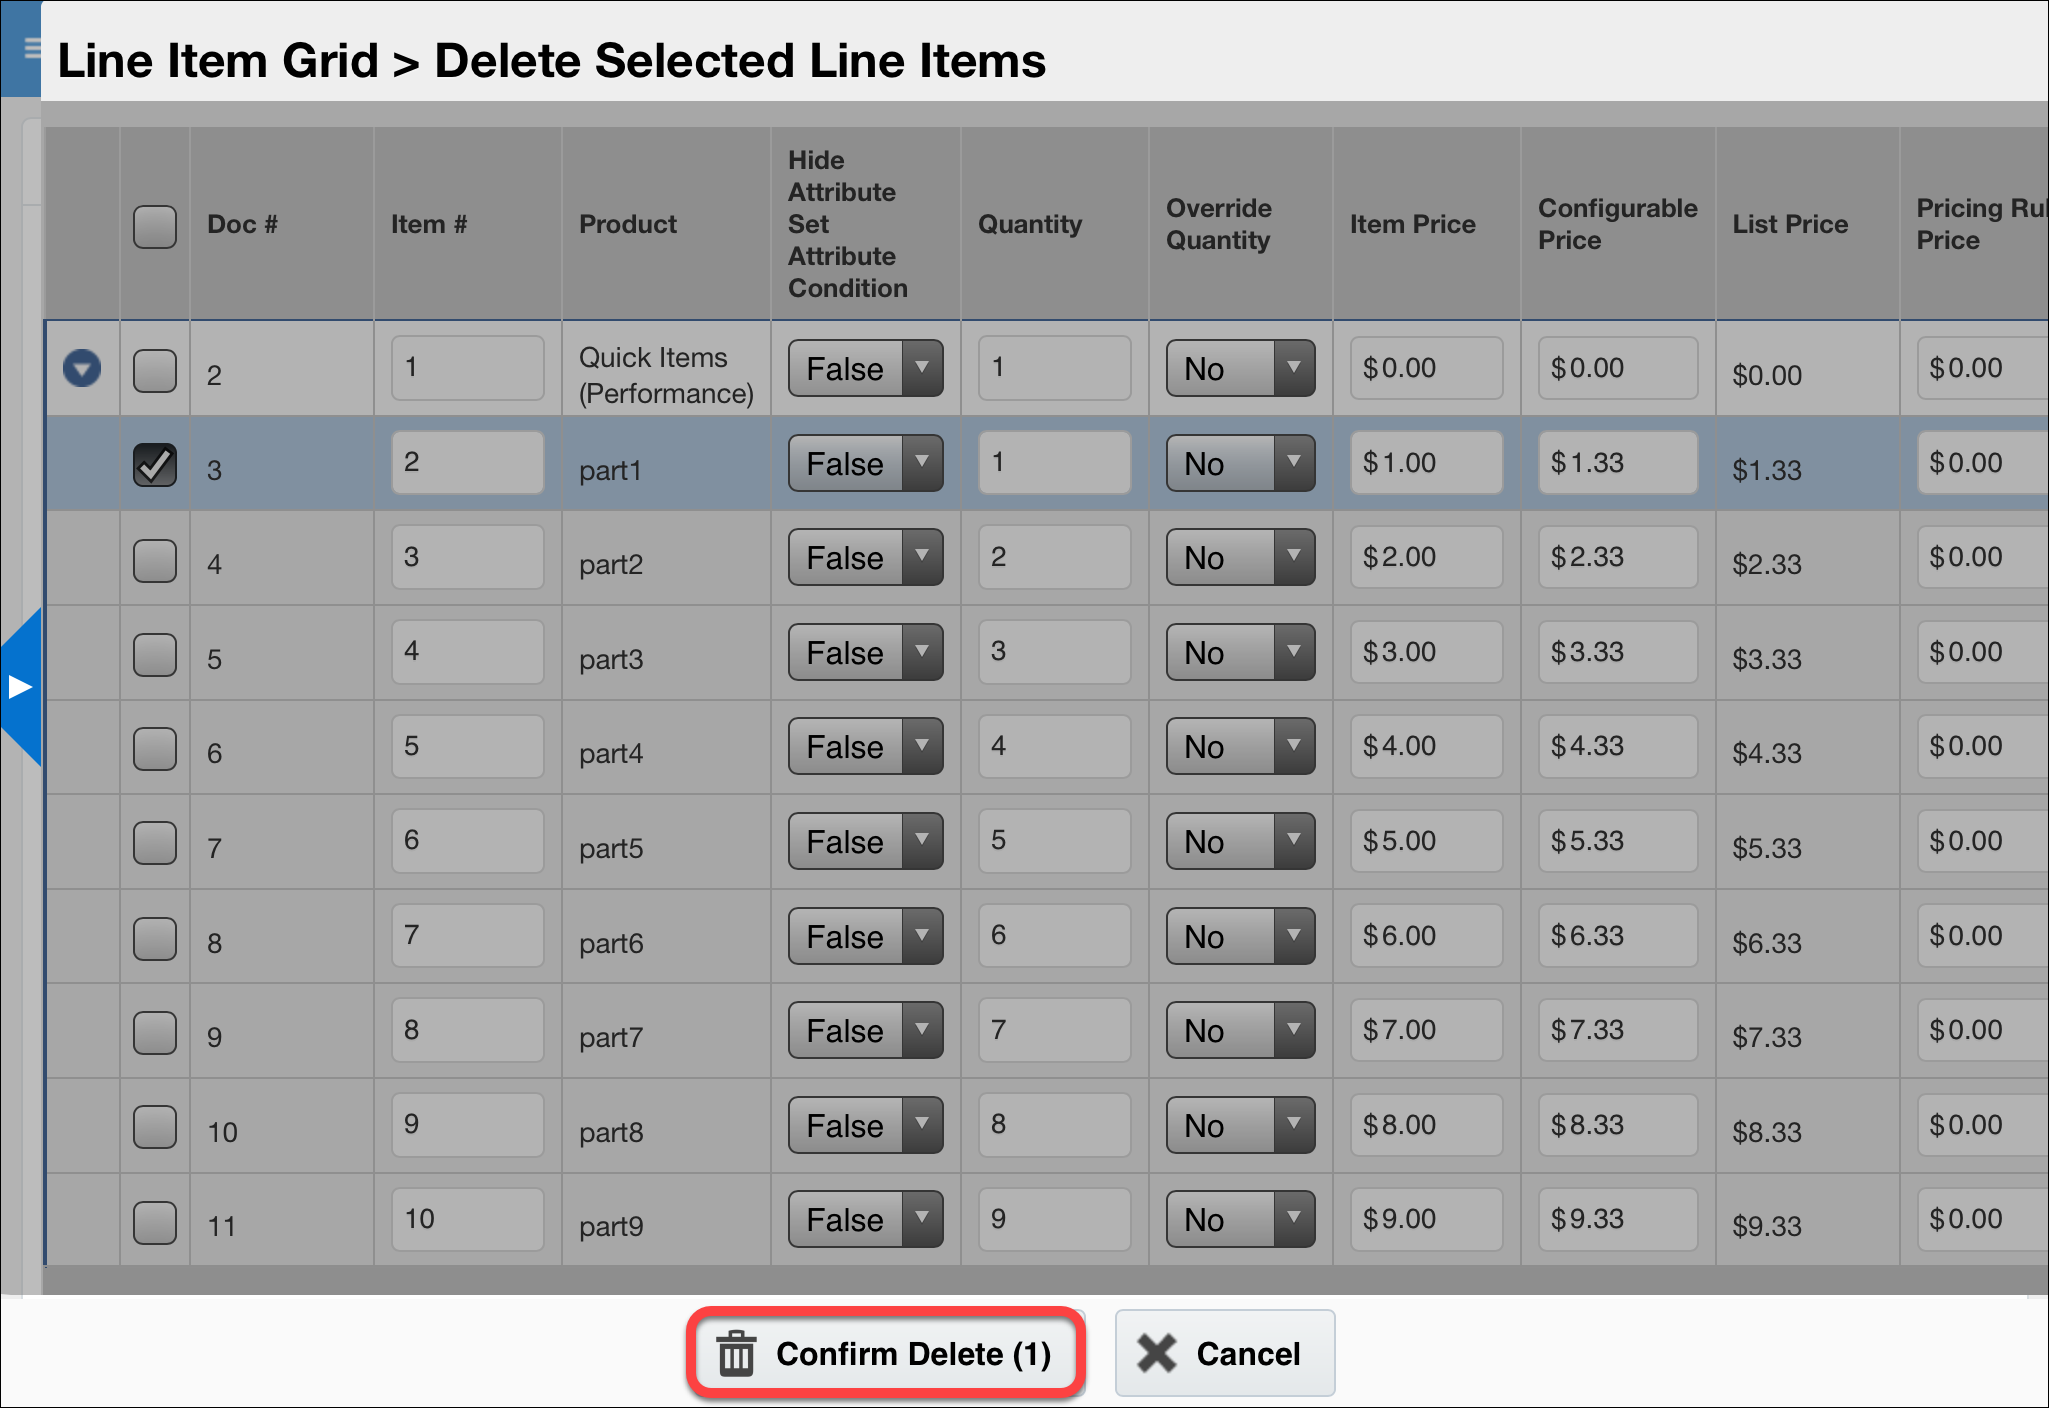
- When a Remove action is added to the Line Item Grid page actions, line items can be selected and deleted.
- When a Copy Line Items action is added to the Line Item Grid page action, line items can be selected and copied.
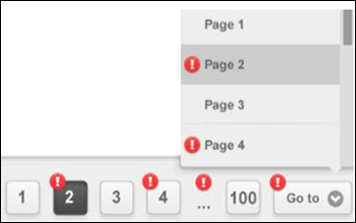
- When the number of line items on the Line Item Grid exceeds the maximum number defined in the layout property, the grid splits into multiple pages. Navigate the pages using a horizontal row of buttons beneath the line items.
- If there are more than five pages, ellipsiss ( … ) indicate a span between visible buttons.
A Go to button, when tapped, opens a menu showing all existing pages. Tap a page number to go directly to the selected page.
- If an error, such as for Constraint rules, required attributes, and invalid values, exists for an attribute on the Line Item Grid, an error icon overlays the button for the page number which contains the error.
If the problematic page’s number button is not visible, an error icon overlays the Go to button and a corresponding error icon displays to the left of the page number which contains the error.
Administration
![]() Creating a Mobile Commerce Layout
Creating a Mobile Commerce Layout
To create a mobile Commerce layout based on the existing desktop layout:
- Click Admin to go to the Admin Home Page.
-
Click Process Definition under Commerce and Documents.
The Processes page opens.
- Confirm that Documents is selected in the Navigation column for the Commerce Process where you want to create a mobile layout, and click List.
- Select Create Mobile Layout from the Navigation drop-down for the Quote level.
- Click List.
-
A confirmation pop-up appears. Click Create.
The mobile Commerce Layout Editor opens. The mobile layout has been created and automatically saved. The Commerce Process must be deployed in order for users on mobile devices to see the mobile layout.
![]() Mobile Commerce Layout Generation
Mobile Commerce Layout Generation
The mobile Commerce layout is generated based on the existing desktop layout.
- Panels on the desktop layout become tabs on the mobile layout.
- Tabs on the desktop layout become groups on the mobile layout.
- Column layouts do not translate to mobile.
- Attributes that were organized by columns on the desktop layout will be stacked vertically (leftmost attributes on top, rightmost attributes on the bottom) on the mobile layout.
- The Commerce sticky action bar is shown at the bottom of the mobile Commerce layout.
- The Line Item Grid will be placed in the Line Item Grid sidebar on mobile, regardless of what panel it is contained in on the desktop layout.
![]() Accessing the Mobile Commerce Layout Editor
Accessing the Mobile Commerce Layout Editor
After a mobile Commerce layout has been created, access the mobile Commerce Layout Editor using one of the following navigation paths:
Standard Navigation Path
- Click Admin to go to the Admin Home Page.
-
Click Process Definition under Commerce and Documents.
The Processes page opens.
- Click List for the Commerce Process with the mobile layout you want to modify.
- Select Mobile Layout from the Navigation drop-down for the Quote level.
- Click List.
Quick Links Navigation Path
- Click Admin to go to the Admin Home Page.
-
Click the Quick Links icon next to Process Definition in the Commerce and Documents section
The Processes Quick Links window appears.
- Select the Commerce Process with the mobile layout you want to modify from the Process drop-down.
- Click the + icon next to Quote to expand the Quote-level.
- Click Mobile Layout.
![]() Using the Mobile Commerce Layout Editor
Using the Mobile Commerce Layout Editor
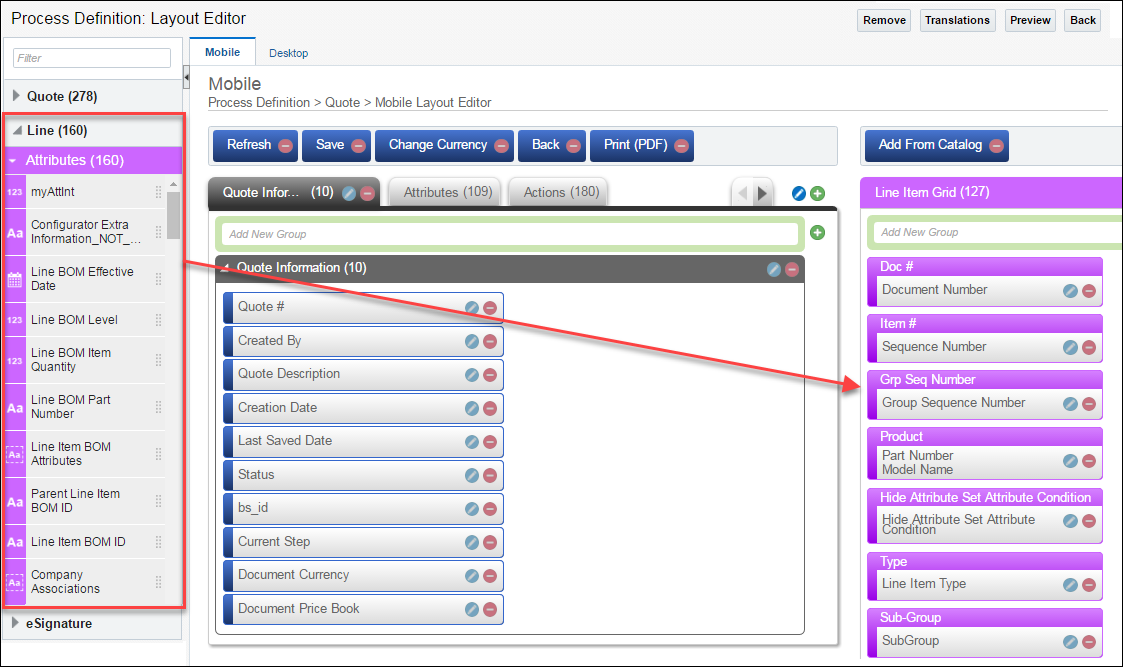
The mobile Commerce Layout Editor includes a sidebar and a main editing area.
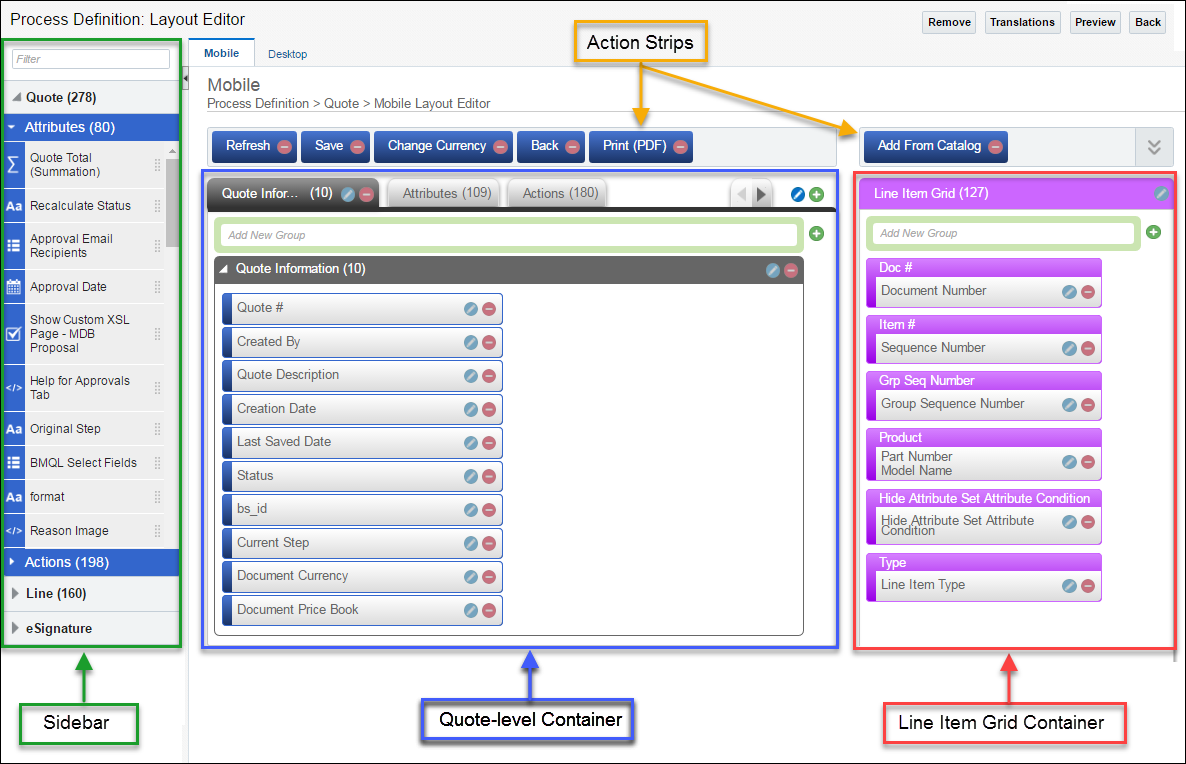
- The sidebar contains quote-level attributes and actions, as well as line-level attributes that can be added to the layout.
- The main editing area contains sections where attributes and actions can be added or removed from the Quote page and the Line Item Grid.
- The Quote-level Container relates to the Quote page.
- The Line Item Grid Container relates to the Line Item Grid.
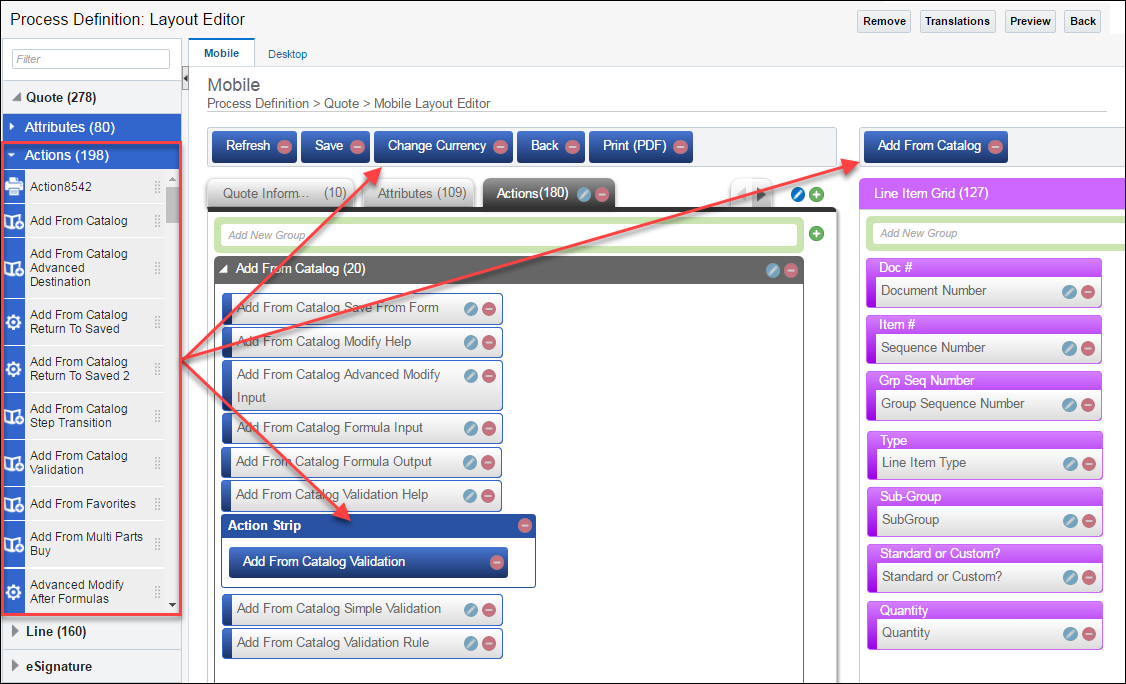
- Use the Quote Action Strip on the left to add quote-level actions to the Quote page main actions. Use the Quote Action Strip on the right to add quote-level actions to the Line Item Grid page main actions.
- Use the Quote Menu Attribute Strip to add a quote-level menu attribute to the Line Item Grid page. Once added, this attribute can be used in the condition of Commerce access rules in order to hide/show Line Item Grid columns.
![]() Adding Quote-Level Attributes to the Layout
Adding Quote-Level Attributes to the Layout
Drag and drop Quote-level attributes from the sidebar to the Quote-level container or the Quote-menu attribute strip.
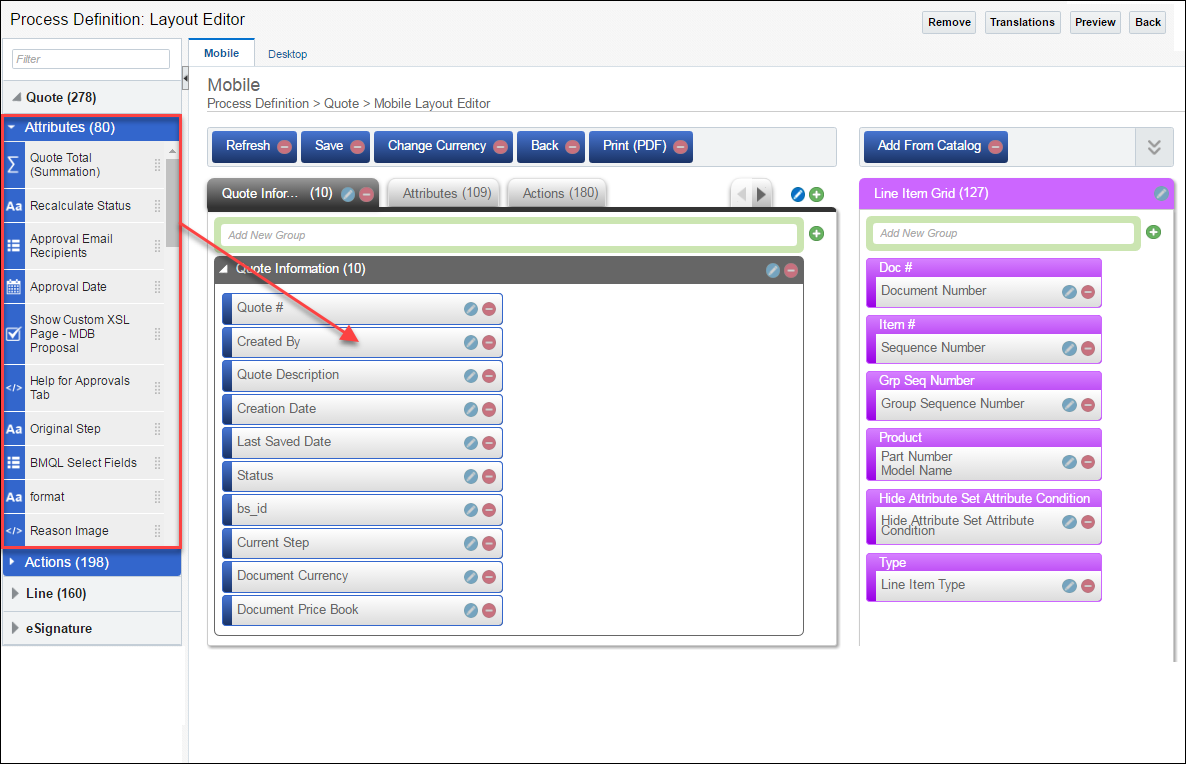
Quote-Menu Attribute Strip Use Case
Add a menu attribute for different Line Item Grid views (for example, discounting view, part info view, and so on). Then use access rules to show/hide Line Item Grid columns based on what view the user selects.
Key Difference From Mobile Configuration
In Mobile Commerce, quote and line-level attributes do not need to be on the desktop layout in order for them to be placed on the mobile layout. All Commerce attributes, regardless of whether or not they exist on the Commerce desktop layout, can be added to the mobile Commerce layout.
![]() Adding Line-Level Attributes to the Layout
Adding Line-Level Attributes to the Layout
Drag and drop Line-level attributes from the sidebar to the Line Item Grid.
- Each line-level attribute that is added to the layout becomes a column of the Line Item Grid.
- Users can not access the line-level layout on mobile, so there is no mobile layout for the line-level.
![]() Adding Quote-Level Actions to the Layout
Adding Quote-Level Actions to the Layout
Drag and drop Quote-level actions from the sidebar to the sticky action bar, the Quote-level action strip or the Quote-level container.
- An action strip is automatically created when an action is added to the Quote-level container.
- Line-level actions cannot be added to the layout.
![]() Modifying Attribute Properties on the Mobile Commerce Layout
Modifying Attribute Properties on the Mobile Commerce Layout
Only some attribute properties can be overridden on the mobile Commerce layout:
Group Properties (i.e. Desktop Tabs)
- Name (Show/Hide)
- Icon (Browse, Show/Hide)
- Description (Show/Hide)
- Initial State (Collapsed/Expanded)
Quote-Level Attributes
- Label (Show/Hide)
- Help icon (Show/Hide)
- Display Type (Combo Box/Radio Group)*
- Display Type (Checkbox Group/Multi Select)*
Line Item Grid Properties
- Label (Show/Hide)
- Pagination (Max 20)
Line-Level Attributes
- Label (Text field)
- Mapping Type (Attribute/Product)
- Attribute (drop-down)
- Editable (Yes/No)
- Display Sum (Show/Hide)*
- Copy Line Popup (Show/Hide)
*May or may not be shown based on the attribute data type
![]() Managing Mobile and Desktop Layouts
Managing Mobile and Desktop Layouts
After a mobile Commerce layout has been created, the desktop and mobile layouts are not synced. Therefore, changes to the desktop layout will not affect the mobile layout, and vice-versa.
If changes are made to the desktop Commerce layout, and the admin wants these changes to be reflected on the mobile Commerce layout, the admin can do one of the following two things:
- Manually Make the Changes to the Mobile Layout
- Advantage: All mobile layout customization will remain.
- Disadvantage: Adding all new attributes and layout elements to the mobile layout could be very time consuming.
- Delete the Mobile Layout and Create a New One
- Advantage: The new mobile layout will include all desktop attributes and layout elements.
- Disadvantage: Mobile customization will be lost and will have to be recreated.
To delete a mobile Commerce layout:
- Click Admin to go to the Admin Home Page.
-
Click Process Definition under Commerce and Documents.
The Processes page opens.
- Click List for the Commerce Process with the mobile layout you want to delete.
- Select Mobile Layout from the Navigation drop-down for the Quote level.
- Click List.
-
Click Remove.
A Confirmation pop-up appears.
- Click Remove.
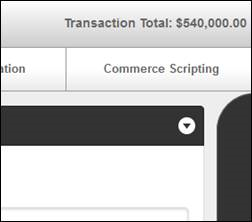
By default the Transaction Total attribute is located in the top right-corner of mobile Commerce header bar. This attribute cannot be moved on the mobile layout, but it can be hidden:
Admin > Commerce Settings > Enable Transaction Total for Mobile Layouts > Yes/No
For Transaction Total to display a value other than $0.00:
- Create a Formula to calculate the correct total (Formula will vary between implementations).
- Set the attribute’s default value to use the Formula.
-
Select Trigger Auto Update within the attribute.
![]() Mobile Commerce Tips and Considerations
Mobile Commerce Tips and Considerations
- Mobile functionality must be enabled on a site in order to create mobile layouts. If your site does not already have mobile enabled, create a Service Request in My Oracle Support.
- If you have Mobile Configuration enabled, Mobile Commerce is enabled as well, but a Mobile Commerce Layout must still be defined.
- Commerce rules execute on mobile as they do on desktop.
- Similar to desktop functionality, fields modified on the current page by auto update functionality are highlighted yellow.
- The mobile Navigation button, which appears in the left corner of the topmost header bar, contains links from the Commerce and Subheader navigation menus. Links will dynamically hide/show for each user, depending on the permissions set for their user type. Admins can set permissions under Admin Home Page > Navigation Menus > List Links > Customize Menus.
- Print actions that have a setting for Save Document to File Attachment Attribute when the end user prints, can perform differently on mobile applications than on desktop applications.

- The desktop application has these options:
- No: to not save the output to an attribute
- Save – Automatically: the output automatically saves to an attribute when the end user selects the Print action on the desktop interface
- Save – User Confirmation: the output saves to an attribute when the end user selects the Print action on the desktop interface and confirms the save in a preview window
- The mobile application has these options:
- No: to not save the output to an attribute
- Save – Automatically: the output automatically saves to an attribute when the end user selects the Print action on the mobile interface
- Rich Text templates cannot be edited from a mobile layout.
If a Rich Text attribute’s Document View is set as Read/Write for a particular Step and Participant Profile, the user sees a single-select menu to select from templates that an admin has predefined.
A Preview button is visible. The user can preview the selected template; however, the contents cannot be edited on a mobile device.
The template single-select menu, when present, will always contain the options Currently Saved and None, in addition to any predefined templates.
- Currently Saved: Allows the contents to remain as what is currently saved. This option should remain selected if customizations were made to a transaction’s Rich Text Editor while editing the transaction on desktop.
None: Clears the contents of the Rich Text Editor.
When you change the template selection (including None ) and then save, Currently Saved becomes the selected option in the RTE menu and the content of Currently Saved has been updated to reflect the saved changes.- If a Rich Text attribute’s Document View is set as Read-Only for a particular Step and Participant Profile, the end user cannot change the template selection and only the Preview button is visible.
Documents on Mobile Devices
When printing or previewing a document on a mobile device:
- iOS 8: Formatting in DOCX files is stripped from a preview. To see the complete formatting, use iOS functionality to open the document in an installed app, such as Word or Pages, instead.
- Android: Oracle CPQ recommends using Google Docs to open DOCX files on Android devices. While other applications may produce acceptable results, this functionality was tested using Google Docs.
Because of Apple iOS file upload restrictions, PDFs can't be uploaded to the eSignature File Attachment attribute while using iOS devices.
However, if a PDF has previously been uploaded to the eSignature File Attachment attribute, or it was saved to the File Attachment attribute upon printing, it can be sent via eSignature on iOS devices.
