OAuth Provider Integration
Overview
OAuth 2.0 is the industry-standard protocol for authorization. Access Tokens are more secure than basic authentication. Oracle CPQ supports access tokens when accessing both REST and SOAP v2.0 endpoints.
The OAuth Provider integration type provides a more secure authentication and authorization standards. The use of an OAuth Provider integration supports REST API-based integrations where an OAuth Provider, such as Oracle Identity and Access Management (IAM) and Oracle Identity Cloud Service (IDCS), authenticates and authorizes inbound and outbound REST communications with CPQ.
Beginning in Oracle CPQ 25A, SOAP Web Services 2.0 supports OAuth 2.0 access tokens when authorizing web service calls into CPQ. Before adding OAuth Token support for SOAP V2.0, you must have an OAuth Provider Integration with a valid IDCS registration, client ID, and secret already set up. The OpenID Connect section of the OAuth Provider Integration does not need to be completed to support SOAP APIs.
Oracle CPQ with a CRM system such as Salesforce or Microsoft Dynamics 365, the integration uses an OAuth access token to authenticate user access to the CRM system. Generated automatically when the user accesses Oracle CPQ from the CRM system, the token supports the synchronization of data between Oracle CPQ and the CRM system.
urldata() functions can use a special variable, which inserts the user's access token into a request header when connecting to a Microsoft Dynamics 365 or Salesforce CRM. This Bearer token allows Oracle CPQ to securely access the CRM system. Use the following variables to insert the token for the respective CRM system.
- For Microsoft Dynamics 365 integrated sessions:
$_access_token_dynamics365$
- For Salesforce integrated sessions:
$_access_token_salesforce$
Notes:
- If the user does not have an integrated session, the access token variable is replaced with a blank.
- The partner login icon will generate a token for the user as long as the user has generated a token and logged in at least once in the past.
Register Oracle CPQ as a Resource in the OAuth Provider
Any external application wanting to use REST APIs to access Oracle CPQ resources such as Oracle CPQ Commerce and Configuration data can do so only when Oracle CPQ is registered as a resource with an OAuth Provider like IAM. By registering Oracle CPQ as a resource and the CRM system as a trusted client in the OAuth Provider, the application registered as a trusted client can seamlessly access Oracle CPQ REST APIs.
Notes:
- CPQ supports the following scopes to access CPQ REST APIs: api, /api, <hosturl>/api, and <hosturl>api.
- For information about registering an application as a resource in IAM (also referred to as IDCS), refer to the Oracle Identity Cloud Service documentation.
Register Oracle CPQ as a Trusted Client in the OAuth Provider
When an administrator registers an application such as Microsoft Dynamics 365 or Oracle Sales as a resource and Oracle CPQ as a trusted client in the OAuth Provider, the administrator can create an opportunity in the CRM system and a quote in CPQ. Using the OAuth Provider for outbound authentication flows, the administrator can easily access the required information from the CRM system and use it in Oracle CPQ to create the quote. When registering a trusted client in the OAuth Provider, administrators must select scopes of registered resources with which Oracle CPQ wants to integrate.
OpenID Connect for Single Sign-On
Oracle CPQ 23B and later adds support for OpenID Connect (OIDC) as a Single Sign-On (SSO) option. OIDC is an extension of the existing OAuth Provider configuration available for use with Oracle Identity and Access Management (IAM)'s Identity Domains and Oracle Identity Cloud Service (IDCS). OIDC adds an identity layer to OAuth 2.0 that enables a federated SSO solution between Oracle and Custom Applications configured in IDCS.
OpenID Connect is based on RESTful web services using JSON schema that include an ID token for sharing user information, such as the type of credential used for authentication, when a user is authenticated, and user properties (e.g., first name, last name, email id).
Administration
 Use the Integration Center to Configure an OAuth Provider Integration (Oracle CPQ 22D and later)
Oracle CPQ 22D and later includes enhancements to the Integration Center for easier configuration of Oracle Identity and Access Management (IAM) and Oracle Identity Cloud (IDCS), as an OAuth Provider. The enhancements allow administrators to directly upload the Oracle IDCS certificate to the Setup page.
Customers must open a Service Request (SR) on My Oracle Support to enable the "OAuth Provider" integration type in the Oracle CPQ Integration Center. When the integration type is enabled, administrators can use the Integration Center to create an OAuth Provider integration for CPQ. The OAuth Provider integration authenticates inbound and outbound REST communications with CPQ. Oracle CPQ customers should only enable this integration type when they want another OAuth provider, such as Oracle IDCS, to authenticate REST API calls with Oracle CPQ.
To set up Oracle IDCS as an OAuth Provider, administrators complete the following steps:
- Navigate to the Admin Home page.
-
Click Integration Center in the Integration Platform section. The Integration Center opens.
- Click Create Integration.
-
Select OAuth Provider from the Type drop-down. The Vendor field defaults to the name of the OAuth Provider. This is a read-only field.
-
Enter the valid OAuth issuer name in the Issuer field. This field validates the access token obtained is issued by the correct provider.
The OAuth Issuer for Oracle IDCS is https://identity.oraclecloud.com/
- Enter the base URL of the OAuth Provider in the Tenant URL field.
-
Enter the token endpoint used for obtaining the OAuth token in the Token Endpoint field.
The Token Endpoint for Oracle IDCS is: /oauth2/v1/token
-
Enter the scope used for accessing the public key of the OAuth Provider in the Scope field.
The OAuth Provider Scope for Oracle IDCS is: urn:opc:idm:__myscopes__
Tenant Signing Certificate SetUp
The public certificate validates the access token during inbound REST API calls. The public certificate is obtained from the OAuth server using OAuth client credentials.
-
Choose one of the following methods to set up the certificate:
-
Click Choose File next to Upload Certificate to browse to the certificate file then click Save to save the file.
-
Click the Retrieve Certificate checkbox to retrieve the certificate details. The following fields are required by the system to retrieve the certificate, enter the following:
-
JWKS Endpoint – the endpoint of the OAuth server to which the client connects to obtain the public key. The JWKS endpoint for Oracle IDCS is: /admin/v1/SigningCert/jwk
-
JWKS Authorized Client ID – the client ID of any trusted client registered with the OAuth Provider
- JWKS Authorized Client Secret – the client secret of any trusted client registered with the OAuth Provider
The Last Modified field indicates the last time the certificate information was entered or updated. This can help administrators track and troubleshoot certification information.
Notes:
-
Following the initial certificate set up, Oracle CPQ 22D and later allows administrators to download the last uploaded certificate. The Download Certificate link displays in the User Interface when available.
- For existing OAuth Provider integrations where the public key was set up, upon upgrade to Oracle 22D or later, the Retrieve Certificate checkbox will be selected and the details will be auto-filled for the JWKS Endpoint, JWKS Authorized Client ID, JWKS Authorized Client Secret, and Last Modified fields.
-
For standard compliance, the naming of fields (JWKS Endpoint, JWKS Authorized Client ID, JWKS Authorized Client Secret) has changed in Oracle CPQ 22D from earlier Oracle CPQ versions. The functionality of the field remains the same between the versions.
Client App Configuration
Use this section to configure Oracle CPQ outbound REST API calls.
- Enter the Client Id of the Oracle CPQ application registered with the OAuth Provider in the Client Id field.
-
Click Download Oracle CPQ Public Key to obtain the self-signed certificate, which is used to register Oracle CPQ as a client in the OAuth Provider.
OpenID Connect
Use this section to configure OpenID Connect as an identity layer to OAuth 2.0 to enable a federated SSO solution between Oracle and custom applications configured in IDCS.
The OpenID Connect section is not required in order to support SOAP APIs with Web Services 2.0.
-
Enter the valid IDCS authorization endpoint in the Authorization Endpoint field. Oracle CPQ uses this endpoint to get the authorization grant from IDCS.
The authorization endpoint for Oracle IDCS is /oauth2/v1/authorize
- Enter the valid URL called by Oracle CPQ during the logout process to terminate the user session in IDCS in the Logout Endpoint field.
The logout endpoint value is:/oauth2/v1/userlogout
-
Enter the URL for the user to be redirected to after logging out of Oracle CPQ in the Post Logout Redirect URL field.
The post logout redirect URL is:http://<yourcpqSiteUrl>/sso/openid_connect_request.jsp
- Click Save.

Enable OpenID Connect for Single Sign-On
Once the OAuth Provider with OpenID Connect Integration is setup, complete the following steps to enable OpenID Connect for Single Sign-On.
1. Click Single Sign-On in the Integration Platform section of the Oracle CPQ Home page. The Single Sign-On Settings page displays.
2. Select OpenID Connect from the Single Sign-On Method drop-down.
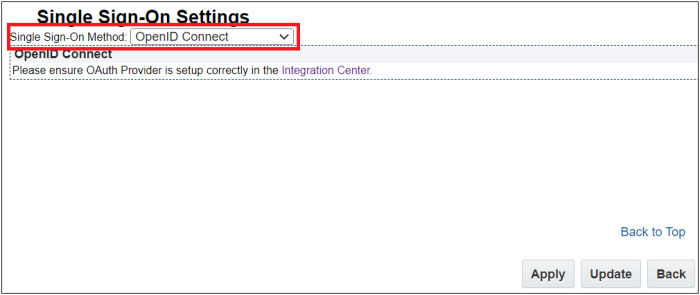
3. Click Apply. The OAuth Provider with OpenID Connect Integration is connected with the Single Sign-On settings.
4. (Optional) Log a Service Request (SR) with My Oracle Support to include the site domains in the iframe domain allowlist. This step is only required if you are embedding Oracle CPQ in another application that is not already registered in the allowlist.
Use the Integration Center to Configure an OAuth Provider Integration (Oracle CPQ 22C and earlier)
Customers must open a Service Request (SR) on My Oracle Support to enable the "OAuth Provider" integration type in the Oracle CPQ Integration Center. When the integration type is enabled, administrators can use the Integration Center to create an OAuth Provider integration for CPQ. The OAuth Provider integration authenticates inbound and outbound REST communications with CPQ. Oracle CPQ customers should only enable this integration type when they want another OAuth provider, such as IDCS, to authenticate REST API calls with CPQ.
Complete the following steps:
- Navigate to the Admin Home page.
-
Click Integration Center the Integration Platform section. The Integration Center opens.
- Click Create Integration.
- Select OAuth Provider from the Type drop-down.
-
The Vendor field defaults to the name of the OAuth Provider. This is a read-only field.
-
Enter the valid OAuth issuer name from the OAuth Provider in the OAuth Issuer field. This field validates the access token obtained is issued by the correct provider.
The OAuth Issuer for Oracle IDCS is https://identity.oraclecloud.com/
- Enter the base URL of the OAuth Provider in the Tenant URL field.
-
Enter the token endpoint used for obtaining the OAuth token in the Token Endpoint field.
The Token Endpoint for Oracle IDCS is: /oauth2/v1/token
-
(Optional) Enter the value used for accessing the public key of the OAuth Provider in the OAuth Provider Scope field. Scope is used to limit the authorization granted to the client by the resource owner.
The OAuth Provider Scope for Oracle IDCS is: urn:opc:idm:__myscopes__
OAuth Provider Public Key Setup
The public certificate validates the access token during inbound REST API calls. The public certificate is obtained from the OAuth server using OAuth client credentials.
-
Enter the endpoint of the OAuth server to which the client connects to obtain the public key in the Resource Endpoint field
The Resource Endpoint for Oracle IDCS is: /admin/v1/SigningCert/jwk
- Enter the client ID of any trusted client registered with the OAuth Provider in the Client ID field.
-
Enter the client secret of any trusted client registered with the OAuth Provider in the Client Secret field.
Client App Configuration
Use this section to configure Oracle CPQ outbound REST API calls.
- Enter the Client Id of the Oracle CPQ application registered with the OAuth Provider in the Client ID field.
-
Click Download Oracle CPQ Public Key to obtain the self-signed certificate, which is used to register Oracle CPQ as a client in the OAuth Provider.

Use BML to Make Outbound Calls to a Resource
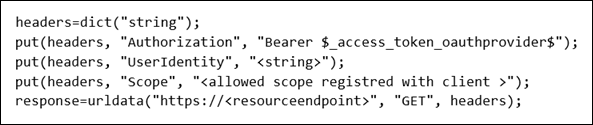
When making outbound calls to a resource registered with the OAuth Provider, administrators must use an additional identifier. To accomplish this, a string token ("$_access_token_oauthprovider$") can be inserted into a header value. When the call is executed, this token is replaced with the access token obtained from the OAuth Provider and the values entered in the Integration Center when configuring the OAuth Provider integration.
If the call requires user identity, insert the corresponding identifier ("UserIdentity") in the header. If the identifier is not inserted, the call is made without user identity propagation. For certain OAuth Providers such as IDCS, scope must be passed. Obtain the scope value from the resource's API documentation.
For example: Integrate with an external resource registered with the OAuth Provider
Notes
-
Open a Service Request on My Oracle Support to enable the OAuth Provider integration type in the Integration Center. Administrators can then use an OAuth provider for inbound and outbound REST API calls to CPQ.
-
Oracle CPQ only supports Oracle Identity and Access Management (IAM) and Oracle Identity Cloud Service (IDCS) as an OAuth Provider.
Consider the following tips when using this enhancement:
- Only one Oracle CPQ registration is supported in IDCS.
- If the value entered in the OAuth Issuer field does not match with the token issuer, the integration setup fails.
- To access Oracle CPQ REST APIs, an OAuth Provider administrator must register external clients as trusted clients in the OAuth Provider. If a non-trusted client attempts to access Oracle CPQ APIs, the client is not granted access and an error is thrown.
- It is not required for OAuth Provider Public Key Setup and Client App Configuration to both be set up in order to save the integration. Administrators must populate the Client Id in at least one of them.
Related Topics
See Also


