Data Table Export Scheduler Integration
Overview
The Data Table Export Scheduler automates the export of data tables to an SFTP server. The ongoing scheduled exports provide historical data that can be used for audit and compliance purposes. Administrators can identify data tables to export and schedule the periodicity, start time, and an optional termination date. Upon completion of a scheduled export, an email notification is sent to the email address associated withthe Application Administrator login. Notifications are sent for success or failure of the entire export, as well as partial exports. The email includes a success or failure status and the details regarding the export.
The Data Table Export Scheduler integration type is used to define the SFTP connection and scheduling details for data table exports.
Host Public Key and SSH Protocols
Oracle CPQ supports the following Host Public Key types: RSA and ECDSA.
The following SSH protocols are supported:
Key Exchange:
- ecdh-sha2-nistp384 (Recommended)
- ecdh-sha2-nistp256
- ecdh-sha2-nistp521
- diffie-hellman-group16-sha512
- diffie-hellman-group18-sha512
- diffie-hellman-group14-sha256
- diffie-hellman-group15-sha512
- diffie-hellman-group17-sha512
- diffie-hellman-group-exchange-sha256
Host Key Algorithms:
- ecdsa-sha2-nistp384 (Recommended)
- rsa-sha2-512 (Recommended)
- rsa-sha2-256
- ecdsa-sha2-nistp256
- ecdsa-sha2-nistp521
MAC Algorithms:
- hmac-sha2-512-etm@openssh.com (Recommended)
- hmac-sha2-256-etm@openssh.com (Recommended)
- hmac-sha2-512
- hmac-sha2-256
Ciphers:
- chacha20-poly1305@openssh.com (Recommended)
- aes256-ctr
- aes192-ctr
- aes128-ct
Beginning in Oracle CPQ 26A, we will only support the four ciphers listed above for outbound integrations to customer managed SFTP servers. If your SFTP server does not support one of these ciphers, upon upgrade to Oracle CPQ 26A your Data Cube Export and Data Table Export Scheduler integrations will no longer work. We recommend you ensure that your infrastructure supports one of the supported ciphers.
Administration
 Setup a Data Table Export Scheduler Integration
To create a Data Table Export Scheduler integration within Oracle CPQ, complete the following steps:
-
Navigate to the Integration Center page.
Admin Home > Integration Platform > Integration Center
- Click Create Integration.
-
Select Data Table Export Scheduler from the Type menu.
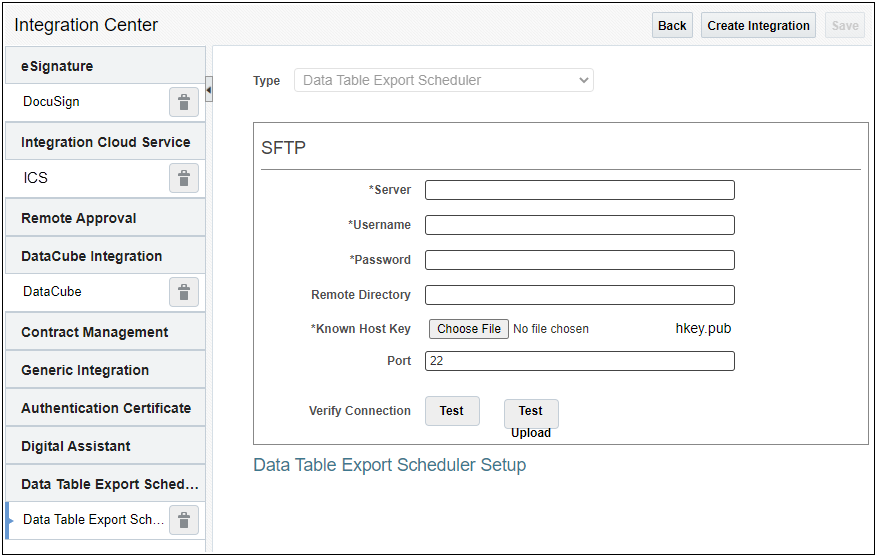
- Enter the Server name of the SSH server where data table exports are sent.
- Enter the login Username and Password to use when connecting to the SSH server.
- Enter the Remote Directory where data table exports are sent.
- Click Choose File to navigate and select the Known Host Key file.
- Enter the Port number to use when connecting to the SSH server.
- Click Save.
- Click Test to verify your connection.
- Click Test Upload to test file upload. A successful file upload test displays a Test Connection Passed message. The remote server is sent an SFTP test file named
CPQ-SFTP-TEST.TXT and contains a UTC timestamp (i.e. 2022-05-06T16:02:59.170Z).
 Schedule a Data Table Export
To schedule a data table export within Oracle CPQ, complete the following steps:
-
Navigate to the Integration Center page.
Admin Home > Integration Platform > Integration Center
-
Select the Data Table Export Scheduler Integration.
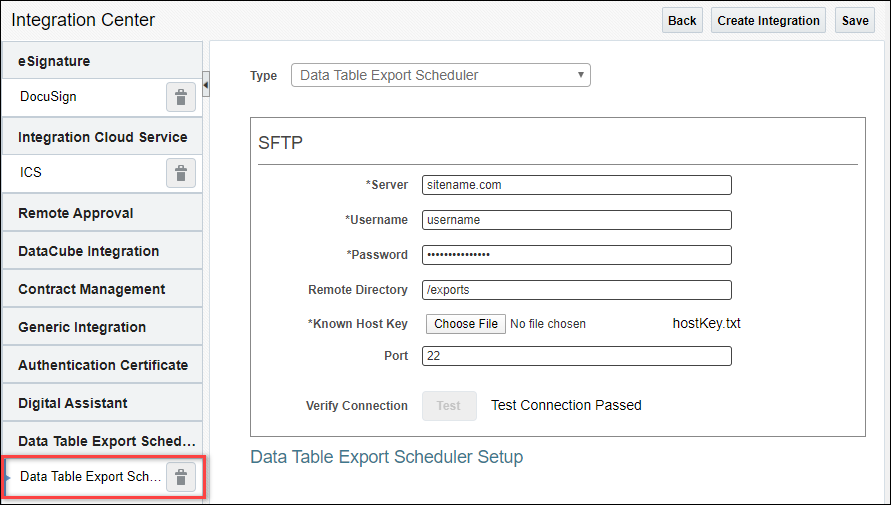
- Click Data Table Export Scheduler Setup.
-
Select the New Data Table Export Schedule option, which is located at the bottom of the scheduled exports list. You can also select a scheduled export to view the export parameters.
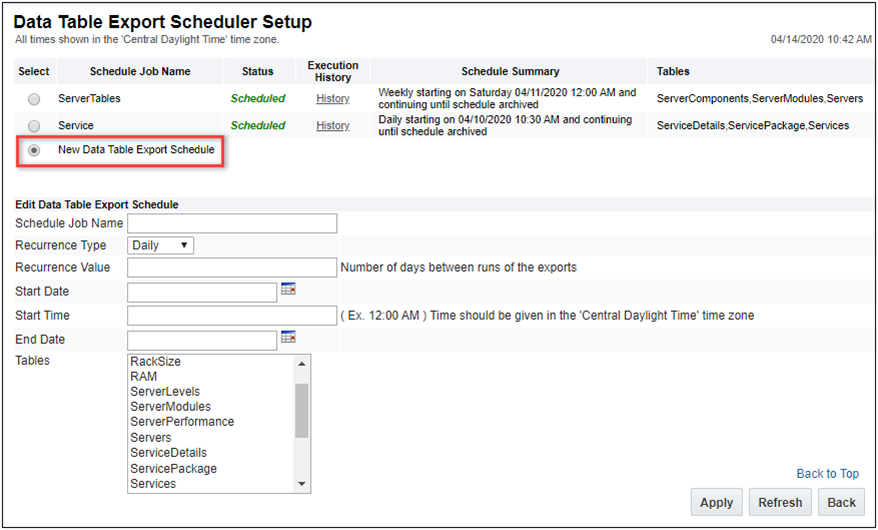
- Enter the Schedule Job Name.
- Select Daily, Weekly, or Monthly Recurrence Type.
- For Daily recurrence types, enter the Recurrence Value.
-
Enter the Start Date.
- For weekly recurrences, the export occurs on the same weekday as the start date.
- For monthly recurrences, the export occurs on the same day of the month as the start date.
-
If a monthly export start date is scheduled at the end of the month and that day is invalid for any future months, the export will be executed on the last day of the month.
For example, If Start Date for monthly export is set to January 31, the export will be executed on the 28th or 29th day of February; and on the 30th day of April, June, September, and November.
- This behavior is different from other monthly recurring jobs that will not run in months where the specified day does not exist.
-
Enter the Start Time.
- Scheduled exports are executed sequentially. When several large exports are scheduled to run at the same time, some of these exports may not execute at the exact specified time.
- The Start Time references the system time, which is displayed at the top of the page. This may be different from the user's profile time preference.
- (Optional) Enter an End Date.
-
Select the Tables to be included in the export.
When all table entries are selected, the selection is interpreted as "select all current deployed tables", not a specified list of tables that were available when the schedule was created.
- Click Apply.
Before a scheduled job has run its first export, it can be removed from the list by archiving it. After the first job has run, the job will be marked as archived, not deleted.
 Suspend a Data Table Export
To suspend a scheduled data table export, complete the following steps:
-
Navigate to the Integration Center page.
Admin Home > Integration Platform > Integration Center
-
Select the Data Table Export Scheduler integration.

- Click Data Table Export Scheduler Setup.
-
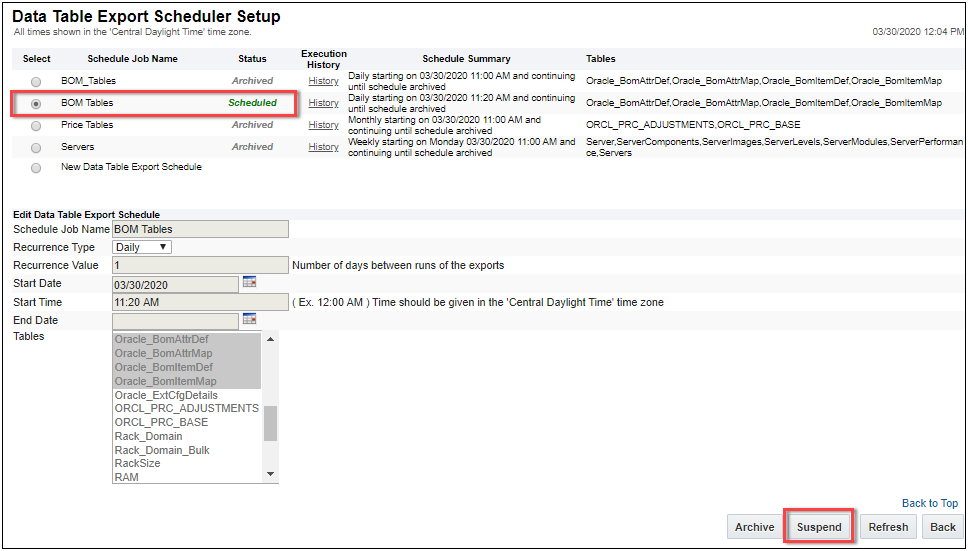
Select a Scheduled export, and then click Suspend.
 Resume a Data Table Export
To resume a suspended data table export, complete the following steps:
-
Navigate to the Integration Center page.
Admin Home > Integration Platform > Integration Center
-
Select the Data Table Export Scheduler integration.

- Click Data Table Export Scheduler Setup.
-
Select a Suspended export, and then click Resume.
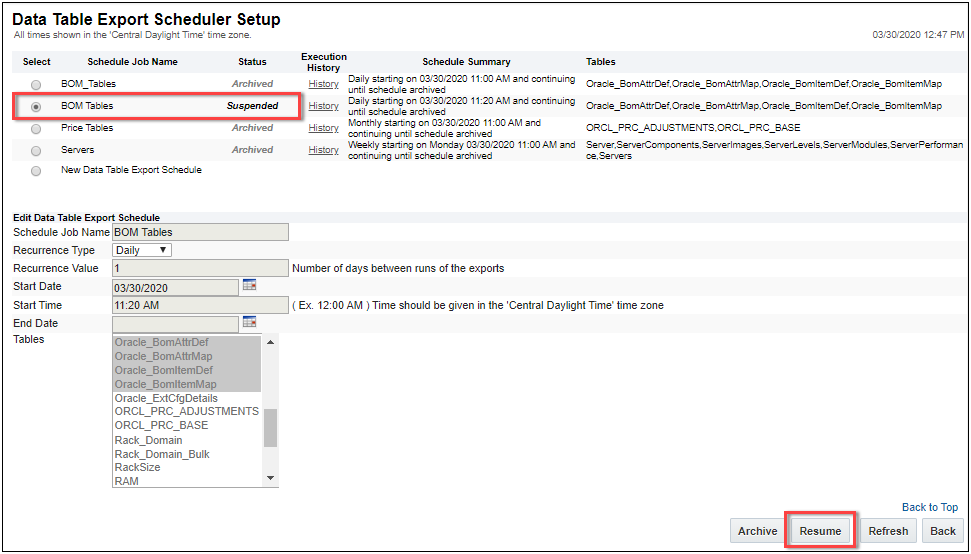
When a suspended export is resumed, the export will execute immediately if the date is past the originally scheduled time. For example, assume a monthly data table export, which is scheduled to run on August 15th, is suspended on August 10th.
- If the data table export is resumed on August 14th, the export will occur on August 15th.
- If the data table export is resumed on September 1st, the export will occur immediately. The next export will occur on October 15th.
 Archive a Data Table Export
To archive a scheduled or suspended data table export, complete the following steps:
-
Navigate to the Integration Center page.
Admin Home > Integration Platform > Integration Center
-
Select the Data Table Export Scheduler integration.

- Click Data Table Export Scheduler Setup.
-
Select a Scheduled or Suspended export, and then click Archive.
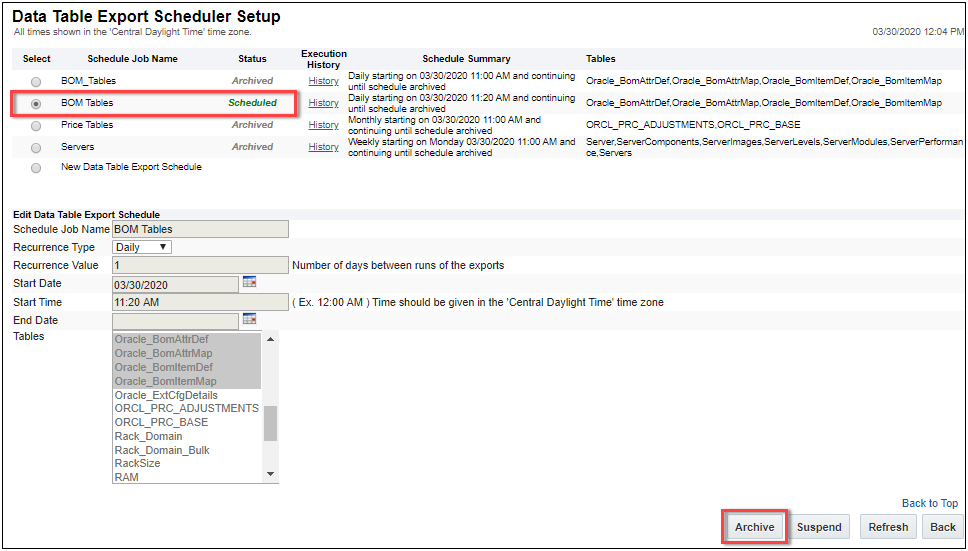
Archived data table export schedules are stored in history for 90 days. Archived data table export schedules with failures are stored indefinitely.
- If an export has never executed, archive will remove the data table export schedule from the system.
- If an export has executed, archive will store the data table export schedule in history for 90 days.
 Scheduled Data Table Export Logs
The export logs show scheduled exports, status, schedule summary, and the tables included in the export.

Administrators can click on the History link to view the execution history for a specific scheduled export. The execution history lists the status, start time, end time, and the destination. The execution history displays up to 60 entries, and each export has two entries. Therefore, for daily exports the history will only display 30 days of execution history.
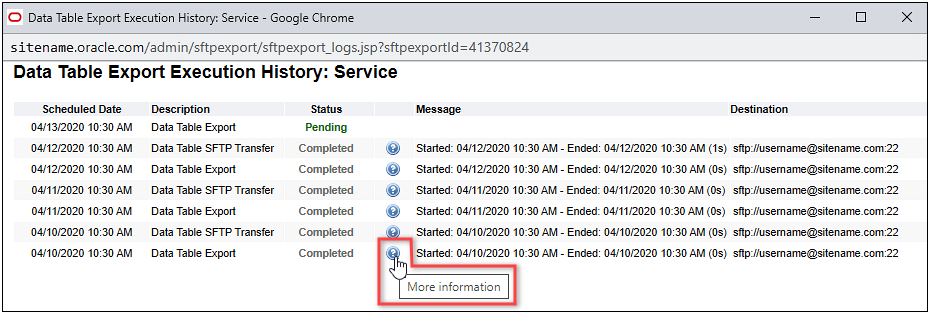
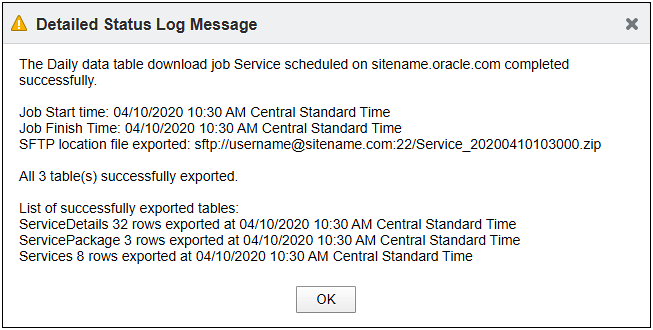
To view more details about a specific export, click on the "More information" icon.
Related Topics
 See Also
![]() Setup a Data Table Export Scheduler Integration
Setup a Data Table Export Scheduler Integration
![]() Scheduled Data Table Export Logs
Scheduled Data Table Export Logs


