DataCube Export Integration
Overview
Customers that have a third party reporting or data warehouse tool, may want to export data from Oracle CPQ to this tool so reports can be run. Once exported, this data can be compared with data from other systems.
DataCube Export gives you a way to transmit Oracle CPQ data, as a text file, to another location. Upon successful completion of a DataCube report's export and transfer to the specified customer SFTP server, the report output generated will be removed from the Oracle CPQ site. If there is an error during the report generation or the transfer of that content to the customer SFTP server, the content will remain until the next scheduled execution of the report.
Host Public Key and SSH Protocols
Oracle CPQ supports the following Host Public Key types: RSA and ECDSA.
The following SSH protocols are supported:
Key Exchange:
- ecdh-sha2-nistp384 (Recommended)
- ecdh-sha2-nistp256
- ecdh-sha2-nistp521
- diffie-hellman-group16-sha512
- diffie-hellman-group18-sha512
- diffie-hellman-group14-sha256
- diffie-hellman-group15-sha512
- diffie-hellman-group17-sha512
- diffie-hellman-group-exchange-sha256
Host Key Algorithms:
- ecdsa-sha2-nistp384 (Recommended)
- rsa-sha2-512 (Recommended)
- rsa-sha2-256
- ecdsa-sha2-nistp256
- ecdsa-sha2-nistp521
MAC Algorithms:
- hmac-sha2-512-etm@openssh.com (Recommended)
- hmac-sha2-256-etm@openssh.com (Recommended)
- hmac-sha2-512
- hmac-sha2-256
Ciphers:
- chacha20-poly1305@openssh.com (Recommended)
- aes256-ctr
- aes192-ctr
- aes128-ct
Beginning in Oracle CPQ 26A, we will only support the four ciphers listed above for outbound integrations to customer managed SFTP servers. If your SFTP server does not support one of these ciphers, upon upgrade to Oracle CPQ 26A your Data Cube Export and Data Table Export Scheduler integrations will no longer work. We recommend you ensure that your infrastructure supports one of the supported ciphers.
 Character Large Object (CLOB)
Oracle CPQ has a maximum (CLOB) property that limits the number of DataCube columns that administrators can enable for a CLOB per Commerce process.
If required, customers can contact Customer Support to increase the limit of allowed CLOB columns.
Enable or Disable CLOB for DataCube Columns
Administrators can use a CLOB attribute in the mapping XML file to enable or disable CLOB on a per column basis. To enable CLOB for a column, set the CLOB attribute to "true". To disable CLOB for a column, set the attribute to "false". Administrators can also omit the CLOB XML attribute. In doing so, the column is not made into a CLOB.

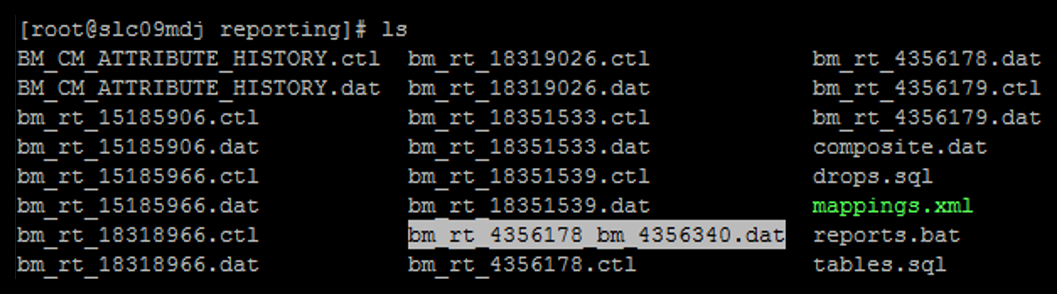
Oracle CPQ creates a data file per CLOB column. The data file contains all data entries for a column, delimited by "<ER>". As shown in the following figure, the data file name follows the following format: <table name>_<attribute name>.dat.
Note: The CLOB files can get very large. As a result, compression time, transfer speed, and the amount of file system space needed on the customer SFTP site are all affected.
Transaction Filters for Mapping XML File
Administrators can place a filter on the mapping XML file for a process data column, which can have no filter, one filter, or multiple filters. Each filter contains the attributes shown in the following table.
|
filter type
|
The filter type can be set to
either "include" or "exclude"
|
|
attribute var name
|
The name of a data column
|
|
operation
|
The supported filter operators
are:
equal, less, lessEqual, greater, greaterEqual, contains, in, between
Also the or conjunction operator is supported between filters.
Filters with the in and between operators ignore empty values in the var_name field, which may cause unexpected results:
- "include" filter types will not contain items where the
var_name field is empty.
- "exclude" filter types will contain items where the
var_name field is empty.
|
|
value
|
The value must be literal.
|
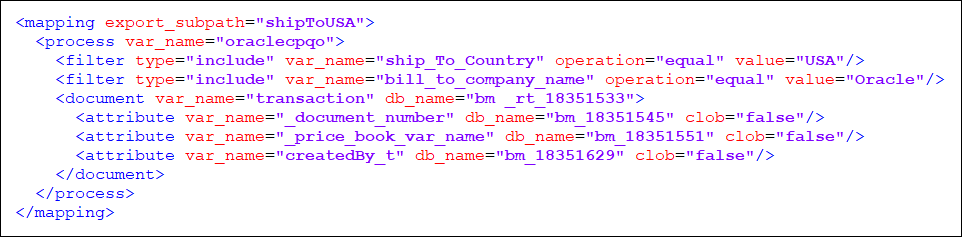
A single CPQ attribute cannot be mapped to multiple database fields in the Mapping XML File.
In the following Mapping XML File with Filter Attributes sample, all Transactions with "_ship_To_country" set
to "USA" and "_bill_to_company_name" set to "Oracle"
are included in the DataCube report.
DataCube Export File Location (export_subpath)
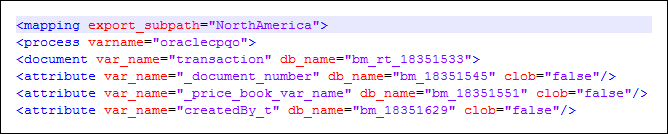
The DataCube mapping XML file contains an "export_subpath" attribute under the reporting root directory. This attribute allows administrators to name the folder where DataCube reports are stored. As shown in the below example, the folder is a sub directory of the "reporting_root" folder. The folder also specifies the sub directory that a reporting system sends a report during export.
For example: Assume an administrator creates a DataCube integration in the Integration Center, sets the "Remote Directory" to '/my/reports', and uses the mapping XML file for a particular report to set export_subpath = "NorthAmerica". After generating the report, it is zipped and sent to a remote server in the /my/reports/NorthAmerica/ directory.
Note: When an administrator specifies an invalid folder name, a warning appears in the error log and DataCube reports are stored in the <reporting_root> folder.
Using Transaction Arrays in DataCube Export
Beginning in Oracle CPQ 23D, CPQ will support exporting transaction arrays in DataCube exports. Main and sub-document transaction arrays and array set attributes can be added to the DataCube XML mapping file. Likewise, the default generated sample mapping.xml file now includes all array sets and array set attributes for the specified process. DataCube exports also support filtering of transactions based on the criteria provided for the array set attributes.
For example, the following DataCube XML mapping file includes a main document array set (services_c) and a sub-document array set (shippingOptions_c). The <array_set> tag is used to define the transaction arrays. The example filter (highlighted in green) will only export records where the “region_c” attribute values are “North America”.
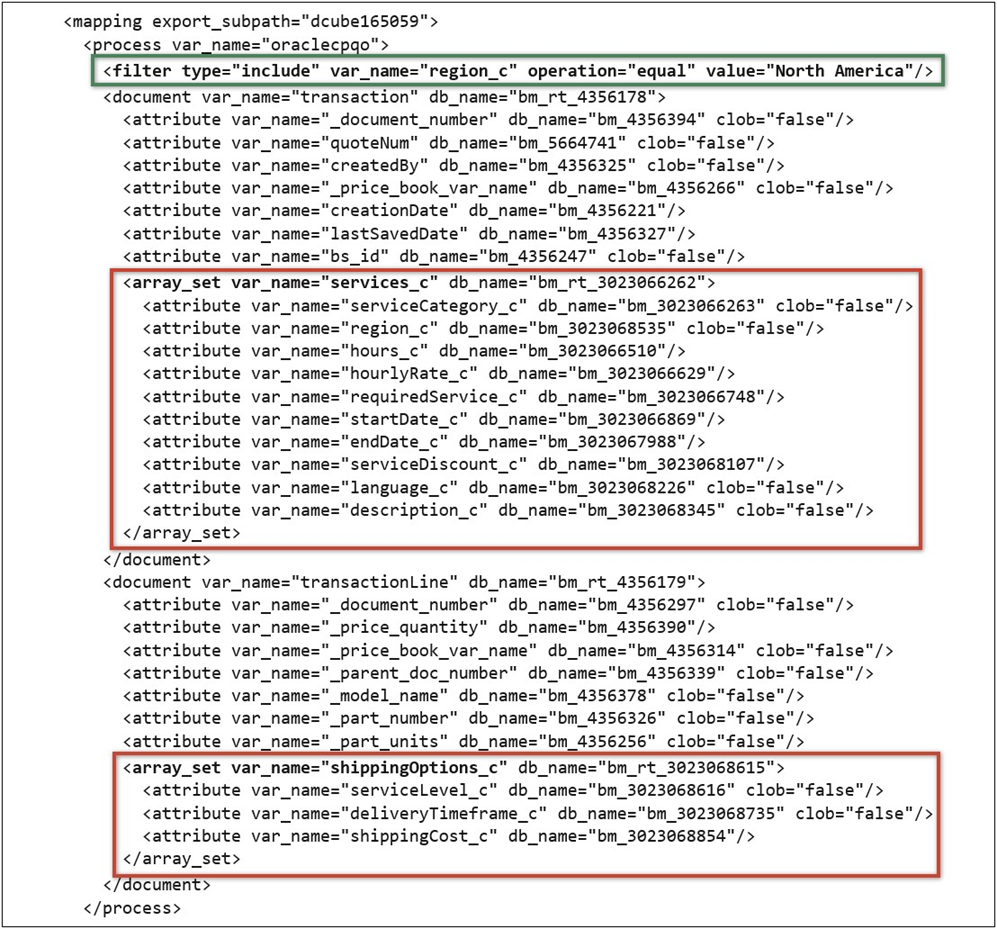
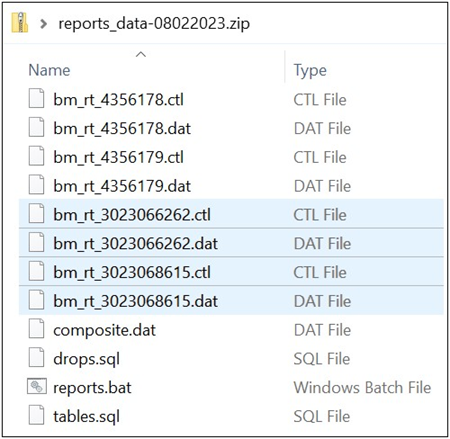
Exported zip files will include .ctl and .dat files for each transaction array listed in the XML mapping file. The following example highlights the services_c (bm_rt_3023066262.ctl and bm_rt_3023066262.dat) and shippingOptions_c (bm_rt_3023068615.ctl and bm_rt_3023068615.dat) transaction array files included in the DataCube export.
Administration
Set Up the DataCube Integration
The Integration Center contains a DataCube integration type, which allows administrators to control their own SFTP and database credentials. DataCube output files are sent to a remote server using the following information entered in the Integration Center when configuring a DataCube integration.
- Navigate to the Integration Center.
- Click Admin to go to the Admin Home Page.
Click Integration Center in the Integration Platform section.
The Integration Center page opens.
-
Select DataCube Integration from the Type menu.
The DataCube Reporting Setup appears
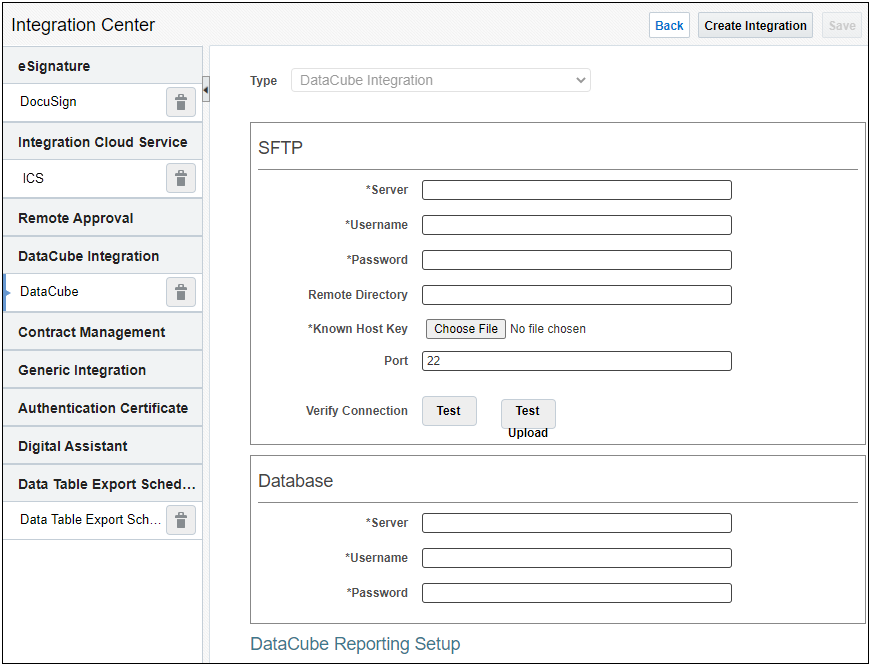
- Set the following SFTP parameters:
Server: The name of the SSH server to which DataCube reports are sent.
Username: The login name to use when connecting to the SSH server.
Password: The login password to use when connecting to the SSH server.
Remote Directory: The directory under which all DataCube reports are sent.
- A blank value will default to the user's login directory.
- Known Host Key: The upload file with the Known Host Key.
The Known Host Key format is the truncated OpenSSH format (as produced by
ssh-keygen)
<key-type>(SPACE)<key-data>where
<key-type> is
ssh-rsa or one of the supported EC formats (e.g.
ecdsa-sha2-nistp256,
ecdsa-sha2-nistp384, or
ecdsa-sha2-nistp521) and
<key-data> is Base64 encoded of raw public key data from
ssh-keygen tool.
For example:
ssh-rsa AAAAB3NzaC1yc2EAA... and
ecdsa-sha2-nistp256 AAAAE2VjZHNhLXNo...If you don't have the
Known Host Key, log a Service Request on
My Oracle Support.
Port: The port number to use when connecting to the SSH server.
- A blank value will use the SSH default port 22.
- Set the following Database parameters:
Server: The database server that the DataCube report's SQL will run on.
Username: The login name to use in the DataCube report's SQL.
Password: The login password to use in the DataCube report's SQL.
The database parameter fields must be filled in. This information indicates the database to import the DataCube into. If you do not have a specific database for the DataCube import, you can enter dummy data into the fields as this information is irrelevant for your use case.
The DataCube extraction process will create a reports.bat batch file. This .bat file will format a sqlplus import command using the information entered in the Database parameters section so the file can be processed directly by the database server. Depending on the database type (SQL/ No SQL), additional steps may be required to process the data and insert to the database server. The database information is not used to create a connection to the database server.
- Click Save.
-
Click Test to verify your connection.
- Click Test Upload to test file upload. A successful file upload test displays a Test Connection Passed message. The remote server is sent an SFTP test file named
CPQ-SFTP-TEST.TXT and contains a UTC timestamp (i.e. 2022-05-06T16:02:59.170Z).
If you run into issues setting up the DabaCube integration, log a Service Request (SR) on My Oracle Support and provide the following information:
- The Oracle CPQ server URL
- The URL of the SFTP server
- Credentials for the SFTP server
- A port (if a non-standard port is being used)
Setting up DataCube Export
- Navigate to the Processes page.
- Click Admin to go to the Admin Home Page.
Click Process Definition in the Commerce and Documents section.
The Processes page opens.
If DataCube Export is enabled, a DataCube Reporting button appears on the Processes page.
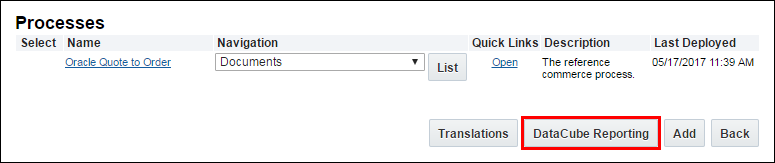
Note: When administrators enable DataCube export, a DataCube Reporting button displays on the Processes page. In prior releases, the name of this button was Reporting.
If you do not see the DataCube Reporting button, contact your Oracle CPQ application sales representative to evaluate your access to the DataCube Export feature.
- You will need to specify where (which third party system) to send the files. The files are usually transmitted via SFTP.
- You will also have to obtain encryption and decryption keys.
-
Click DataCube Reporting.
The Reporting Setup page opens.
-
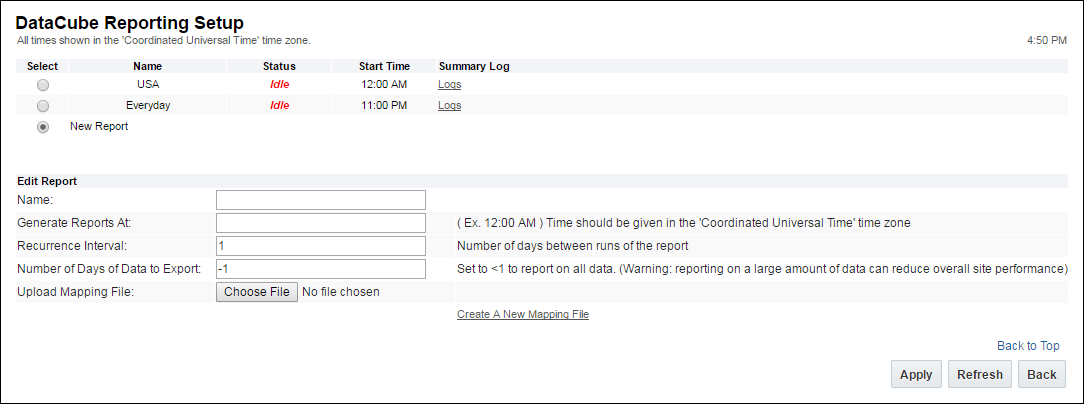
Click New Report.
Administrators can schedule multiple DataCube reports. Each report can have its own mapping XML file and its own scheduled time, reporting period, export location, CLOB attributes, and defined filter. Filtering Transaction data from a DataCube allows administrators to schedule multiple DataCube reports with each report containing different data.
- Enter a Name for the report.
-
Enter the time in the Generate Reports At field.
The system time displays in the upper right of the page. The time zone displays in the upper left of the page. A Recurrence Interval field also displays on the DataCube Reporting Setup page. Use this field to specify the number of days between each report generation cycle.
-
Enter a number in the Recurrence Interval field.
Use this field to specify the number of days between each report generation cycle.
- Enter a Number in the Number of days of data to export field.
-
Click Create a New Mapping File to download the default mapping XML.
The XML will look something like this:
-
Edit the mapping file in an XML editor.
- The XML will tell you which data is included and what files it's placed in to, as well as the variable name of the columns.
-
Update the variable names for the database ID fields.
- There should be no additional changes.
- See below, in the sample XML, for an example of the relationship between Commerce Attributes and the 3rd party database field IDs.
- Save the completed mapping file.
- Click Choose File next to the Upload Mapping File button to upload the file into CPQ.
- Click Apply.
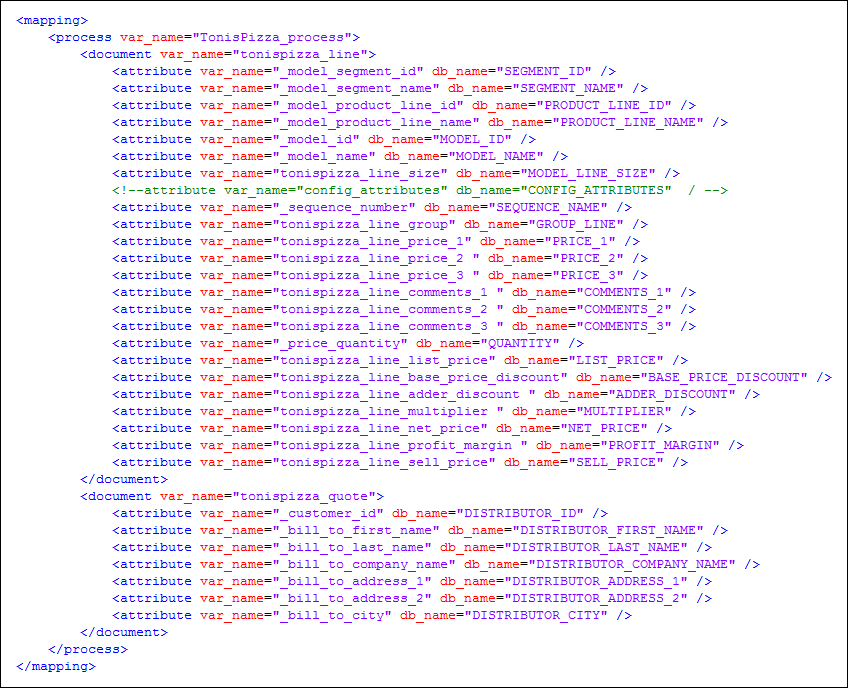
Example XML (Upload)
- This is a sample snippet of XML and does not represent what might be included in your mapping file
- The variable db_name represents the customer field and will have to be populated for each corresponding Oracle CPQ attribute.
DataCube Reporting Logs
- Navigate to the Processes page.
- Click Admin to go to the Admin Home Page.
Click Process Definition in the Commerce and Documents section.
The Processes page opens.
- Click DataCube Reporting.
-
Select the Logs link next to a specific report to open.
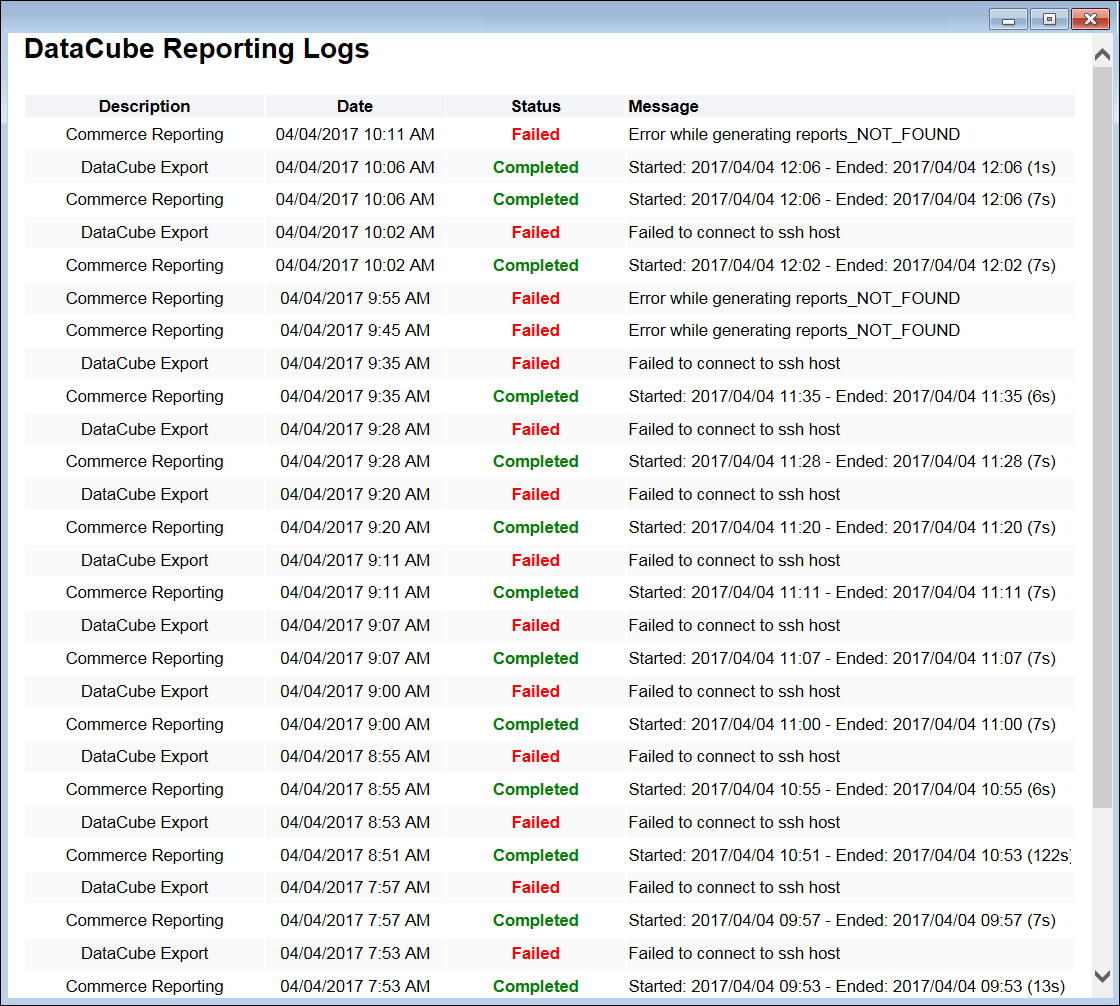
The DataCube Reporting Logs window appears.
- This page summarizes the generation and export of the report over the past seven days.
- In the Description column, "Commerce Reporting" indicates report generation and "DataCube Export" indicates the export of the report.
- Each log entry contains a Status: Running, Completed, or Failed.
- A short message details the start time, end time, and duration of completed tasks. For failed tasks, the main cause for failure displays. For additional details, administrators can refer to the error logs (bm.log).
Notes
Use caution when naming data tables. CLOB data files are a concatenation of the table name and column name.
-
Table Definition 1:
<document db_name="table" ....> and contains CLOB column <attribute db_name="abc" clob="true"...>.
This generates a data file for the table named "table.dat" and a CLOB column named "table_abc.dat".
-
Table Definition 2:
<document db_name="table_abc"...>.
The table’s data file name will conflict with the above CLOB data file. As a result, one data file will overwrite the other.
Notes:
-
Any existing DataCube reports on a site that do not have DataCube reporting turned on will be put into a suspended state.
-
The var_name parameter in the mapping file needs to match the variable name of the Oracle CPQ attribute exactly (including capitalization).
- Performing a "contains" filter operation may not always work. The data column contains the first 100 characters of what may be a larger value. If the searched content exists in the first 100 characters, the "contains" operation works. Otherwise, the "contains" filter operation may not work as expected.
-
In most cases, the mapping XML file ignores invalid information, and the invalid information does not cause a report to fail. By setting the logging level for DataCubes to WARN, the DataCube logs messages detailing why and when the mapping XML file ignores information.
-
An Oracle administrator controls the logging levels. As a result, customers may need to enter a Service Request (SR) on My Oracle Support to have the logging level changed to WARN.
-
DataCube export can impact end-user performance. To prevent adverse effects, Oracle CPQ has limited the number of DataCube exports to 5 jobs per day.
Oracle recommends specifying a different "export_subpath" for each scheduled report.
- If multiple reports have the same "export_subpath" value, there is no guarantee a generated report will work properly or contain the desired data. Since some of files will use the same file name, multiple reports with the same directory will overwrite each other.
- If multiple reports run in the same day with the same path, the reports will overwrite each other on the remote server. This is because the name of the zip file is the same for all reports that run in a given day (<host company name>_reports_data-<date in MMddyyyy form>.zip).
- Previous versions of DataCube reporting named the compressed report file using the HOSTNAME as the first part of the file name. In Oracle CPQ 2017 R1, the compressed report file uses the Host Company Name as the first part of the file name.
Related Topics
See Also


