Email Designer Loops and Filters
Overview
Loops are used in the Email Designer editor to dynamically expand a section of content by iterating over a set of data. Loops can be added to the following components:
Administration
If a Loop is applied to a Table row and configured to loop over Model Line Items, then a new row will be created in the output for each Model Line Item that is present on the Transaction. Attribute values in each row in the output will correspond to a different Model Line Item on the Transaction, effectively creating a new Table row in the output for each Model on the Transaction.
 Creating a Loop
To add a Loop to a Text Element or Table Row Elements:
- Select the component that the Loop will be added to.
- Click the Loop button (
 ) in the Dynamic Content Bar.
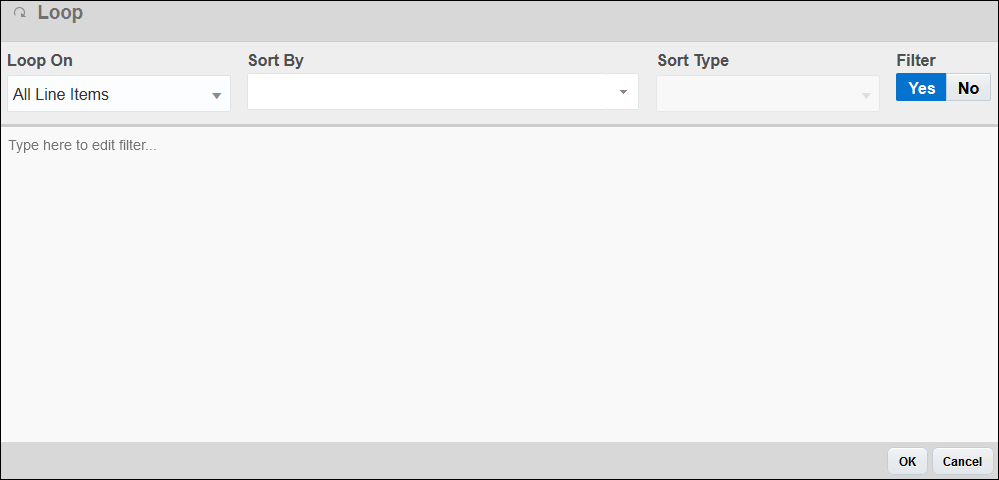
- Select a set of data to loop over from the Loop On drop-down.
- Optionally select an attribute to sort by from the Sort By drop-down.
- Optionally select a sort type from the Sort Type drop-down.
- Optionally add a Filter to the Loop by clicking Yes for Filter. For more information on Filters, see the section Filters.
-
Click OK to save the Loop.
A Loop icon is added to the component in the Template Flow.
 Editing a Loop
Click the Loop icon on the component, or the Loop button in the Dynamic Content Bar when the component is selected, to modify or delete the Loop.
|
Loop On
|
- All Line Items
- Model Line Items
- Part Line Items
|
Yes
|
The set of Transaction data that will be looped over. Selecting All Line Items means that both Model Line Items and Part Line Items will be looped over.
|
|
Sort By
|
All Sub-Document attributes are available to sort by.
|
No
|
The Sub-Document attribute that determines the order in which looped over data will be displayed in the output. If no attribute is selected, looped over data will appear in the same order as the line items appear on the Transaction.
|
|
Sort Type
|
|
No
|
Determines if the Sub-Document attribute being used to sort by will be sorted from lowest value to highest value (ascending) or highest value to lowest value (descending). If the Sub-Document attribute is a Text attribute, ascending will be alphabetical and descending will be reverse-alphabetical.
|
|
Filter
|
|
NA
|
Determines if data will be filtered out and not used in the Loop based on a set of conditions. For more information on Filters, see the section Filters.
|
 Looping Over a Configuration Array Set
A Loop must be nested within another Loop in order to loop over each line in a Configuration Array Set. In an Email Designer template, the only scenario where this is possible is if a Loop is applied to a Text Element that is inside a Table Row that has a Loop applied to it. The "outer" Loop on the Table Row must loop over either All Line Items or Model Line Items in order for the Text Element's Loop to loop over a Configuration Array Set.
To configure the nested Loop to loop over a Configuration Array Set:
- Open the Loop.
-
Select Configurable Array Sets from the Loop On drop-down.
The Configurable Array Set field appears.
-
Select the desired array set from the Configurable Array Set drop-down.

- Click OK to save the Loop.
 Attribute Values and Text Elements in a Loop
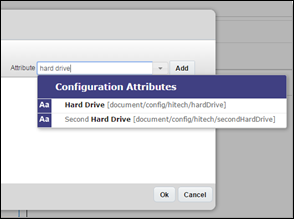
Configuration attribute values can be added to Text Elements that have a Loop over All Line Items or Model Line Items, or are within a Table row that has a Loop over All Line Items or Model Line Items.

 Table Row Looping
Adding a Loop to a Row allows for iterating over Line Items in a Transaction. If a Loop has already been applied to the selected Row, the button is labeled Edit Loop.
-
Click  . A Loop dialog box appears where the items that are looped on can be selected.

- Loop On the following drop-down items:
- All Line Items
- Model Line Items
- Part Line Items
- Sort By Sub-Document (Line Level) Attribute to determine which output Rows will repeat for each Line Item. The Sort By drop-down auto-suggests available Attributes as you type.
- Select a Sort Type from the drop-down:
- Choose Yes or No from the Boolean available to Filter the Loop items. The default value is No.
- When value = No, a Row will be appended to the respective Table for each Line Item of the Loop On type. The content for each output Row will populate according to the content that admins define within the Looped Row.
When the value = Yes, a Row will be appended to the respective Table for each Line Item of the Loop On type, only if the Filter expression evaluates as True for that Row. The content for each output Row will populate according to the content that admins define within the Looped Row.
A large editable Filter text area appears to enter different filters.

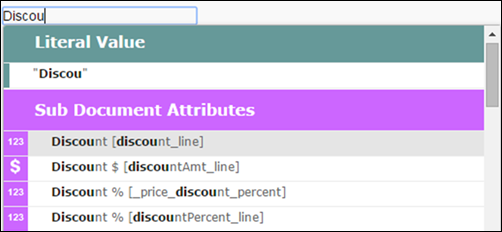
Begin typing and the following list of possible text matches will appear in the drop-down: Literal Values, Operators, Main Document Attributes, Sub-Document Attributes, and User Attributes. These items will be strung together to form a Filter statement. This statement is used to determine which values to filter.
-
Click Save to save the selections and close the dialog box.
The following icon appears in the header bar of Rows with a Loop:

- Click Cancel to close the dialog box and discard any changes made after the dialog box was opened.
- Click Delete Loop to delete the Loop from the Row. This action only appears on already-existing Loops.
Filters
Physically, filtering refers to removing some of the contents from a group of items. You can filter your pool’s water, for example, to remove larger items like leaves. Or you can filter through your photos and remove the ones that are blurry.
In CPQ, filtering removes data from the output so that what appears meets criteria that you define.
For example, you might want to filter a Table row that has a Loop applied to it so that only discounted parts are shown in the output. Without a Filter, the Loop on the Table row will repeat the row for every part on the Transaction. A Filter can be added to the Loop to determine which parts on the Transaction should be looped over.
 Adding a Filter to a Loop
- Open the Loop.
-
For Filter, click Yes.
The Filter pane appears in the Loop window.
-
Begin typing Filter conditions. As you type, a combination of literal values, operators, Sub-Document Attributes, Main Document Attributes, and Configuration Attributes will be suggested. When the desired component is suggested in the list, click on it to add it to the Filter.

-
Continuing adding components to the Filter until the condition is logically complete.

In this example, a line item will only be looped over if its value for the Sub-Document Discount attribute is greater than zero.
- Click OK to save the Filter and the Loop.
Configuration attributes cannot be used in a Filter if the Loop is set to loop over Part Line Items.
Related Topics
 See Also
![]() Looping Over a Configuration Array Set
Looping Over a Configuration Array Set
![]() Attribute Values and Text Elements in a Loop
Attribute Values and Text Elements in a Loop


