Overview
Attribute values that dynamically fill a template with current Transaction, user, and product data are what makes the Document Designer more than just a static template in a word processor. Adding current data to the template—while the output is being created—is a big part of what makes the Document Designer so valuable.

Administration
![]() Where Attribute Values can be Added
Where Attribute Values can be Added
Attribute values can be added to Text and Heading Elements. There are five types of attributes that can be added in the Document Designer:
- Template (Page Number and Total Page Number)
- Main Document (Transaction /Quote-level attributes)
- Sub-Document (Transaction Line/Line-level attributes)
- User (Current user attributes)
- Configuration (Configuration attribute values)
Template, Main Document, and User attributes are always available to be added within Text or Heading Elements. Sub-Document and Configuration attributes can only be added to Text or Heading Elements that have a Loop applied to them, or are within an Element, Layout, or Table row that has a Loop applied to it. For more information on Loops, see the topic Document Designer and Loops.
To add attribute values to a Text or Heading Element:
- Double-click the Text/Heading attribute in the Template Flow to open the Text Element editor window.
-
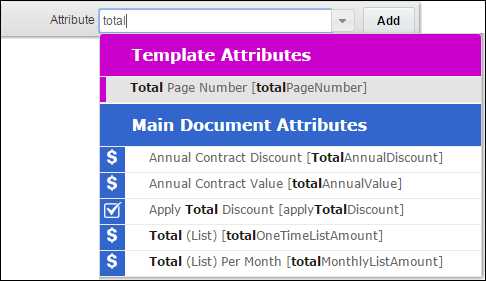
Begin typing the name of the attribute whose value you want to add into the Attribute field. As you type, attributes that are similar in name to what you are typing will be suggested in a drop-down.
-
When you see the attribute you want to add, click the attribute within the drop-down to select it.
The attribute name and variable name now appear in the Attribute field.

- Click Add to add the attribute value to the Element.
- Click OK to save the Element.
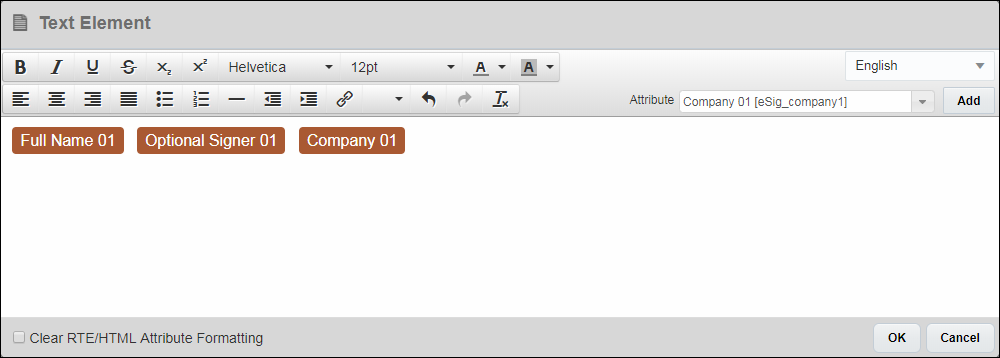
Users can add dynamic data for standard DocuSign tags to Document Designer templates. Each tag defined in the DocuSign application has associated anchor text. Users can place this anchor text in a Document Designer Text Element. When a signature is requested and the document is sent to DocuSign, the anchor tags are interpreted by DocuSign as the locations where a user can provide the relevant information.
The below DocuSign tags are available in the eSignature Set, which holds the eSignature attributes.
- Signature
- Optional Signature
- Initial
- Optional Initial
- Signer Attachment
- Full Name
- Company
- Title
- Date Signed
- Decline
For example: The Document Designer Text Element dialog shown below illustrates anchor text for Full Name 01, Optional Signer 01, and Company 01.
![]() Add Transaction Arrays to Document Designer and Email Designer Documents
Add Transaction Arrays to Document Designer and Email Designer Documents
Transaction Array attributes can be added to Document Designer and Email Designer templates, for both main documents and sub-documents. Administrators can also iterate over the transaction array data set through loop editors, and add corresponding array attributes in relevant template elements.
![]() Adding Main Document Transaction Arrays
Adding Main Document Transaction Arrays
To add a main document transaction array attribute, a loop for the array must be created on a section, table, table row, text element, or XSL snippet element.
Add a Main Document Transaction Array
To add a transaction array to a main document and configure a loop over the array set items, perform the following steps:
-
Navigate to the Document Designer templates.
Admin > Commerce and Documents > Document Designer
- Select the Commerce Process, then click the applicable document link, the Document Designer Editor opens.
-
Select a Section, Table, Table Row, Text Element, or XSL Snippet Element.
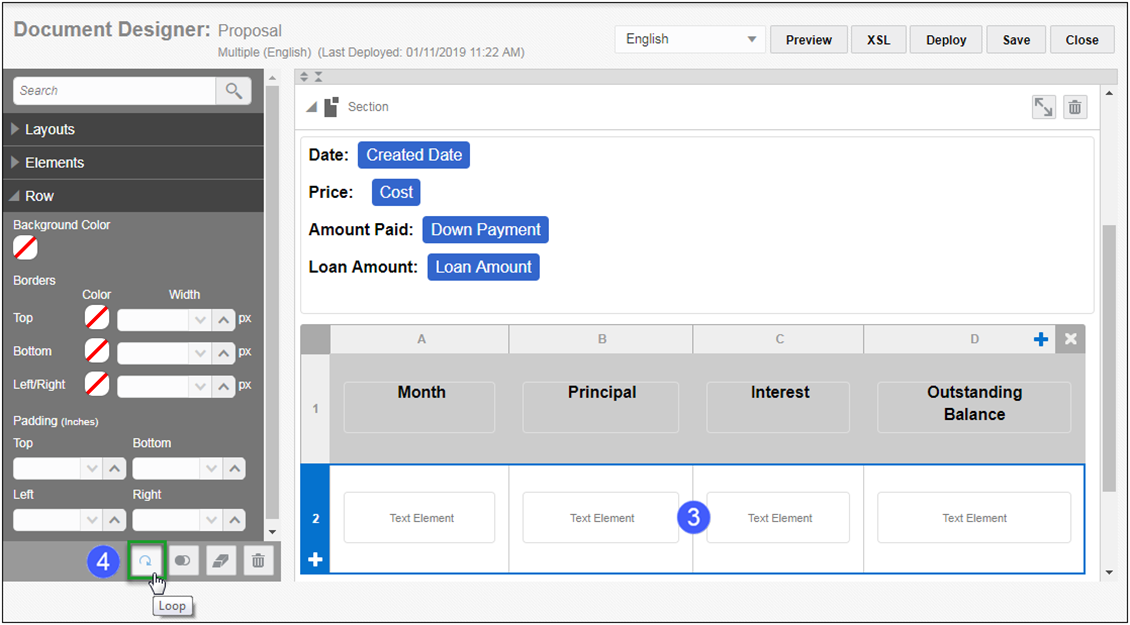
- Click the Loop button in the Dynamic Content Bar. The Loop editor opens.
-
Select Transaction Array Sets from the Loop On drop-down.
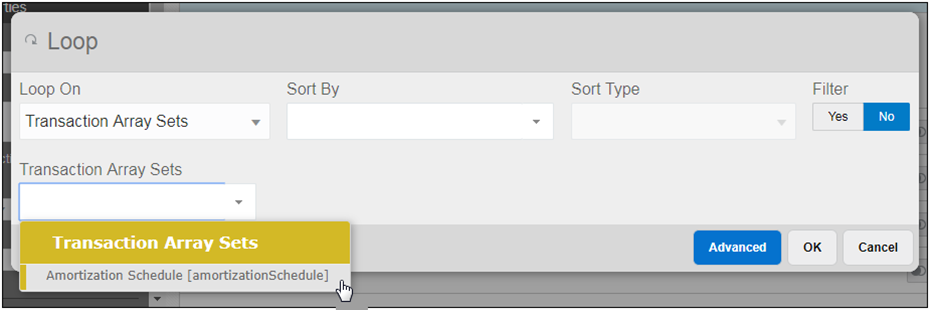
- Select the applicable array set from the Transaction Array Sets drop-down.
- (Optional) Select an attribute to sort by from the Sort By drop-down.
- (Optional) Select a sort type from the Sort Type drop-down.
- (Optional) Add a Filter to the Loop by clicking Yes for Filter, then define the filter criteria.
-
(Optional) Click Advanced to convert a Loop to an Advanced Loop that displays in XSL format.

- Click OK to save the Loop. The Loop icon
 is added to the template element.
 -
Add the Transaction Array Attributes.
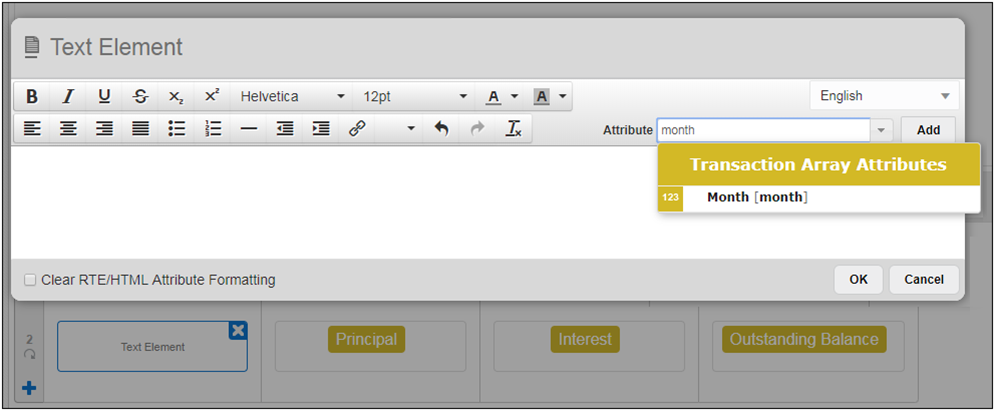
- Save and Deploy the template.
![]() Adding Sub-Document Transaction Arrays
Adding Sub-Document Transaction Arrays
To add a sub-document transaction array attribute, a loop for the array must be nested within a sub-document (i.e. Line Item) loop. The "outer" loop must exist on a section or a table row, and it must loop over Line Items (model or part). The nested loop can be created on a table row, a text element, or an XSL snippet element.
Add a Sub-Document Transaction Array
To add a sub-document transaction array and configure the nested Loop to loop over the array set items perform the following steps:
-
Navigate to the Document Designer templates.
Admin > Commerce and Documents > Document Designer
- Select the Commerce Process, then click the applicable document link. The Document Designer Editor opens.
-
Navigate to the element with a Line Item Loop.
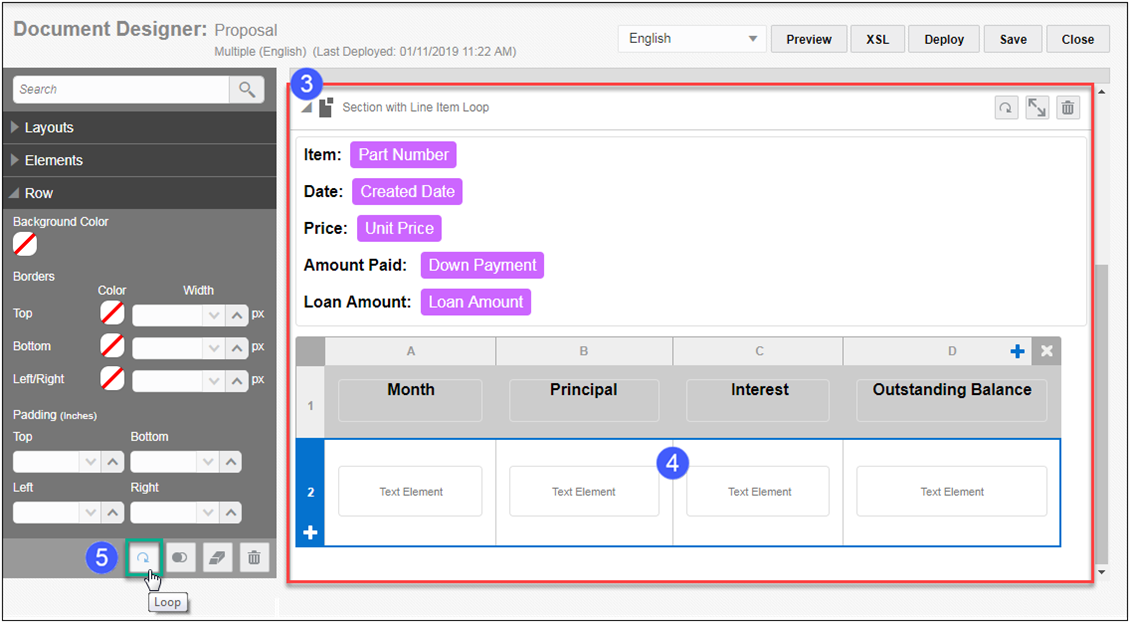
- Select a Section, Table, Table Row, Text Element, XSL Snippet Element within the Line Item Loop.
- Click the Loop button in the Dynamic Content Bar. The Loop editor opens.
-
Select Transaction Line Array Sets from the Loop On drop-down.

- Select the applicable array set from the Transaction Line Array Sets drop-down.
- (Optional) Select an attribute to sort by from the Sort By drop-down.
- (Optional) Select a sort type from the Sort Type drop-down.
- (Optional) Add a Filter to the Loop by clicking Yes for Filter, then specify the filter criteria.
-
(Optional) Click Advanced to convert a Loop to an Advanced Loop that displays in XSL format.

- Click OK to save the Loop. The Loop icon
 is added to the template element.
 -
Add the Transaction Line Array Attributes.
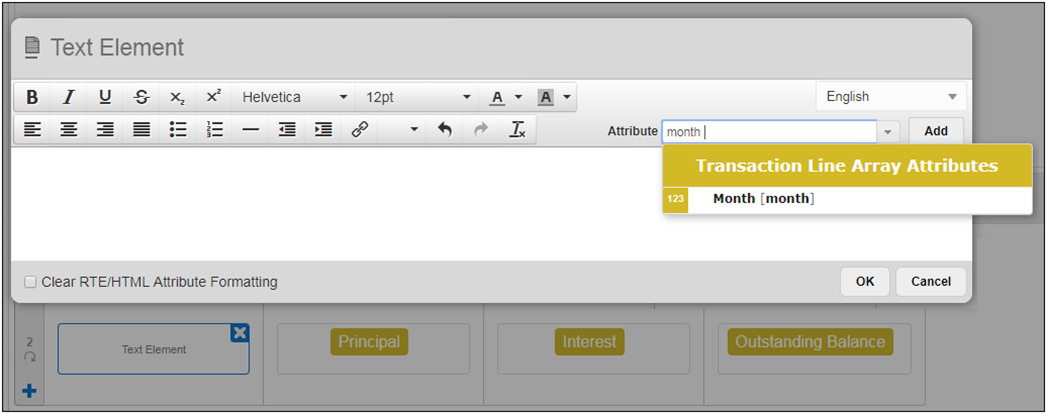
- Save and Deploy the template.
![]() Migrating Document Designer Documents with Transaction Arrays
Migrating Document Designer Documents with Transaction Arrays
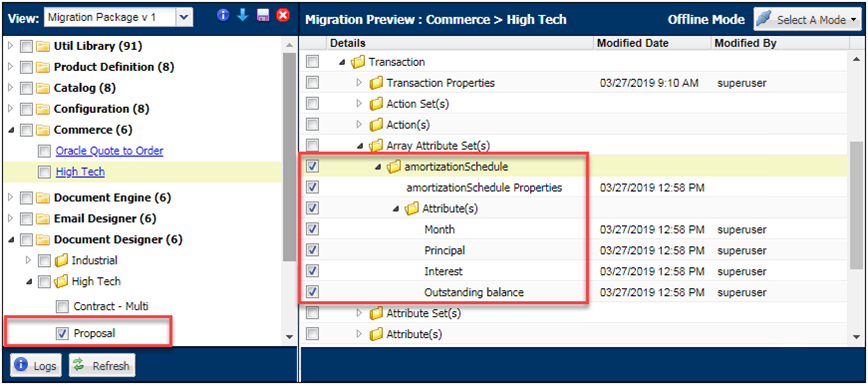
When migrating Document Designer or Email Designer templates that contain transaction arrays, administrators should ensure that the array set and all array set attributes are also migrated.
For example, the following image shows a migration package containing the Document Designer "Proposal" document, note that the "amortizationSchedule" array set and all of its child attributes are also selected.
![]() Headers, Footers, and Page Numbers
Headers, Footers, and Page Numbers
One of the most popular uses for a Footer is to show page numbers. To add page numbers to a Footer:
- If necessary, add a Header & Footer Layout element to the Editor.
- Open the Elements pane.
-
Drag a Text element to the Footer.
The Text Element editor window appears.
-
In the Attribute drop-down, choose Page Number under Template Attributes, and click Add.

The attribute appears in the Text Element dialog box.
- Enter a space, the word “of”, and another space.
- Choose Total Page Number under Template Attributes, and click Add.
-
Make any need changes to the text. For example, you can select the text and center it.

- Click OK.


