Configuration Constraint Rules
Overview
What Are They?
Constraint rules are used to let the user know which values are and are not allowed to be selected in a particular configuration. While a constraint is active, the user can not advance to commerce.
How Do They Work?
A constraint rule has a condition and an action. You can choose attribute values for the condition, which will when true, will trigger an action to be performed. Similarly, you can select action attribute(s) values that can be constrained or allowed. You can also enter a message that alerts the user that the configuration cannot have the selected set-up. The rule becomes inactive when the buyer re-selects values that are appropriate for either the action or condition attribute(s). Constraint actions can be defined as simple-action or table-based actions.
 Multiple Constraint Rules on the Same Action Attribute
In the case of multiple constraints defined on the same action attribute, the rules are first ordered using the following criteria (in sequence):
- Descending order by product hierarchy (model-level first and all-product family level last)
- Descending order by number of rule inputs (rules with single-inputs fire first)
- Ascending order by order number
The sorted rules are then applied on after the other to display the constraint messages in sequence.
 Constraints and Recommendations
Constraints and recommendations can be applied together.
Constraints are applied to all the attributes, followed by recommendations and then constraints will be run again.
The constraints are applied in two passes. The first pass to apply constraints determines the constrained action attributes to which the application of recommendations (if any) is skipped.
The recommendations are applied to only non-constrained action attributes. Constraints are run a second time to determine if any new constraints may have been triggered as a result of running the recommendations. So when the end-user makes changes to the attributes which are constrained and updates the configuration, new recommendations which were not run earlier (due to the earlier constraints) will also run which might trigger new constraints which are caught by the second pass of constraint application.
 AJAX Constraint Rules
Constraint rules can run through AJAX resulting in faster performance and a dynamic user experience in configuration.
AJAX can be enabled for any constraint or hiding configuration rule. Unlike other rules, that are evaluated only if the attributes are set to auto update or if a user clicks the Update action, AJAX rules are evaluated and the action is performed instantly when a user changes any rule input. Input can be condition and action attributes or action inputs. AJAX rules are re-run when a user clicks the Update button.
Notes:
- Constraint rule functionality will remain the same with AJAX. AJAX rules will support advanced condition and actions, table-based rules, and reverse constraint behavior. The exception to this are rules that have arrays as condition/action attributes or action inputs. AJAX constraint rules do not automatically hide the Pricing and Recommended Item sections when the user selects a constrained value. If the user performs an Update action, then these additional sections will be hidden. Also, constraint messages that are displayed below the main content when constraints exist in some other tab are not removed via AJAX.
- Recommendation messages will appear/disappear via AJAX for attributes that are inputs/action attributes of AJAX rules. It should be noted that this does not imply that recommendation rules are fired by AJAX. Recommendation rules will only be fired when the user performs an Update action. However, if a recommendation rule has already fired on an attribute and that attribute is a part of an AJAX rule, then the recommendation value setting and messages will occur via AJAX.
End-User Interaction
With AJAX rules, the end user will experience a faster, more dynamic Model Configuration page.
AVP (Attribute Value Pricing ) will not automatically update is the user selects a constrained value that is constrained through an AJAX rule. Users will see the correct pricing upon performing an Update action.
Administration
 Creating a Constraint Rule
-
 Navigate to Admin > Catalog Definition.
-
Select Product Families in the Navigation column, and click List.
-
For the Product Family for which you want to create a Constraint rule, select Constraints in the Navigation column and click List.
- Click Add to create a new rule.
-
Enter the rule  Properties.
This section is where you will enter basic details about the rule. For example, the name, status and where it will be applied.

| Name |
Enter the name of the rule. This is required. |
| Variable Name |
Enter a variable name for the rule. The Variable Name field populates automatically. Variable names can only contain alpha-numeric characters and underscores. The entry can be changed before saving, but after saving the value is read-only.This is required. |
| Description |
Enter a description, if desired. |
| Status |
Determine the status of the rule:
- Active: Rule is fired when the condition is met.
- Internal: Rule is active only for FullAccess users; it is inactive for all other users.
- Inactive: Rule is not fired, even if the condition is met.
|
| Edit Start/End Dates |
Select the box to open a date selector to set how long the rule will remain in the chosen status. If no duration is selected, the rule will remain on the selected status until you, or another FullAccess user, changes it. |
| AJAX Enabled |
Upon checking this box, you are enabling AJAX functionality for the rule. This means that the rule will run without refreshing the page or requiring an action be performed.
- Prior to 19B, AJAX functionality is only available for Hiding and Constraint rules.
-
Beginning in Oracle CPQ 19B, Recommendation Rules can be AJAX enabled for JET Configuration UIs. AJAX functionality is only provided for JET Configuration UIs, this functionality is not available for legacy Configuration UIs.
|
-
Select the rule  Conditions.

The condition section allows you to select the logic that specifies when a rule should run. There are three options: Always True, Simple Condition and Advanced Condition.
 Configuration Context Attribute
Beginning in Oracle CPQ 24B the Config Operation Context (_config_operation_context) configuration system attribute can be used to identify the operation that initiated the current Configuration session. This read only system attribute will reflect unique values for new configurations, reconfigurations, search flows, and ABO Modify actions.
The Config Operation Context system attribute is available for use in all Configuration Rule type conditions and in BML advanced conditions and/or actions. For example, when a Config Operation Context attribute is selected in a simple condition, the possible values (new, reconfigure, modify_asset, and search_flow) can be selected in the Values drop-down.
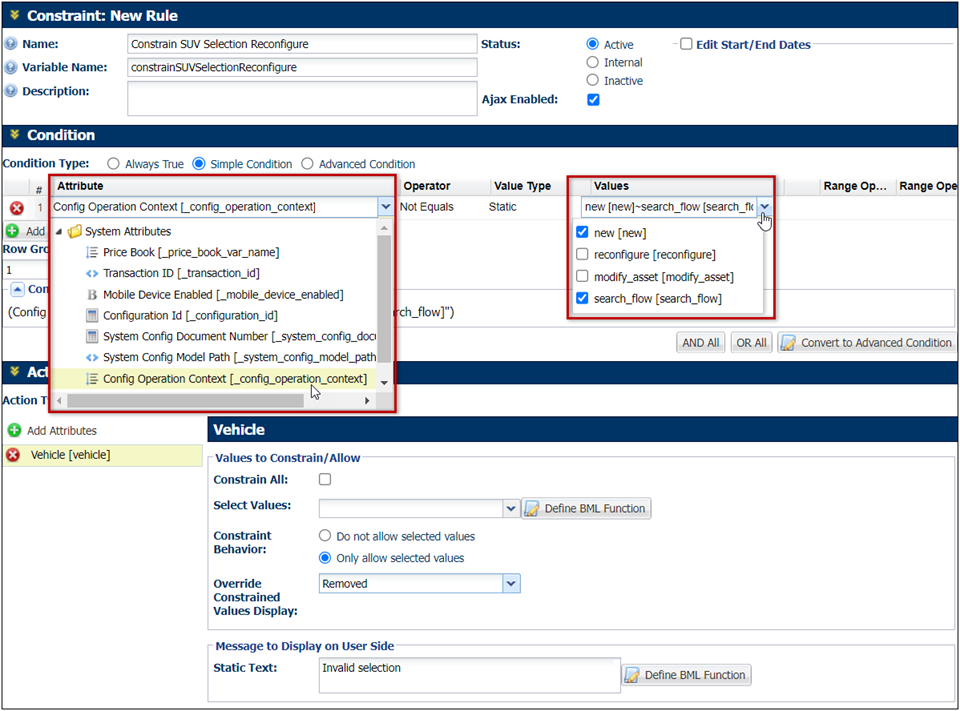
The Config Operations Context attribute can be used in Configuration Rules to allow Administrators to better manage the configuration experience if necessary. For example, if an administrator would like to define a rule that should only execute for a new configuration, or resulting from a modify asset action, they can use this new attribute to control execution.
- Choose to apply the rule to either Configuration, Selection, or Both. Configuration is the default selection.
- Choose the Action Type:
- Standard: Use the UI to add attributes to constrain or allow.
- Table Lookup: Select values to constrain or allow from a Data Table. See the topic Table-Based Rules for more information
- Click Add Attributes to open the Action Attribute window.
-
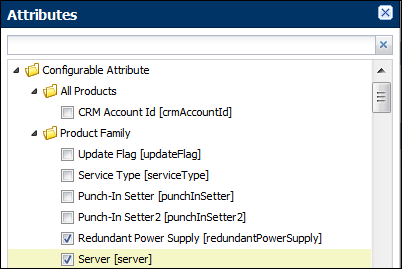
Select attributes from the Attributes dialog box and click Add.
-
Select the values to constrain:
 Constrain All
-
Check Constrain All.
-
Select the Override Constrained Values Display option.
The Constrained Values Display Override is only available for the JET Configuration UI.
-
No Override: Constrained attribute values are define by the attribute options.
-
Disabled: Constrained attribute values will be disabled.
-
Removed: Constrained attribute values will be removed from the menu.
-
Normal: Constrained attribute values will appear in menus without being marked.
-
Strike Through: Constrained attribute values will be struck through (i.e. crossed out).
The Strike Through option is not available for Image Menus.
 Selected Values
-
Leave Constrain All unchecked.
- Select the Constraint Behavior:
- Do not allow selected values (constrain)
- Only allow selected values (allow or reverse constraint)
-
Check the applicable menu items from the Select Values drop-down.
-
Select the Override Constrained Values Display option.
The Constrained Values Display Override is only available for the JET Configuration UI.
-
No Override: Constrained attribute values are define by the attribute options.
-
Disabled: Constrained attribute values will be disabled.
-
Removed: Constrained attribute values will be removed from the menu.
-
Normal: Constrained attribute values will appear in menus without being marked.
-
Strike Through: Constrained attribute values will be struck through (i.e. crossed out).
The Strike Through option is not available for Image Menus.
-
Type a message in the Static Text box or click Define BML Function to create a dynamic message.
This message displays to the users only when the rule is run.
-
Click Update and Back to save and return to the Constraint: Rules List page.
Uses Case
 Override Constrained Value Display
Customers can constrain the same Configurable Attribute differently depending on different conditions. Administrators can override the "Constrained Value Display" option defined in single select and multi-select menu-type configurable attributes within the action area of a constraint rule. For example, a customer has two constraint rules that have different Override Constrained Values Display options. The first constraint rule has the Override Constrained Values Display set to Disabled for "Sports" and "Luxury" vehicle values when the "Outright SUV buy" option is selected.
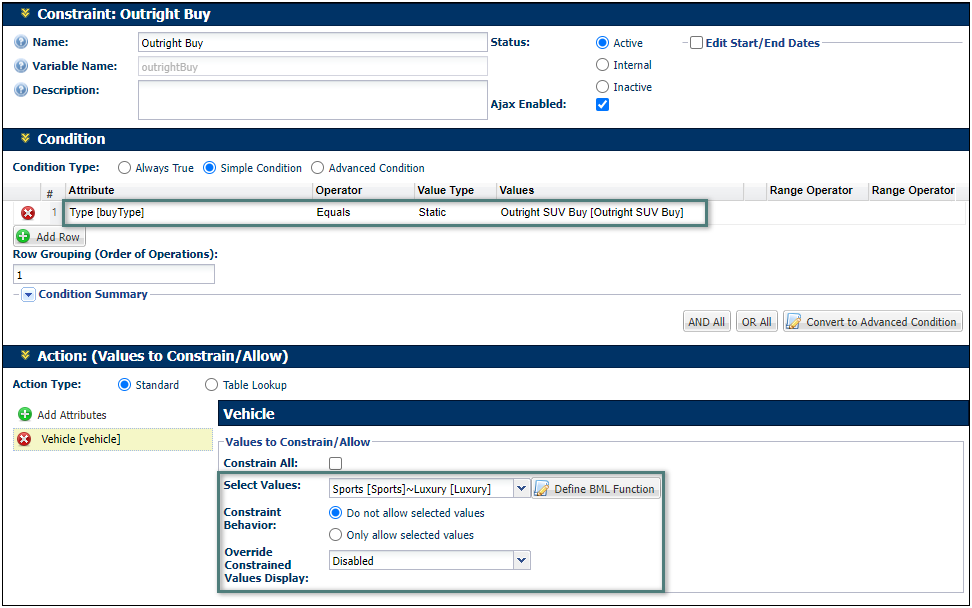
When a sales user chooses the "Outright SUV buy" option, the Sports and Luxury options are grayed out (i.e. disabled).

The second constraint rule has the Override Constrained Values Display set to Normal and user message displayed for the "Luxury" vehicle value when the "SUV Lease" option is selected and the "Expense Limit" is less than $1000.
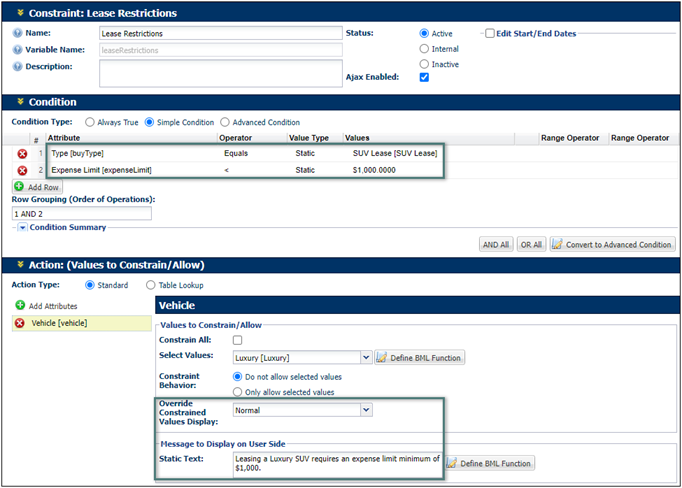
When a sales user chooses the "SUV Lease" option, sets the "Expense Limit to $500, and selects the Luxury option, the option appears normal, but the vehicle options are outlined in red to indicate an error and the defined error message is displayed.
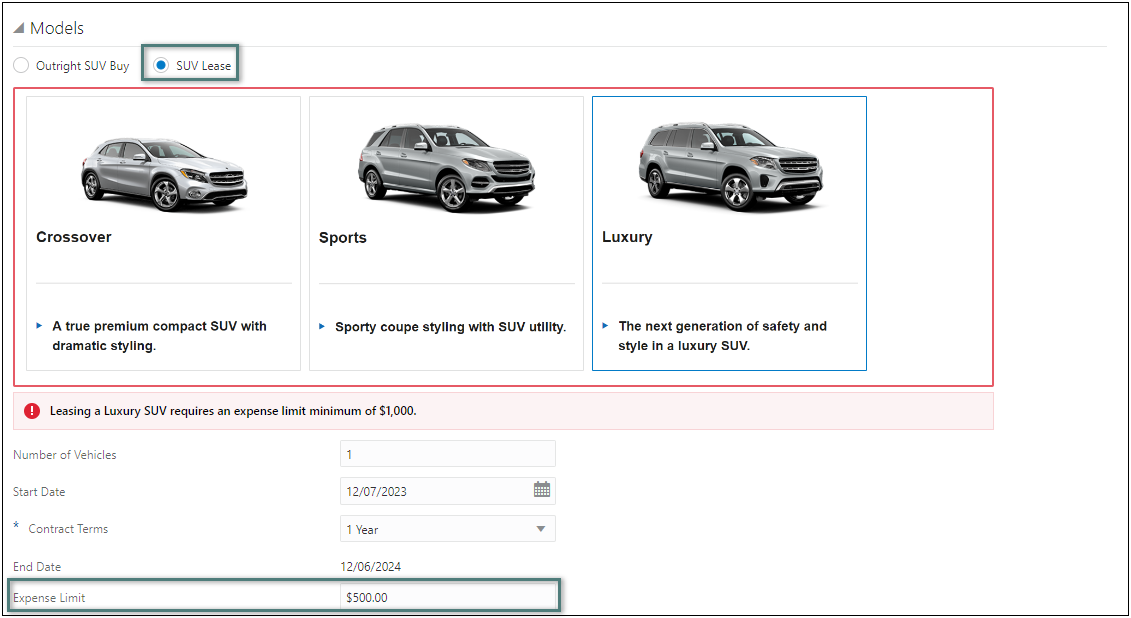
The Constrained Value Display Override is applied from the last constraint rule executed on the attribute. The order is defined by the order of the rules on the Constraint: Rules List page.
Notes
Notes:
-
AJAX Rules are supported on Search Flow and Model Configuration pages.
-
AJAX Rule with fewer action attributes - AJAX rules update the page using JavaScript post page loads. Because of this, it is important to limit the number of attributes affected per AJAX call.
-
If an AJAX rule fails to evaluate properly, the action will be timed out for 2 minutes. The end user can continue to interact with the page after that.
-
AJAX Rule without SOAP/ Table Queries – AJAX rules are not recommended to be used on rules with a large amount of BML, SOAP calls, or table queries as it could adversely impact performance and hence, end user experience.
-
AJAX rules are not supported for the default wizard.
-
AJAX rules are meant primarily for User Interface (UI) clicks and get triggered when the parent attribute is modified. Including when using AJAX/access rules, the "read-only" behavior is triggered when the UI click satisfying the condition is done; therefore, the field can be modified first and then the UI click can make it read-only and still the modified value can be saved.
-
AJAX rules are designed for UI behavior and do not provide the functionality to honor access rules in API and import. For APIs/import line items a validation rule should be written to prevent updating/overwriting the value on a column based on conditions.
Related Topics
 See Also
![]() Multiple Constraint Rules on the Same Action Attribute
Multiple Constraint Rules on the Same Action Attribute
![]() Constraints and Recommendations
Constraints and Recommendations
![]() Override Constrained Value Display
Override Constrained Value Display


