Shopping Cart Administration
Overview
Beginning in Oracle CPQ 22B, CPQ no longer supports shopping cart feature for Legacy Configuration UI. For more information, refer to Deprecation Announcements.
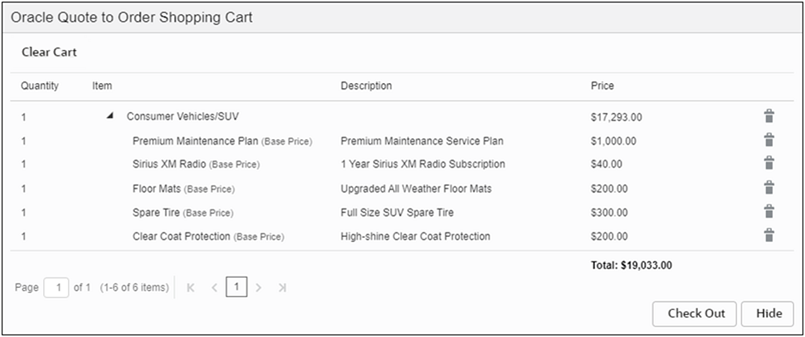
The shopping cart displays the total number of items in the cart and the total cost for those items. Users can add multiple products to a shopping cart before checking out. Users can selectively checkout items from the shopping cart. Upon checkout, all data is carried into the newly created commerce transaction, where the products added to the shopping cart show up as line items. Users can also add items to existing quote from the shopping cart, similar to the "Add from catalog" functionality in commerce.
A shopping cart is available per Commerce Process. Administrators can enable the shopping cart for a Commerce Process in the Shopping Cart Editor. By default, this functionality is disabled.
 User-Side Shopping Cart

| Description |
The description field is mapped to the Model Name for a Model and a Part Number for a part. The user cannot edit this field.
On an application supporting Price Books, the Price Book is displayed in parentheses next to the part number under the description column.
|
| Price |
The price field contains the Total Price for a configured Model.
- If the user adds a part and Price Books are not available, then the Price field contains the price associated with the part.
- If Price Books are available, the Price field contains the price of the part from the chosen Price Book.
- For a recommended item, the price field contains the recommended price. The end user cannot edit this field in the shopping cart.
- To view pricing methods that could impact the prices of shopping cart items, refer to Pricing Overview.
|
| Quantity |
For recommended items and for items chosen in the Multiple Parts Buy page, this field is populated by the recommended quantity / user specified quantity. |
| Cart Total |
The Cart Total provided in the Shopping Cart is a sum of item quantity multiplied by the unit price for each item. It does not allow advanced functions. |
Administration
Enable and Display Shopping Cart
Administrators perform the following tasks to enable and display the Shopping Cart:
 Enable Shopping Cart for a Commerce Process
Customers can add one Shopping Cart per Commerce Process. The Shopping Cart is disabled by default and administrators must enable this feature.
-
Navigate to Admin > Commerce and Documents > Process Definition.
-
Select Shopping Cart from the applicable commerce process navigation drop-down, and then click List.
-
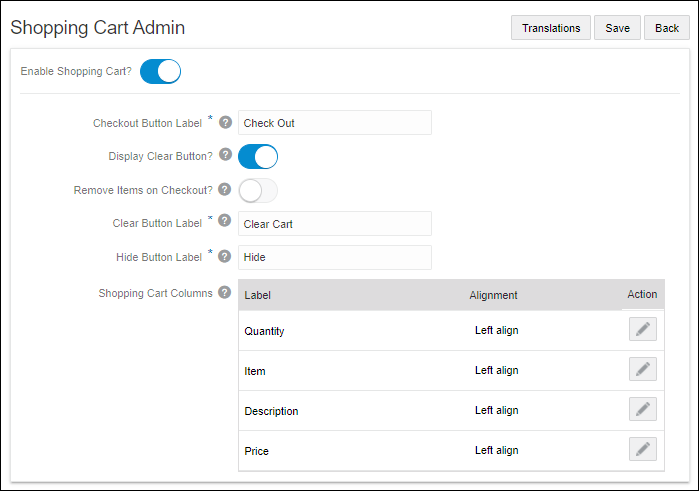
Set the Enable Shopping Cart? option.

-
Set the following properties:
-
Check Out Button Label - Enter the text that will display on the checkout button.
-
Display Clear Button - Check to enable the Clear button, which allows the user to remove all items in their Shopping Cart at once.
-
Remove Items on Checkout - Check to have selected items removed from Shopping Cart when they are added to a quote.
-
Clear Button Label - Enter the text to be displayed on the Clear button.
-
Hide Button Label - Enter the text to be displayed on the Hide button.
Note: Beginning in Oracle CPQ 22B, users can no longer edit the quantity of shopping cart items. Accordingly, the Editable option has been removed from the Shopping Cart Quantity column on the Shopping Cart Admin page.
- Set the following properties:
Check Out Button Label - Enter the text that will display on the checkout button.
Display Clear Button - Check to enable the Clear button, which allows the user to remove all items in their Shopping Cart at once.
Remove Items on Checkout - Check to have selected items removed from Shopping Cart when they are added to a quote.
Clear Button Label - Enter the text to be displayed on the Clear button.
Hide Button Label - Enter the text to be displayed on the Hide button.
-
If applicable, click on the Edit icon  to modify the Shopping Cart column labels and alignment.
Items can be dragged and dropped to change the order in which columns appear in the Shopping Cart.
-
Enter the text that will display for the shopping cart column label.
-
Select Left, Center, or Right column alignment.
-
Click the Apply icon  to apply your changes.
-
Click Save.
-
 Deploy the applicable Commerce Process.
-
Navigate to Admin > Commerce and Documents > Process Definition.
-
Select Deployment Center from the applicable process Navigation drop-down, then click List.
-
Check the Deploy option, then click Add Event.
 Create a Shopping Cart Process Invocation
After enabling the Shopping Cart for a process, administrators must set up the Shopping Cart invocation in the Process Invocation section. Process Invocation creates buttons that link product catalog pages with Commerce Processes. Invocation rules are evaluated on adding items to the cart and not on checking out.
-
Navigate to: Admin > Commerce and Documents > Process Invocation.
-
Click on the applicable page link. (e.g. Model Configuration, Parts Search Results).
- Click Add on the Action List page.
- Enter the Name for the process invocation button (e.g. Add to Cart).
- Optional, enter a Description.
- Select the Shopping Cart Action Type option.
- Click Add on the Create/Edit Action page.
- Select Access Rights from the Shopping Cart Navigation menu, and then click List.
- Select the Company Type.
Select applicable User Types, and then click the > toggle to add User Types to the Access Rights panel.
Repeat this step for all desired User Types.
Click Update on the Access Rights Editor page.
-
Select Rules from the Shopping Cart Navigation menu, and then click List.
-
Click Add on the Invocation Rules page.
-
Enter a Name for the process invocation rule.
-
Click Add on the Create/Edit Process Invocation Rule page.
-
Click Back on the Create/Edit Process Invocation Rule page.
-
Click Back on the Invocation Rules page.
-
Click Back on the Action List page.
-
Check the Model Configuration select box.
-
Click Deploy.
 Add Shopping Cart to Navigation Menus
After enabling and deploying a shopping cart within a Commerce Process, administrators must add the shopping cart to navigation menus to make it visible to end-users.
- Navigate to: Admin > Styles and Templates > Navigation Menus.
-
Click List Links next to the Commerce navigation menu.
-
Click Customize Menus.

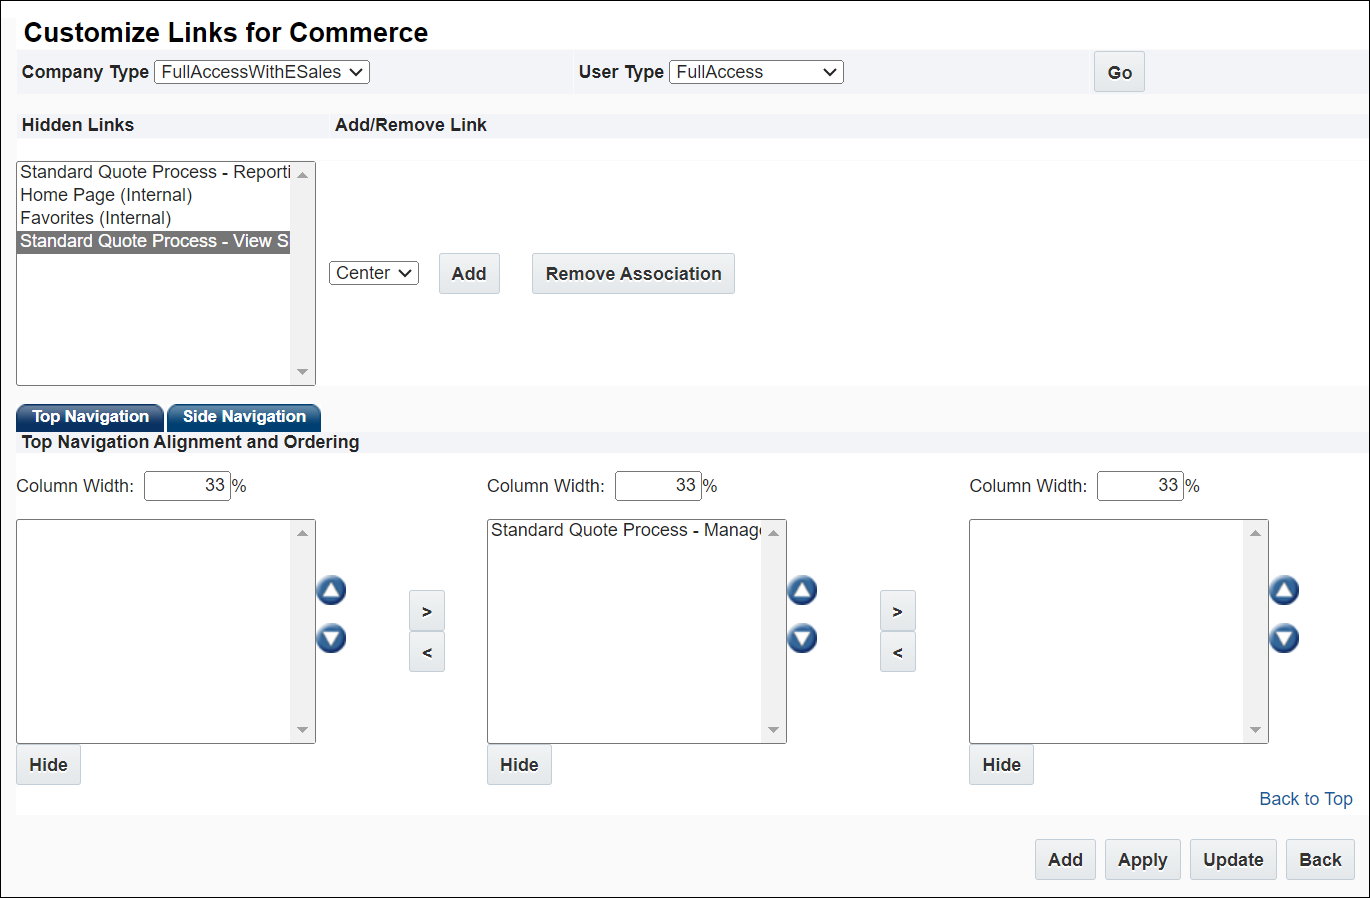
- Choose the applicable Company Type and User Type, then click Go.
-
Select the 'View Shopping Cart' link from under the Hide Links section, then click Add.
Note: The <Commerce Process name> - View Shopping Cart’ is automatically created when a Shopping Cart is enabled.
- Click Update.
Note: If the Shopping Cart is disabled and the Commerce Process is deployed the Shopping Cart will be removed from the navigation menu If you re-enable the Shopping Cart you will need to repeat this procedure to make it visible to end-users.
 Edit Shopping Cart
Perform the following steps to modify the shopping cart feature.
-
Navigate to Admin > Commerce and Documents > Process Definition.
-
Select Shopping Cart from the applicable commerce process navigation drop-down, and then click List.
-
Set the Enable Shopping Cart? option.

-
Set the following properties:
-
Check Out Button Label - Enter the text that will display on the checkout button.
-
Display Clear Button - Check to enable the Clear button, which allows the user to remove all items in their Shopping Cart at once.
-
Remove Items on Checkout - Check to have selected items removed from Shopping Cart when they are added to a quote.
-
Clear Button Label - Enter the text to be displayed on the Clear button.
-
Hide Button Label - Enter the text to be displayed on the Hide button.
Note: Beginning in Oracle CPQ 22B, users can no longer edit the quantity of shopping cart items. Accordingly, the Editable option has been removed from the Shopping Cart Quantity column on the Shopping Cart Admin page.
- Set the following properties:
Check Out Button Label - Enter the text that will display on the checkout button.
Display Clear Button - Check to enable the Clear button, which allows the user to remove all items in their Shopping Cart at once.
Remove Items on Checkout - Check to have selected items removed from Shopping Cart when they are added to a quote.
Clear Button Label - Enter the text to be displayed on the Clear button.
Hide Button Label - Enter the text to be displayed on the Hide button.
-
If applicable, click on the Edit icon  to modify the Shopping Cart column labels and alignment.
Items can be dragged and dropped to change the order in which columns appear in the Shopping Cart.
-
Enter the text that will display for the shopping cart column label.
-
Select Left, Center, or Right column alignment.
-
Click the Apply icon  to apply your changes.
-
Click Save.
-
 Deploy the applicable Commerce Process.
-
Navigate to Admin > Commerce and Documents > Process Definition.
-
Select Deployment Center from the applicable process Navigation drop-down, then click List.
-
Check the Deploy option, then click Add Event.
Note: If the Shopping Cart is disabled and the Commerce Process is deployed, the Shopping Cart will be removed from the navigation menu If you re-enable the Shopping Cart you will need to Add Shopping Cart to Navigation Menus to make it visible to end-users.
Notes
Notes:
-
Shopping Cart is session based, therefore the user will lose all cart contents if he logs out.
- Beginning in Oracle CPQ 22B, users can no longer edit the quantity of shopping cart items. Accordingly, the Editable option has been removed from the Shopping Cart Quantity column on the Shopping Cart Admin page.
-
You can no longer create a transaction from shopping cart items with different currency values. You can only create a transaction using a single currency.
-
It is not possible to remove the Price Book name from the parts description field within the Shopping Cart.
- Shopping cart features do not support BOM Mapping.
-
Beginning in Oracle CPQ 22B, the commerce process variable name "processVarName" is used when creating a shopping cart navigation link instead of the process ID. This simplifies creating shopping cart navigation links, since locating the process variable name is easier than locating the process ID. The new shopping cart URL is:
javascript:viewShoppingCart('processVarName');
If customers have existing shopping navigation links referencing the commerce process ID, they will be updated to the commerce process variable name when upgrading to Oracle CPQ 22B.
Related Topics
 See Also
![]() Enable Shopping Cart for a Commerce Process
Enable Shopping Cart for a Commerce Process
![]() Create a Shopping Cart Process Invocation
Create a Shopping Cart Process Invocation ![]() Add Shopping Cart to Navigation Menus
Add Shopping Cart to Navigation Menus


