Transaction Line Item .XLSX Export and Import
Overview
Export Transaction Line Items to .XLSX File Format
Oracle CPQ provides the ability to export Line Item Grid data to a Microsoft Excel (.XLSX) file on an end user's local computer. End users can export the current Transaction's line item information to run formulas and calculations on the Transaction data quickly and easily.
Note: CPQ supports Transaction Line .xlsx export and import for the Redwood Quote UI and the JET Transaction UI. These features are not supported for the legacy Transaction UI.
 Export Line Items
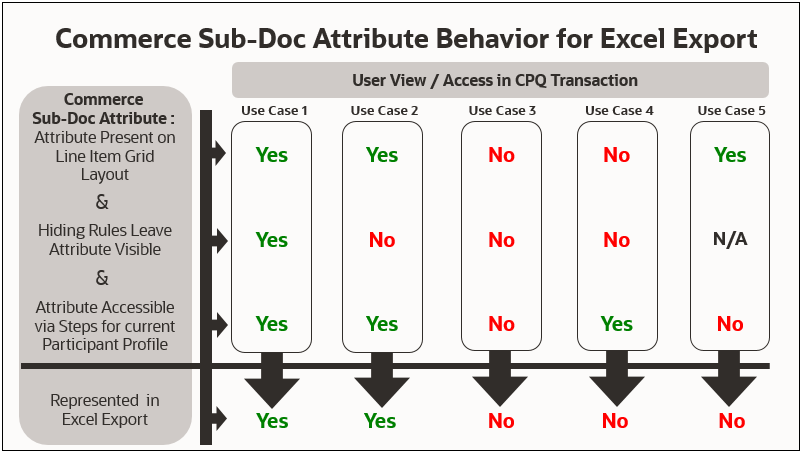
Upon executing the Export action, users can download the Transaction Line Items with all the attributes currently accessible to them. The export includes all their viewable information from the Line Item Grid as determined by their user profile settings. If a Line Item Grid column is hidden from the end user by a Commerce access rule or a Line Item Grid view filter, that data is exported.
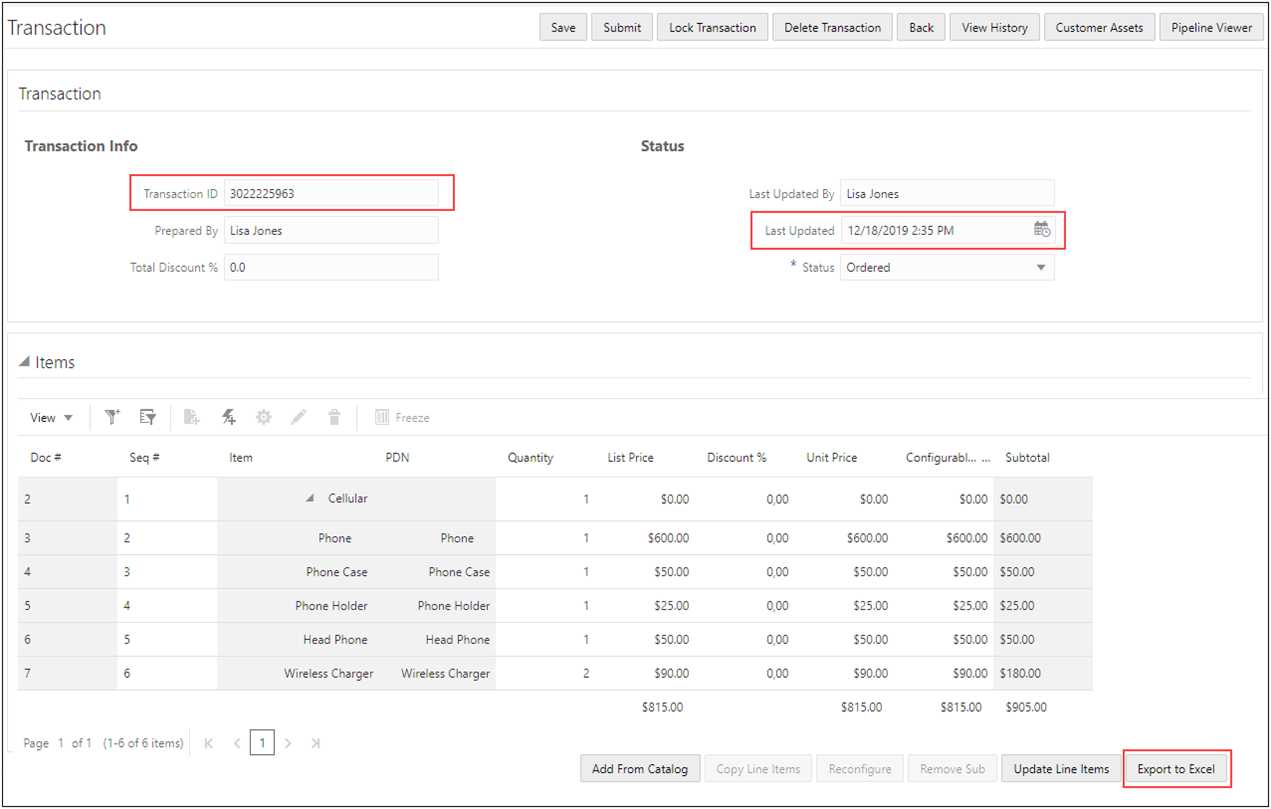
Depending on the user's browser settings, the .XLSX file is either directly downloaded to the user's local computer or a download prompt is displayed.
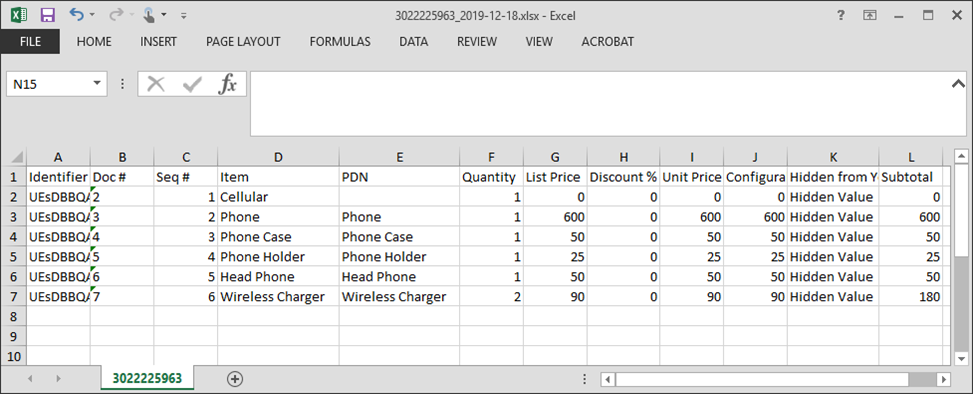
Sample Exported Excel File
The exported Excel filename includes the Transaction ID (bs_id) and date of the export request. For example, 3022225963_2019-12-18.xlsx. Within the .XLSX file, the Excel sheet is given the Transaction ID (bs_id).
The first row of the Excel sheet is a header row that provides the Line Item Grid column labels. Each subsequent row corresponds to a specific line item and the cells in the row contain the values for the labeled columns.
The first column of the Excel sheet is an "Identifier" column. This column provides encoded hierarchical information regarding Model and part relationships for the line items. This information is for internal use and should not be modified.
In the above example, column K is labeled "Hidden From You" with the row values showing "Hidden Value" to indicate this type of hidden data. However, if the end user's participant profile hides an attribute for the current step they are on, that information is not exported.
 Filter Transaction Lines when Exporting to .XLSX File Format
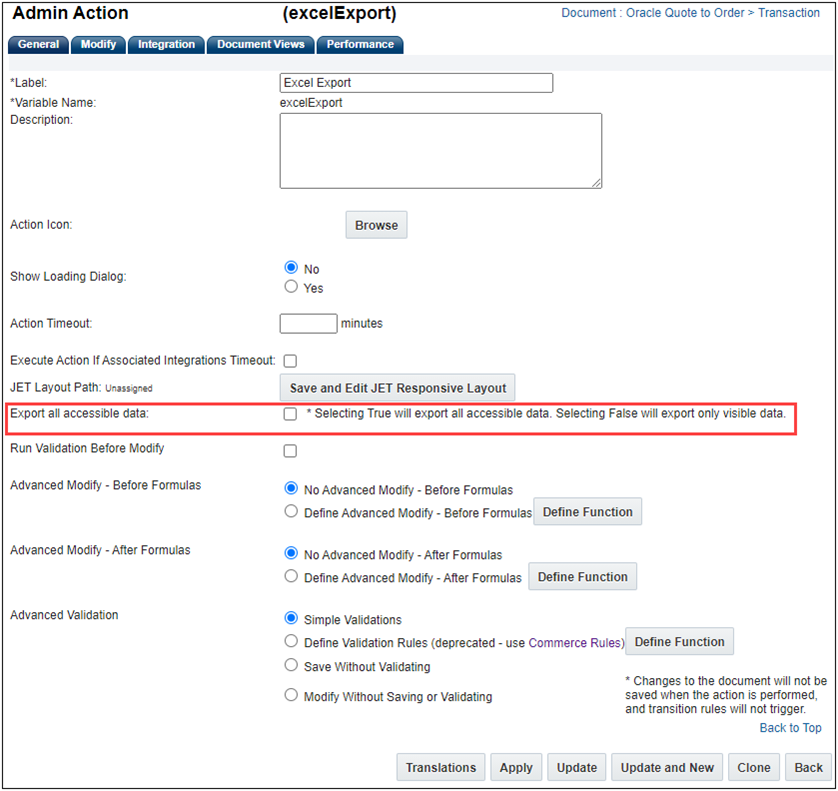
Oracle CPQ 20A provided the ability to export Line Item Grid data to a Microsoft Excel (.XLSX) file on an end user's local computer. The export included all columns and line items that the end user had access to for a given Transaction. Beginning with Oracle CPQ 21B, Export Line Item action contains an additional option to allow the export of only the Line Item Grid data that is visible to the end user on the current step, taking into account Commerce access rules and Line Item filter rules. Administrators can choose to continue using the current functionality of exporting all the Line Item Grid data or use the new option.
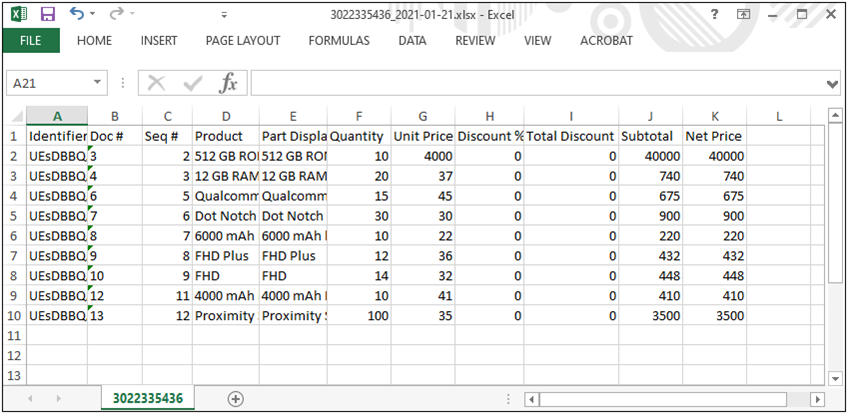
The following example quote provides administrator-defined filters for the end user. When the Line Item Grid filters are selected, only the Line Item Grid rows and columns that meet the filtered criteria are visible to the end user.
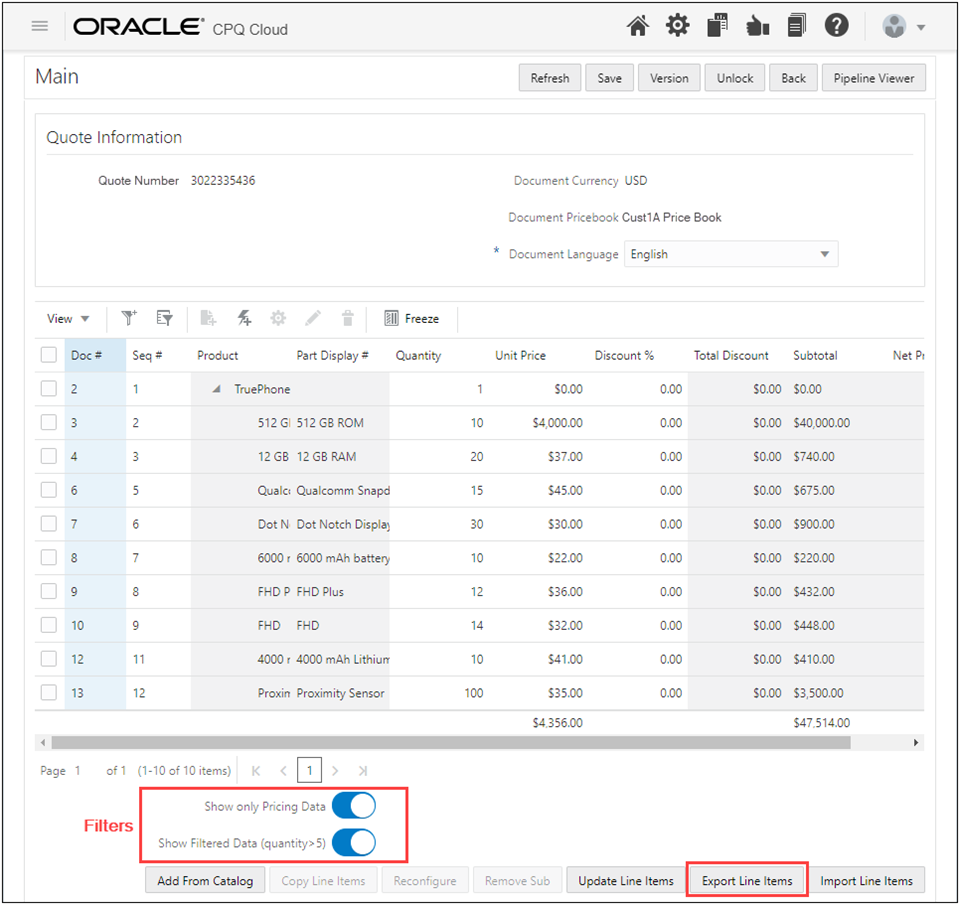
If the end user clicks on Export Line Items, the visible line item data is provided in the Excel export output file.
Notes:
-
Upon upgrade to 21B, the Export all accessible data setting defaults to False (export only visible data). Customers who are already using the Export Line Items functionality and want to continue the behavior of exporting all the accessible data must set the Export all accessible data checkbox to True by selecting the checkbox on the Export Line Items Admin Action page.
-
The maximum Transaction Line Items for export to .XLSX file is 1000. You must open a Service Request (SR) on My Oracle Support to have the maximum number increased.
-
Export of Line Item Grid data to an Excel file is only available using JET UI.
Import Transaction Line Item Data from .XLSX File
Oracle also provides the additional ability to import line item data from a modified CPQ-exported Microsoft Excel (.XLSX) file. This feature leverages Microsoft Excel with Oracle CPQ Commerce to add new or modify existing transaction line data. End users can perform analysis and approval activities before importing line item modifications into the CPQ Transaction. Independent line items or unconfigured Model line items can be added to the CPQ export .XLSX file. The export .XLSX file provides necessary identification data to determine modifications to a pre-existing CPQ Line Item.
 Line Item Data .XLSX File
The exported .XLSX file includes all the end user's accessible data from the Transaction's Line Item Grid as determined by their user access setup on the CPQ environment. If a Line Item Grid column is accessible to the user's participant profile in Steps Administration, but is hidden from the view through a Commerce access rule or a Line Item Grid view filter, that data is still exported. For details about how user access setup impacts export .XSLX file content, see Export JET Transaction UI Line Item Grid to .XLSX File Format.
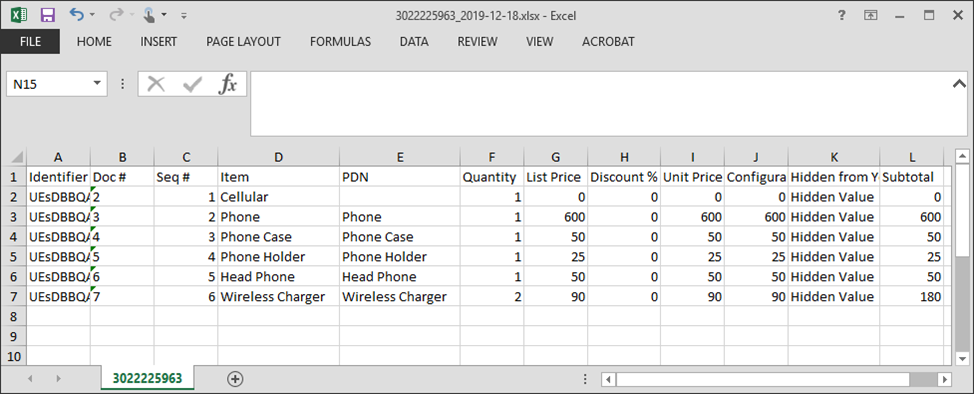
The .XLSX filename includes the Transaction ID (bs_id) and date of the export request. For example, 3022225963_2019-12-18.xlsx. Within the .XLSX file, the sheet name is the Transaction ID (bs_id).
The first row of the Excel sheet is a header row that provides the Line Item Grid column labels. Each subsequent row corresponds to a specific line item and the cells in the row contain the values for the labeled columns.
The first column of the Excel sheet is an "Identifier" column. This column provides encoded hierarchical information regarding Model and part relationships for the line items. This information is for internal use and should not be modified.
In the above example, column K is labeled "Hidden From You" with the row values showing "Hidden Value" to indicate this type of hidden data. However, if the end user's participant profile hides an attribute for the current step they are on, that information is not exported.
 Import .XLSX File Details and Helpful Hints
The following list defines the supported data modifications and helpful user hints when using this import feature.
 Import .XLSX File Error and Warning Messages
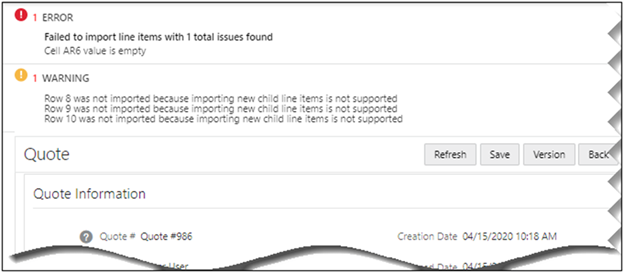
Validation of data provided in the .XLSX import file occurs once the Import Line Items action is invoked. Error and warning messages, including a summary message with the total number of errors found, displays at the top of the Transaction page. There are two types of messages that may result from this validation:
- Error – An error message results when the data in the .XLSX file is not able to be processed into the Transaction's Line Item Grid. If any error messages occur, the import fails and none of the line item data is imported. Error messages help the end user identify necessary changes required for successful import of the .XLSX file. Common causes of error messages include:
- Transaction's Identification metadata in Column 1 is invalid
- Column labels are incorrect or invalid
- Cell values are an invalid data type or formatted incorrectly
- Cell value does not match user's current language or currency
- The .XLSX file contains an empty cell that clears an attribute value that must be populated. (e.g. Boolean attributes should have a 'true' or 'false' value)
- Empty row between populated rows
- New part is not found in Parts List
- Warning – A warning message results when a modification in the .XLSX import file is not supported by the import feature. The warning message includes the location of the unsupported modification and lets the end user know that the update was skipped during import. Warning messages do not prevent valid modifications in the .XLSX file from being imported. Common causes of warning messages include:
- Multi-level Line Items are not supported for import
- The first worksheet in the .XLSX file is empty
 Sample Use Case
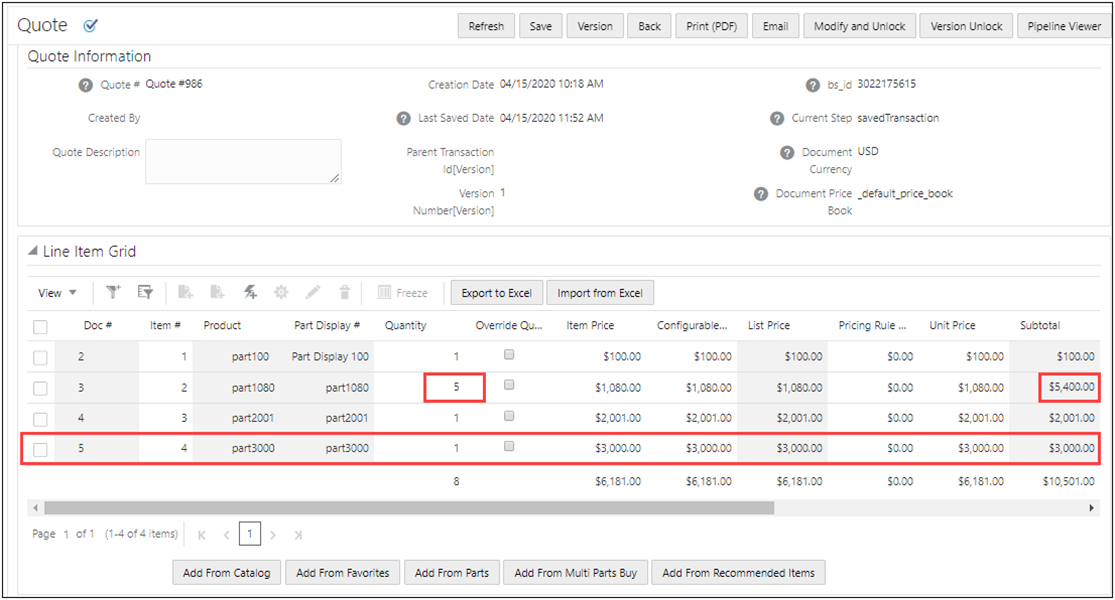
A sales manager wants to change a quantity of one of the line items and add a new line item to a Transaction.
- Navigate to the Transaction.
-
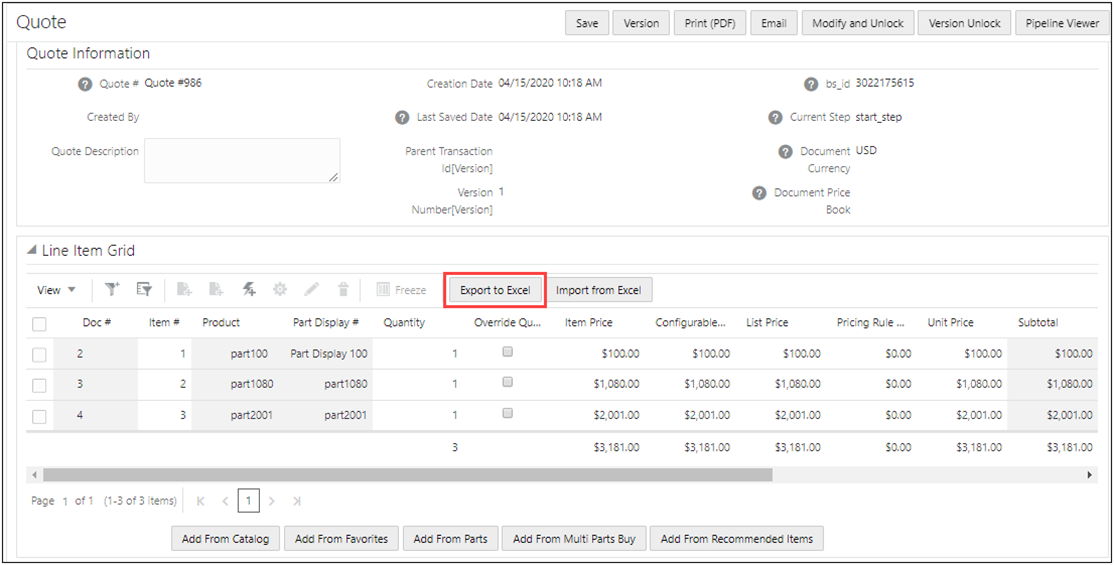
Click Export to Excel action button to export the line item data to an .XLSX file. The .XLSX file is downloaded and can be saved to the sales manager's local drive.
-
Open .XLSX file and modify file to change an existing line item quantity and add the new line item.

- Save the .XLSX file.
-
Navigate to the same Transaction.
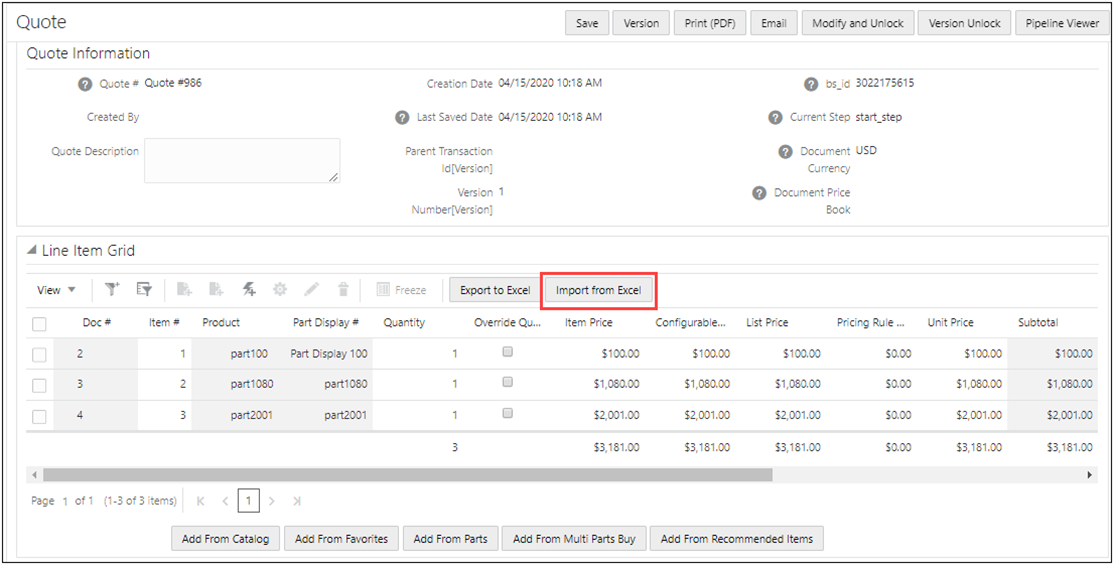
- Click Import from Excel action button. The Import Transaction Line Items window displays.
-
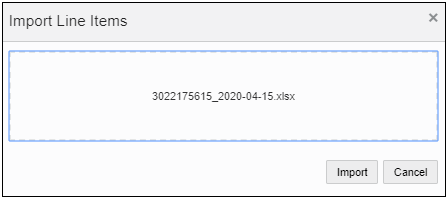
Drag and drop the .XLSX file into the file box or click in the box to navigate through the File Manager to upload the .XLSX file.
-
Click Import. The file is imported, validated for errors, updated accordingly, and modifications automatically saved to the Transaction.
Tips and Considerations
- Importing Transaction line item data from an .XLSX file is not supported in Legacy UI.
- If Asset Based Ordering (also called Subscription Ordering) is enabled, administrators must ensure that ABO-based attributes on the Transaction Line Item Grid be marked as read-only in the Transaction Layout or in the user profile permissions.
- Care should be taken by the end user when importing a Transaction's Line Item Grid while the Transaction is in active Collaborative Quoting mode. The .XLSX file is a snapshot of the Line Item Grid taken when the Export Line Items action is invoked. Changes to the Line Item Grid by a collaborator can make the import file information out of date.
- A maximum of 1000 rows can be imported at one time.
- When Price Books are enabled for a Transaction but it does not yet have a Price Book selected, the default Price Book is automatically selected when importing the Line Item data.
Administration
 Enable Line Item Grid .XLSX Export
-
Administrator must create an Export Line Items Commerce action to facilitate exporting line item information from the current Transaction.
Refer to the Adding Commerce Actions procedure and video for detailed instructions.
-
Once the Export Line Items action is created, administrators must add this action to an Action Bar in the JET Transaction Layout for end customer access.
Refer to Commerce Layout Editor - Actions section for details on adding an action to the JET layout.
Export uses the current user's language when exporting.
Currency attributes are treated as float attributes types.
Care should be taken by the end user when exporting a Transaction's Line Item Grid while the Transaction is in active Collaborative Quoting mode. The .XLSX file is a snapshot of the Line Item Grid taken when the Export Line Items action is invoked. Changes to the Line Item Grid by a collaborator can make the export file information out of date.
 Set Export Data Option
To determine the Microsoft Excel export data option, complete the following steps:
-
Create or modify an existing Commerce Export Line Items action to facilitate exporting line item information from the current Transaction. Refer to the Oracle CPQ Administration Online Help for details about adding a Commerce action.
-
Select the desired export data option from the Export all accessible data setting on the Admin Action page.
-
Click Apply or Update to save the settings.
-
If this is a newly created action, administrators must add this action to an Action Bar in the JET Transaction Layout for end user access. Refer to the Commerce Layout Editor > Actions section of the Oracle CPQ Administration Online Help for details on adding an action to the JET layout.
 Enable Line Item Grid .XLSX Import
To import a Transaction's Line Item Grid .XLSX file, an administrator must perform the following steps:
-
Navigate to the Processes page.
Admin Home > Commerce and Documents > Process Definition
- Select Documents from the Navigation drop-down for the applicable process, and click List. The Documents List page opens.
- Select Actions from the Navigation drop-down for the Transaction, and click List. The Actions List page opens.
-
Click Add. The Admin Action page opens.

- Enter the Label and Variable Name for the Action.
- Select Import Line Items from the Action Type drop-down.
- Click Add. The Action is added and the Admin Action tabs appear.
-
Review and update the settings within the Admin Action tabs.
Refer to Commerce Actions for detailed information.
- The General tab provides the Max Displayed Errors field. This field designates the number of error messages to display in the JET Transaction UI. The default value is 5.
- When an existing line item is updated during import, the Modify tab settings are applied to the selected attributes for the Main document and Sub-Document.
- When a new line item is added during the import, the Initialization tab settings are applied to the line item.
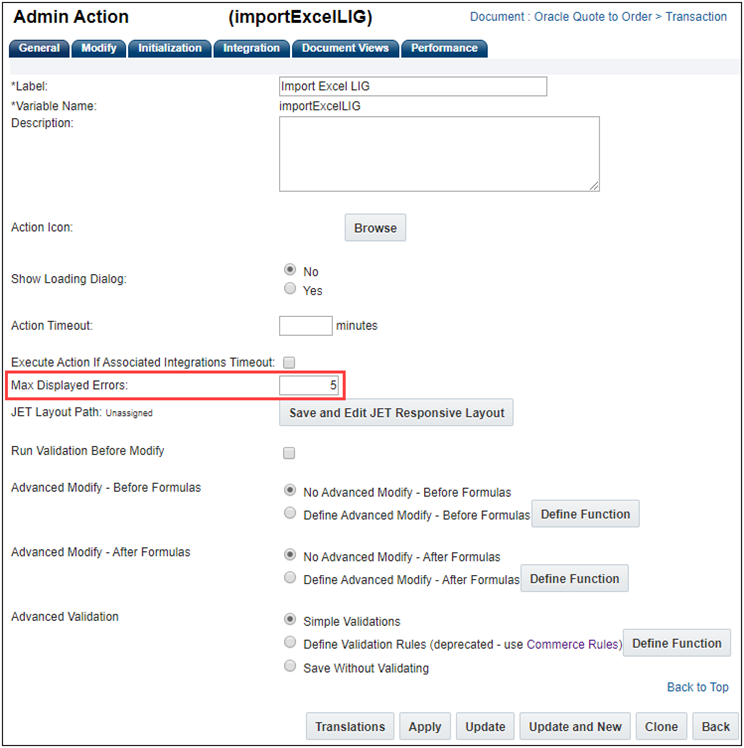
- Click Apply or Update to save the settings.
-
Once the Import Line Items Commerce action is created, administrators must add this action to an Action Bar in the JET Transaction Layout for end customer access.
Refer to Commerce Layout Editor > Actions section for details on adding an action to the JET layout.
Notes
Notes:
- This feature is only available with Redwood Quote UI and JET Transaction UI.
- Prior to Oracle CPQ 21B, all line items belonging to a Transaction, irrespective of their visibility through user Line Item Grid filter or Commerce Filter Rules were part of the Excel export.
-
Beginning in Oracle 21B, administrators can determine the best option, based on their business model, for end users to export Line Item Grid data to an Excel file.
Related Topics
 See Also
![]() Filter Transaction Lines when Exporting to .XLSX File Format
Filter Transaction Lines when Exporting to .XLSX File Format
![]() Import .XLSX File Details and Helpful Hints
Import .XLSX File Details and Helpful Hints
![]() Import .XLSX File Error and Warning Messages
Import .XLSX File Error and Warning Messages
![]() Enable Line Item Grid .XLSX Export
Enable Line Item Grid .XLSX Export
![]() Enable Line Item Grid .XLSX Import
Enable Line Item Grid .XLSX Import


