Overview
The Subscription Workbench (previously called the Customer Assets page) is a new pre-defined page that displays to sales users the assets associated with a transaction’s Customer Account ID. The Subscription Workbench provides the ability to view purchased, modified, and terminated assets; and to search, filter, and sort assets. The UI Designer can be used to customize the Subscription Workbench.
To view the Subscription Workbench, complete the following steps:
- Log in to CPQ, click Subscription Workbench. The Subscription Workbench page displays.

- Perform one of the following steps:
- Enter the account name in the Account Name field.
- Enter the account ID in the Account Id field.
- Click on the
 Look up Key to select an account.
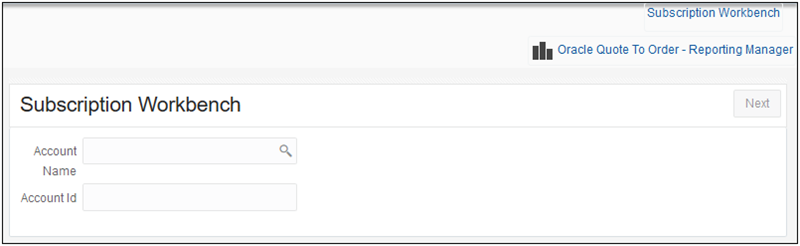
- Click Next. The Subscription Workbench showing the list of assets/subscriptions for that account displays.
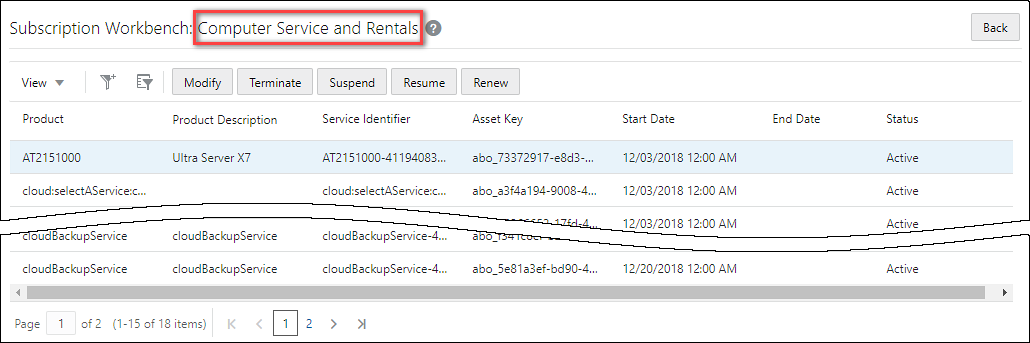
The Subscription Workbench displays active assets based on the request date associated with the current order. The page does not display assets scheduled to start on a later date.
For example: Assume a customer adds a sports network to their cable service on Aug. 1. This creates Asset 1 with a future request date of Aug 1. The customer then calls back the next day and adds a cooking network to their cable service on July 1, which is order 2. The Subscription Workbench does not display Asset 1 on the second order, which has a request date of July 1. The Subscription Workbench only displays Asset 1 for orders with Aug. 1 or later as the request date.
The customer name displays in the title of the Subscription Workbench.
The Simple and Advanced Filters provide the functionality previously available from the Query By Example (QBE) filter. Just as with the QBE filter, users can define filter criteria for multiple column items using the Advanced Filter. In addition to defining a multiple column filter, the Advanced Filter allows users to specify if the results match any or match all filter criteria. The Simple Filter searches all columns and then filters results based on a user-defined keyword or phrase.
Simple Filter
The Simple Filter supports quick text or numeric searches, such as Part Number searches. The Simple Filter Icon is located in the toolbar above the associated table for JET UI pages.
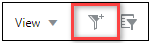
To use the Simple Filter, perform the following steps:
-
Click on the table toolbar Simple Filter icon.
The keyword entry field appears in the table toolbar.

-
Type the desired keyword or phrase and then press <Enter> or <Return> to filter results.
If the keyword is present in any column, the resulting lines are returned.
- To deactivate the filter, click on the active Simple Filter icon.

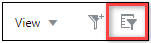
Advanced Filter
The Advanced Filters supports use cases where multiple criteria are required to focus on a subset of lines. A wide range of operators and the Match all or Match any option expand the user's ability to fine tune their filtering. The Advanced Filter icon is located in the toolbar above the associated table for JET UI pages.
![]() Use the JET UI Advanced Filter
Use the JET UI Advanced Filter
To use the Advanced Filter, perform the following steps:
-
Click on the table toolbar Advanced Filter icon.
The Advanced Filter window opens.
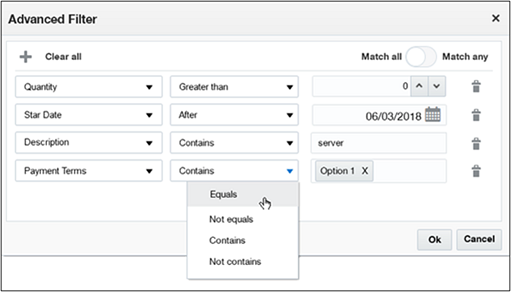
- Define the filter criteria:
- If required, click the Add Row icon.

- In the first column, select the desired table column names.
- In the second column, select the applicable operator.
- In the third column, define the criteria for the column filter.
- To delete a row, click the Delete Row icon.

- Select Match all or Match any.
- If required, click the Add Row icon.
-
Click OK to filter results.
The resulting lines are returned.
- To modify the filter criteria, select Edit Filter.
- To deactivate the filter, click on the active Advanced Filter icon.

Administrators use asset attributes to add new columns to the Subscription Workbench.
The following asset attributes are available in the UI Designer for Subscription Workbench:
- Agreement Id
- Asset Description
- Asset Id
- Asset Key
- Attributes
- Billing Account
- Billing Profile
- Contract
- Currency
- Customer
- Date Added
- Date Modified
- Discount Amount
- Discount Percent
- Display Key
- End Date
- Fixed Recurring Amount
- Fixed Recurring Period
- Installed Date
- One-Time Net Amount
- Parent Asset Id
- Parent Display
- Parent Part Number
- Part Number
- Payment Term
- Purchased Date
- Quantity
- Registered Date
- Resumed Date
- Root Asset Id
- Root Display
- Serial Number
- Service Account
- Service Address
- Start Date
- Suspended Date
- Status Code
- Usage Net Amount
- Usage Unit of Measure
- Warranty End Date
- Warranty Start Date
Administrators use the UI Designer to modify the Subscription Workbench. For additional information about the UI Designer, refer to the UI Designer Administration topic.
Administration
![]() Customize the Subscription Workbench
Customize the Subscription Workbench
Use the UI Designer to customize the Subscription Workbench. You can customize which attributes are displayed and change the search criteria on the asset table. For additional information about UI Designer, refer to the Oracle CPQ Administrator Online Help.
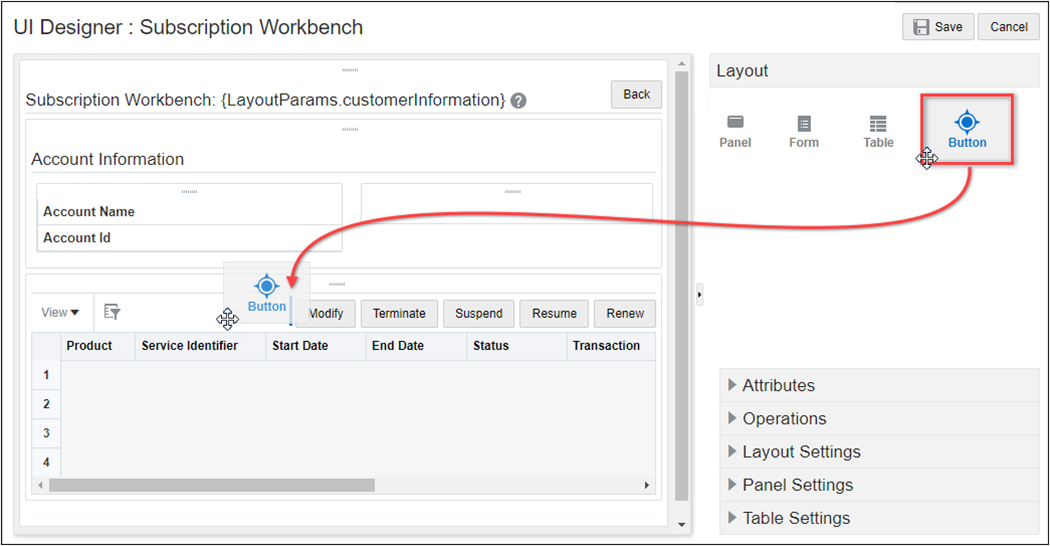
Complete the following steps to access the Subscription Workbench layout in the UI Designer:
- Navigate to Admin > General > UI Designer.
- Select Customer Assets List.
-
To add a button, drag and drop the button icon from the Layout tab to the UI panel.
-
To set or edit the button options, click on the UI panel button and then click on the Button Settings tab.
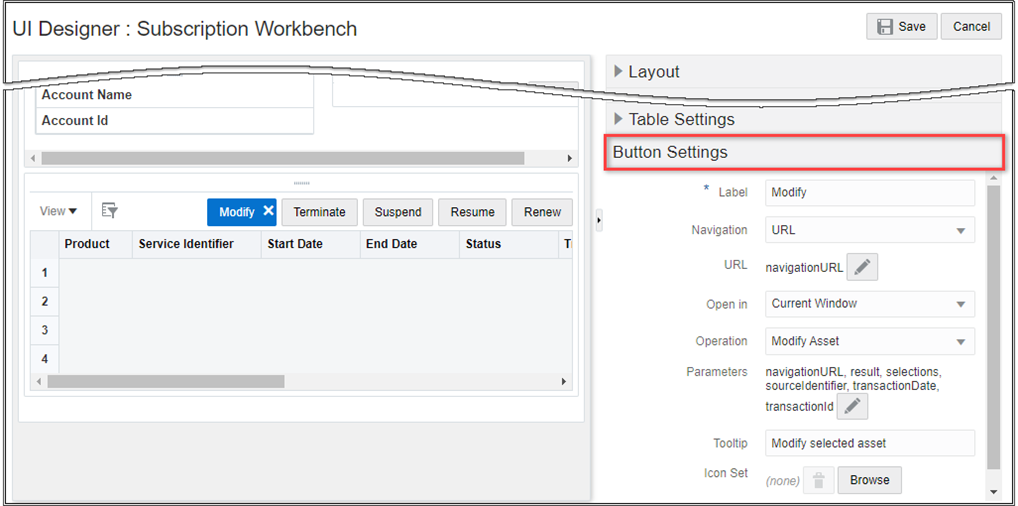
- Set the following options for ABO operations:
- Navigation: select URL
- URL: enter navagationURL
Operation: select the applicable asset operation (e.g. Modify Asset)
IMPORTANT: Beginning in Oracle CPQ 18D, the Subscription Workbench will always invoke the latest REST service for asset operations. Therefore, even though the "getConfigInstance" and "copyConfigInstance" operations are still available in layout editor, they should not be used in the UI since the "getConfigInstance" and "copyConfigInstance" REST operations were deprecated in 2017 R1 and are only available in v3 and earlier REST services.
- Click on the Parameters edit icon and verify the following settings:
- Navigation URL: navigationURL
- Result: result
Asset Id List: "CurrentRow.id"
Note: When a user selects multiple rows, this parameter will automatically expand to list the ids of all selected rows.
- SourceIdentifier: commerceProcess
- Transaction Date: txnDate
Transaction Id: transactionId
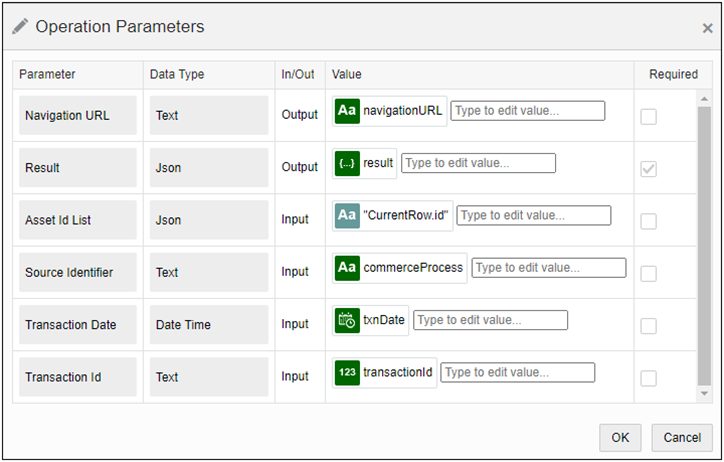
- Click OK to close the Operation Parameters.
-
To edit the table filter:
- Click anywhere within the table.
- Open the Table Settings in section in the right panel.
-
Click on the Resource Query Filter edit icon to define the filter applied to the table.
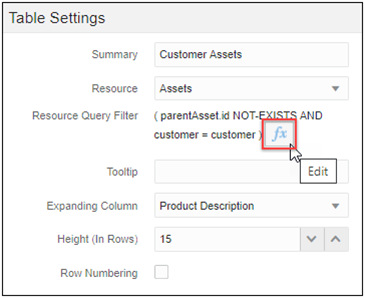
- Click Save.
To setup a user-defined Link for accessing the Subscription Workbench, complete the following steps:
- Navigate to Admin Home page.
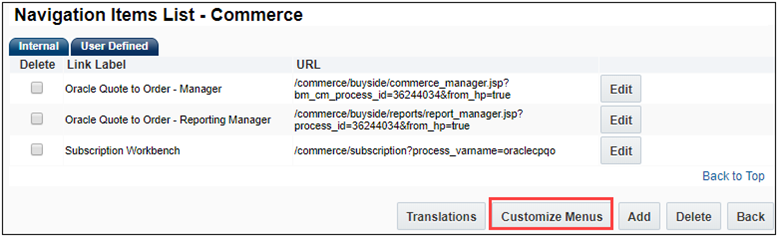
- Click Navigation Menus under Styles and Templates. The Navigation Menus page displays.
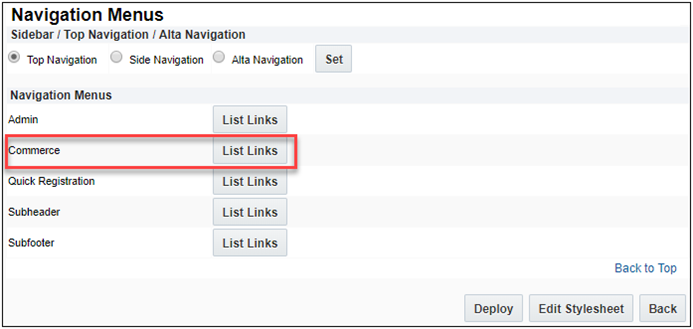
- Click List Links for Commerce. The Navigation Items List – Commerce page displays.
- Select the User Defined tab.
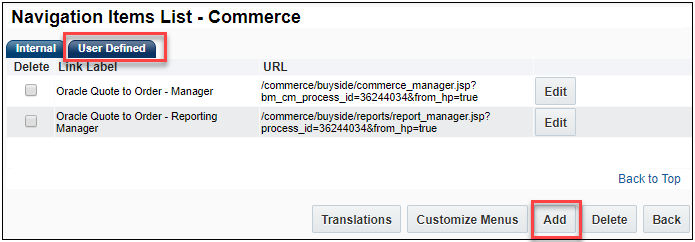
- Click on Add. The Link Editor page displays.
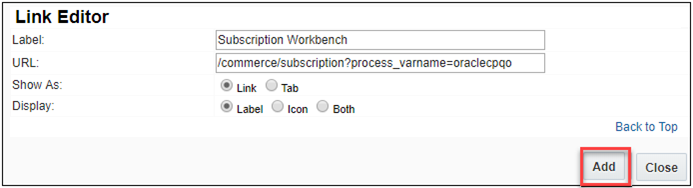
- Enter Subscription Workbench for the Label.
- Enter a valid URL. For example,
/commerce/subscription?process_varname={PROCESS_VARNAME}whereprocess_varnameis the valid Commerce process. - Select Link for Show As.
- Select Label for Display.
- Click Add. The Navigation Items List - Commerce page displays.
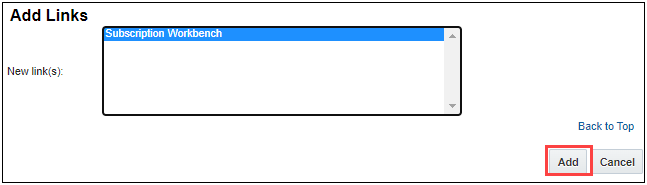
- Click Customize Menus within the User Defined tab. The Customize Links for Commerce page displays.
- Select Subscription Workbench from the Add Links list and click Add. The Customize Links for Commerce page displays with the Subscription Workbench showing in the Hidden Links list.
-
Select Subscription Workbench from the Hidden Links list and then click Add next to the Hidden Links list. The Subscription Workbench link is moved to under the Top Navigation Tab.
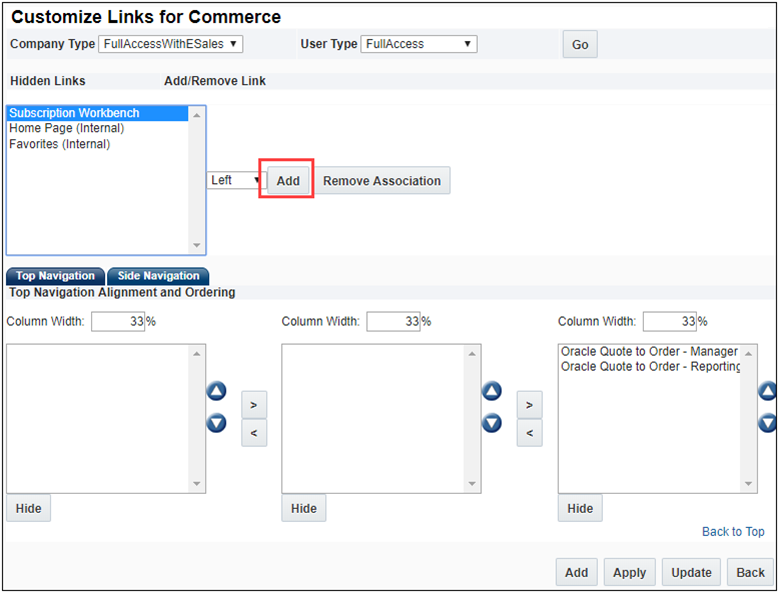
- (Optional) Click the arrows to move the Subscription Workbench link to the desired location to display on the UI.
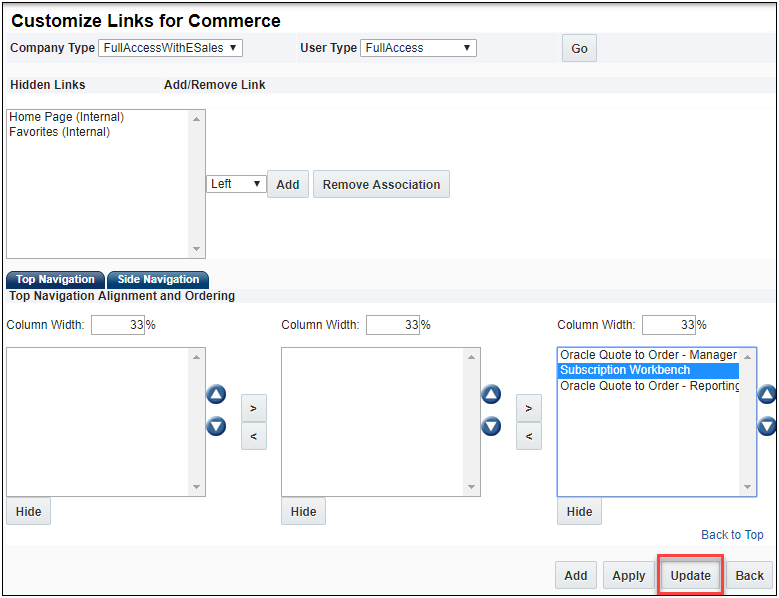
- Click Update to get back to the Navigation Items List – Commerce page.
- Click Back to get to the Navigation Menus page.
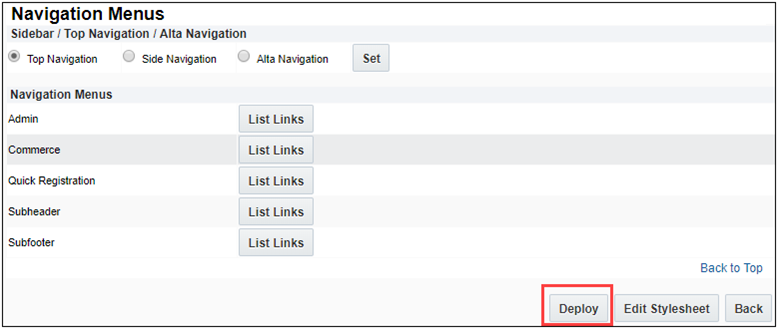
- Click Deploy to deploy the Subscription Workbench to the User-Defined Navigation Menu UI.
![]() Enable Accounts Lookup Library Function
Enable Accounts Lookup Library Function
To enable the Accounts Lookup Library function for Integrations with CRMs, complete the following steps:
- Navigate to the Admin Home page.
- Select Commerce Settings under Commerce and Documents. The Commerce Options page displays.
- Select an Account Lookup BML script from the Accounts Lookup Library Function drop-down.
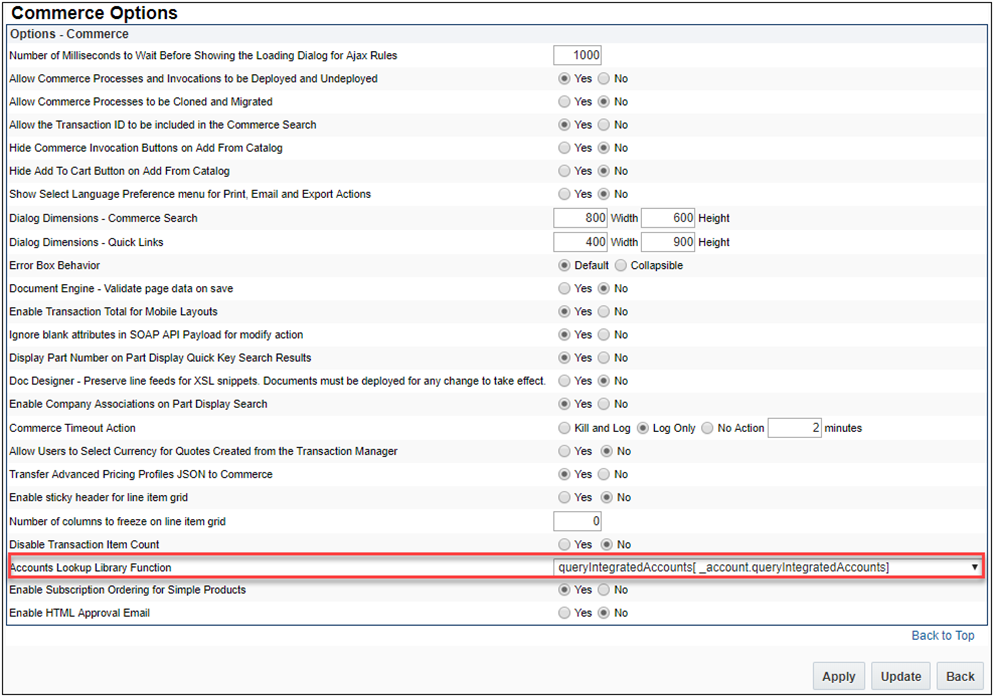
- Click Apply.
Administrators need to develop an Account Lookup BML script in order for the lookup feature to know what data to search. A sample BML script is included within the 19B Subscription Management Installation package. The following examples provide the input and output BML format for the accounts lookup script.
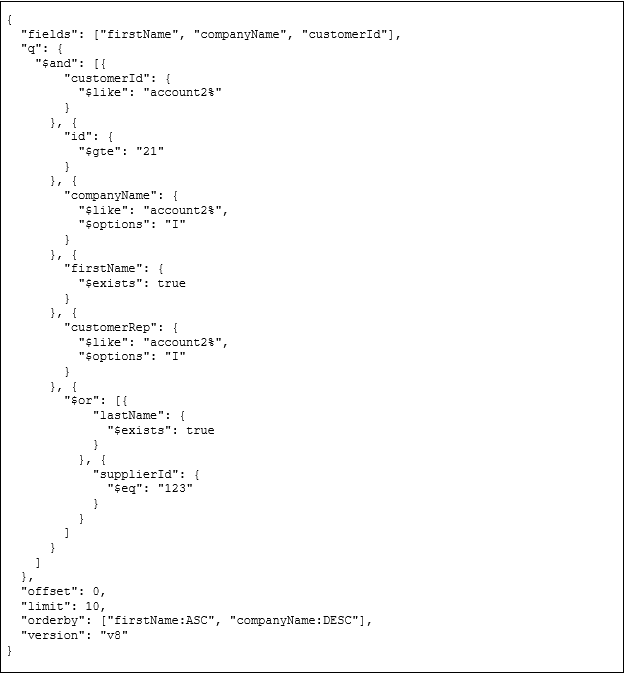
Sample Input BML
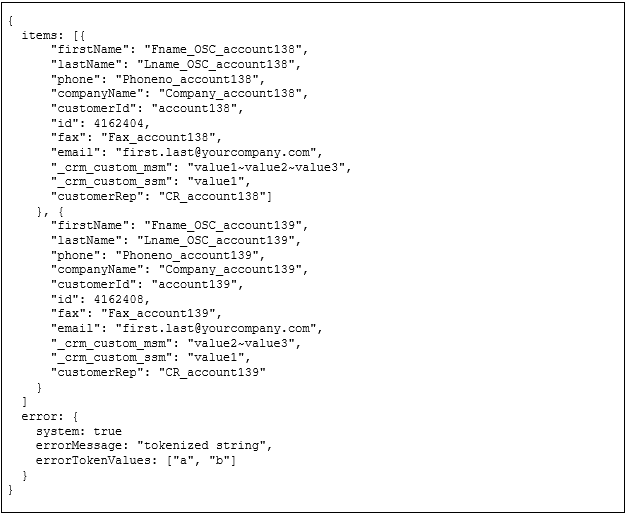
Sample Output BML


