Overview
Administrators can extend the asset table by adding custom asset fields that suit their company's business needs.
Beginning in Oracle CPQ 22C, the available count of Custom Asset Fields is 600. This field count includes:
- 350 text or menu fields (i.e. string type fields)
The string type field length is 1500 characters. - 200 numeric fields (i.e Integer, Float, and Currency)
- 50 date/time data fields
By clicking Assets on the Admin Home page, administrators can view custom asset fields.
This page contains a list of the custom asset fields and the count of available fields.
- The remaining Available Fields count is displayed at the top of the page.
- Asset fields displayed in red indicate an un-deployed fields After successful deployment, the fields are no longer displayed in red.
- Administrators can check the Delete checkbox to select one or more custom asset fields to delete.
- Administrators can click Add to create new custom asset fields.
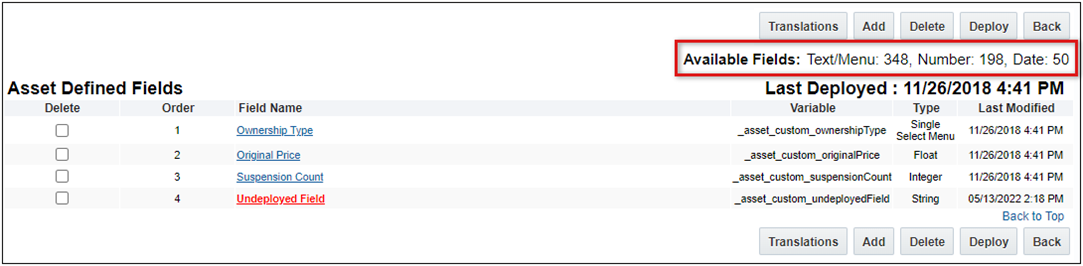
Administrators can select a link in the Field Name column to open the corresponding field editor and modify the associated field properties.
Upon deploying the custom asset field, the field name displays in UI Designer under the list of attributes. Administrators can then add the new or updated custom asset fields to the Subscription Workbench.
Administration
Complete the following steps to add a custom asset field.
Notes:
- Prior to Oracle CPQ 22D, custom asset field variable names had a "_asset_custom_" prefix.
- Beginning in Oracle CPQ 22D, a "_c" suffix will be appended to the variable name provided by the administrator.
- Navigate to the Admin Home page.
- Click Assets in the Products section.
-
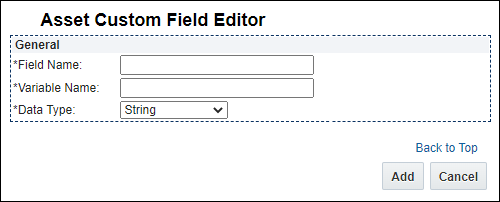
Click Add.
-
Enter the Field Name and Variable Name.
A "_c" suffix will be appended to the variable name.
-
Select the desired Data Type.
-
Click Add.
After you click Add, String, Integer, and Date field types are automatically added to the Asset Defined Fields list.
-
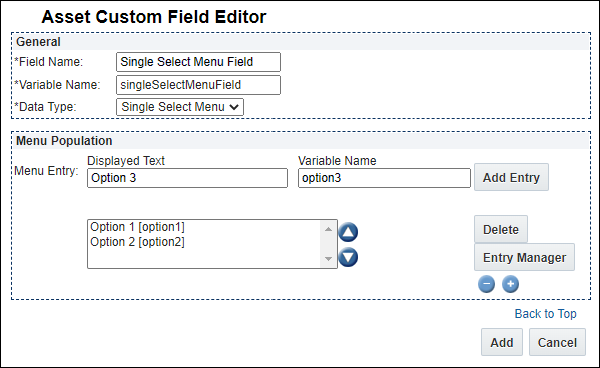
For Single Select Menu or Float field types, complete the applicable steps below:
-
Enter the Menu Entry Displayed Text and Variable Name, and then click Add Entry.
- Repeat this step for all desired menu options.
- To Change the Order of menu entries, select a menu entry and use the up ▲ and down ▼ arrows to move the selected entry.
- To Delete a menu entry, select the menu entry, and then click Delete.
-
Click Add.
-
Check the Currency box currency type fields.
Currency fields are displayed as floating point number fields that will display the number in currency format. The currency displayed is the user's currency.
- Select the Precision value (the number of decimal places that will be accepted in the asset field).
- Click Add.

-
Notes:
- Administrators cannot delete custom asset fields that are referenced in a UI Designer layout. If administrators attempt to delete a deployed custom asset field used in a layout, an error message will display. Administrators cannot delete the field until after the custom asset attribute is removed from the UI layout.
Complete the following steps to delete a custom asset field:
- Navigate to the Admin Home page.
- Under Products, click Assets.
- Under Asset Defined Fields, select the custom asset fields you want to delete.
-
Click Delete.
The custom asset field no longer displays in the Asset Defined Fields section.
By deploying one or more custom asset fields, administrators are adding the fields to the list of UI Designer attributes. Administrators can then use UI Designer to add deployed, re-deployed, and updated custom asset fields to the Subscription Workbench layout.
Notes:
- After the successful deployment of a custom asset field, the field no longer displays in red under Asset Defined Fields.
- Deployed custom asset fields are available for asset REST services.
- The following deployed custom asset field types are available in the Subscription Workbench layout: String, Single Select Menu, Float, Integer, and Date.
Complete the following steps:
- Navigate to the Admin Home page.
-
Under Products, click Assets.
Under the Asset Defined Fields section, all newly created or modified custom asset fields display in red.
Note: Administrators do not need to select the custom fields to deploy. Upon clicking Deploy, all custom fields displayed in red are deployed.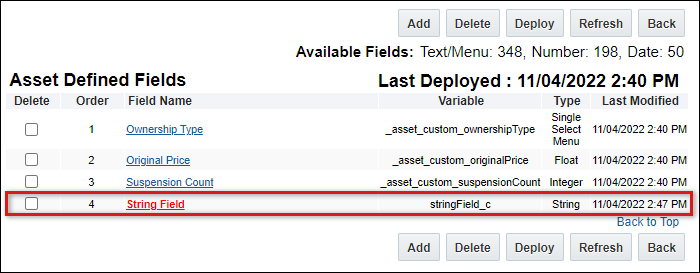
-
Click Deploy.
The deployed custom asset fields remain in the Asset Defined Fields section, but no longer display in red.

As shown below, the deployed custom asset field displays among the list of attributes in UI Designer.
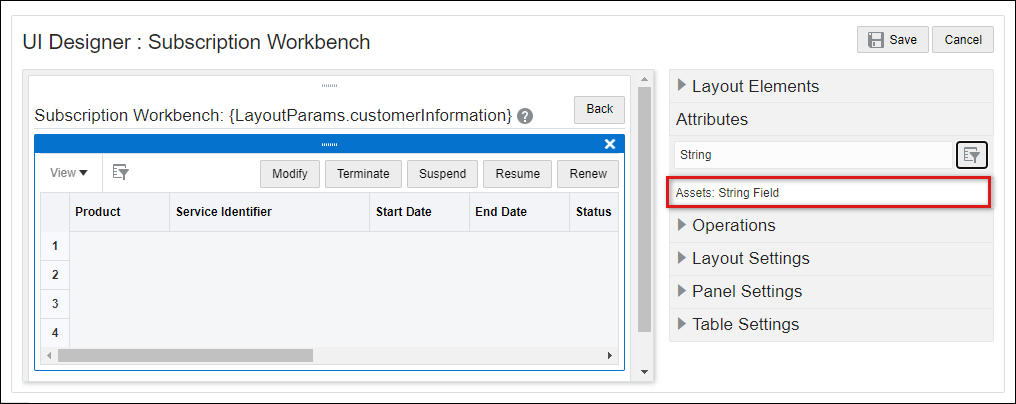
![]() Add Custom Asset Fields to the Customer Assets Layout
Add Custom Asset Fields to the Customer Assets Layout
After deploying a custom asset field, the field displays in the list of UI Designer attributes. Administrators can use the standard UI Designer drag and drop functionality to add the custom asset field in the Subscription Workbench layout. When referenced in a layout, custom asset fields display as read-only fields.
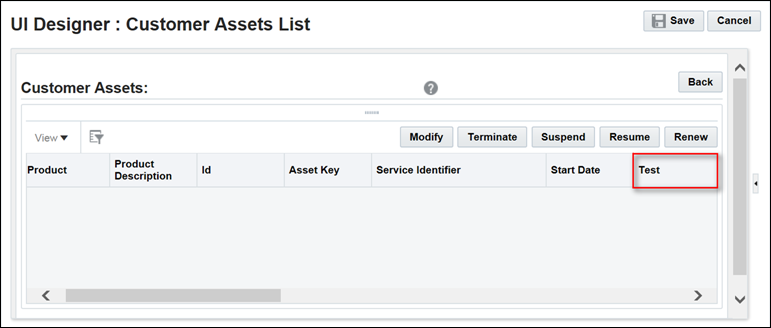
Customer Assets List Layout with Custom Asset Attribute as Field
Notes:
- Beginning in Oracle CPQ 22D, CPQ will adopt Oracle Sales naming conventions for asset custom field variable names. When administrators create new asset custom fields, a "_c" suffix will be appended to the variable name. This update only effects new custom fields for assets. There is no change to existing asset custom fields.
- New and updated custom asset fields are visible in UI Designer after the custom asset fields are deployed.
- Administrators can add updated and re-deployed custom asset fields to the Subscription Workbench page layout.
- To update a field name in UI Designer, administrators must use UI Designer to remove the attribute from the layout, update the custom asset field, deploy the changes, and then add the attribute back to the layout.
![]() Preserve New Transaction Line Attribute Values in Assets
Preserve New Transaction Line Attribute Values in Assets
Complete the following steps to preserve new transaction line attribute values in assets.
- Navigate to Admin > Products > Assets.
-
Add a new custom attribute for assets, and then deploy the changes.
For additional information, refer to Asset REST APIs.This new custom asset attribute can be used to store the value of the new transaction line attribute in an asset.
- Navigate to: Admin > BML Library > ORCL_ABO folder.
- Perform one of the following options for the
abo_getOpenOrderBomsfunction:- If the function hasn't been previously overridden, click on the Create link under the Override Column.
- If the function has already been overridden, click on Edit.
- Search for the "
lineField" array and add a new array with the variable name of the new transaction line attribute. - Save the "
abo_getOpenOrderBoms" library function. -
Select the applicable option below and complete the associated steps:
Complete the following steps for ABO Packages 18D and Later
- Navigate to: Admin > BML Library > ORCL_ABO and perform one of the following options for the
abo_initializeContextfunction:- If the function hasn't been previously overridden, click on the Create link under the Override Column.
- If the function has already been overridden, click on Edit.
- Add the variable name of the new custom asset attribute to the "
assetInfo.fieldQueryList" property. - Add the variable name of the new transaction line attribute to "
extraLineFieldForAsset" property. - Navigate to: Admin > BML Library > ORCL_ABO.
- Perform one of the following options for the
abo_convertDeltaBomtoAssetorabo_convertDeltaBomItemToAssetItem_extfunction:- If the function hasn't been previously overridden, click on the Create link under the Override Column.
- If the function has already been overridden, click on Edit.
-
Include the logic to copy from transaction line to asset. Refer to how displayKey in assetPayload is populated from itemInstanceName_l in fieldJson and add similar changes to store the new transaction attribute value in the new asset custom attribute.
For example - Assuming new transaction line item attribute is a text attribute, the following lines will copy the new transaction line item attribute value to the new custom asset attribute.
transAttrValue = jsonget(oneNode, NEW_TRANSACTION_ATTR_VARIABLE_NAME , "string", ""); if (transAttrValue <> "") { jsonput(assetPayLoad, NEW_ASSET_CUSTOM_ATTR_VARIABLE_NAME, transAttrValue); }
NEW_TRANSACTION_ATTR_VARIABLE_NAMEandNEW_ASSET_CUSTOM_ATTR_VARIABLE_NAMEare referring to constants that should be declared in the constant declaration section for the new transaction attribute variable name and new asset custom attribute variable name respectively. - Save the
"abo_convertDeltaBomtoAsset" or "abo_convertDeltaBomItemToAssetItem_ext" library function. - Perform one of the following options for the
abo_loadAssetfunction:- If the function hasn't been previously overridden, click on the Create link under the Override Column.
- If the function has already been overridden, click on Edit.
-
Locate the loop to convert asset to BOM.
Copy the field value from the new asset custom attribute to the corresponding transaction line attribute within the "
fields" JSON. Refer to sample code wheredisplayKeyfield fromoneAssetNodeis copied toitemInstanceName_lin existing code. - Save the "
abo_loadAsset" library function.
Complete the following steps for ABO Packages 18C and Earlier
- Navigate to: Admin > BML Library > ORCL_ABO and perform one of the following options for the
abo_initializeContextfunction:- If the function hasn't been previously overridden, click on the Create link under the Override Column.
- If the function has already been overridden, click on Edit.
- Locate the block to initialize "
extraLineFieldsforAsset" JSON field (around line# 98 to 103). - Add the variable name of the new transaction line attribute in the "
fieldList" along with the other attributes. - Save the
"abo_initializeContext" library function. - Perform one of the following options for the
abo_convertDeltaBomtoAssetfunction:- If the function hasn't been previously overridden, click on the Create link under the Override Column.
- If the function has already been overridden, click on Edit.
-
Add logic to copy transaction line attribute value from BOM fields (
fieldJson) toassetPayLoadJSON.Refer to how
displayKeyinassetPayloadis populated fromitemInstanceName_linfieldJson and do similar changes to store the new transaction attribute value in the new asset custom attribute. - Save the "
abo_convertDeltaBomtoAsset" library function. - Perform one of the following options for the
abo_loadAssetfunction:- If the function hasn't been previously overridden, click on the Create link under the Override Column.
- If the function has already been overridden, click on Edit.
- Locate the
fieldArrdeclaration (around line# 18). -
In the loop to convert asset to BOM, copy the field value from the new asset custom attribute to the corresponding transaction line attribute within the "
fields" JSON.Note: This will have to be done for both root and descendant assets.
Refer to how assetKey has been defined for both root and descendant assets. - Save the "
abo_loadAsset"library function.


