Setting Up Groups
Overview
Oracle CPQ is commonly administered by teams of individuals who are responsible for administering different subsets of Oracle CPQ features. Administrator Access Control allows an Access Administrator to secure certain administrative features and prevent other Full Access users from accessing those pages, links and services.
Oracle CPQ has two methods to restrict access to Oracle CPQ administration features:
Administrator Groups
An Enable Administrator Groups setting is available on the General Site Option page. When set to Yes, the Administrator Access Control feature is enabled for the entire Oracle CPQ site.
Using Administrator Access Control with Administrator Groups, companies can delegate and restrict access to certain areas of CPQ’s setup and administration. This prevents unauthorized users from introducing unintentional errors, clarifies areas of responsibility, and protects sensitive or proprietary information.
When Administrator Groups are enabled and setup, Full Access users only have access to the administration pages and data to which they are entitled. To ensure this data is properly secured and the logged in user only sees links to the content they can access, Oracle has added a number of security features.
An Access Administrator has the permissions to set up Access Control Groups. For more information, see User Permissions and Setting Up Groups.
 Secure Pages
The Admin Home page only displays the pages to which the logged in user has access. Members of the “All Access” group can access all pages and navigation menus. In the following example, the user has access to only a few of the administrative segments of the Admin Home page. The links are secured from unauthorized access.

Secure Admin Drawer
Full Access users see an Admin Drawer in the upper left-hand corner of the screen under a "hamburger menu”. When the Administrator Access Control feature is turned on, the Admin Drawer only shows the pages to which the logged in user has access.

Secure Navigation Menus
Administrators can customize the Navigation Menus for their users by providing links to internal and customized content. When these links point to administration features, they are removed when the user does not have access to the features. This security applies to headers, sub-headers, and sub-footers when using Top Navigation, Side Navigation, or Alta Navigation.
If a custom link points to a restricted administrator page, it is not automatically hidden. An access denied message will display.
Secure SOAP Web Services
All SOAP APIs for administrative features that are public to Full Access users are secured, blocking unauthorized users from accessing data.
When using web services version 1.0 or version 2.0:
- A SuperUser can access all administrator SOAP APIs (e.g. parts, groups, configuration, price books, data tables, users, exchange rates).
- Authorized users can access designated administrator SOAP APIs.
- Users trying to access restricted SOAP APIs will see an error message and the operation will fail.
- The getGroups operation retrieves information for Sales groups only.
- The modifyGroups operation can modify Sales groups only.
The following error displays in the response when a SOAP API to access data tables is called by an unauthorized user.

Secure REST Web Services
All REST APIs for administrative features that are public to Full Access users are secured, blocking unauthorized users from accessing data.
- A SuperUser can access all administrator REST APIs (e.g. parts, groups, configuration, price books, data tables, users, exchange rates).
- Authorized users can access designated administrator REST APIs.
- Users trying to access restricted REST APIs will see an error message and the operation will fail.

Consider the following tips when using the Administrator Access Control feature:
- Newly created Data Table folders and Product Families are only available to “All Access” users upon creation. An Access Administrator must grant access to those newly created items before they are usable by Full Access users who are not “All Access” users.
- Bulk Data Services can only be globally allowed or restricted. A user with access to Bulk Data Services can access any data available for bulk upload or download, so grant access sparingly.
- Users can only migrate settings when they have access to the features in both the target and the source site. If the user does not have access to a feature, the migration will fail.
- Keep in mind that User Administrators can proxy login as any user. These users can bypass Access Controls by logging in as a Full Access user with greater access rights. As a result, grant User Administrator rights sparingly.
Sales Groups
Sales Groups are a collection of users and are useful for determining access rights for Commerce documents. From the Group Administration List page, you can add, edit, or deactivate user groups.
Administration
Enable Administrator Groups for Your Site
An Enable Administrator Groups setting is now available on the General Site Option page. When set to Yes, the Administrator Access Control feature is enabled for the entire Oracle CPQ site. Only a SuperUser can modify the setting. When Administrator Groups are enabled, the access permission features available in prior releases are no longer available and will no longer apply. If you were using these features, you must configure access control using the new Administrator Access Control functionality.
-
The Enable Administrator Groups option is by default set to Yes for customers new to Oracle CPQ.
-
The current Enable Administrator Groups selection (i.e. Yes or No) is retained on Oracle CPQ sites upgraded from Release 18B to a later version.
-
When the Enable Administrator Groups selection is set to Yes, the Access Permissions tab on the Users page is turned off and does not display. When the Enable Administrator Groups selection is reset to No, the Access Permissions tab displays and retains its previous values.
View Groups Based on Group Type
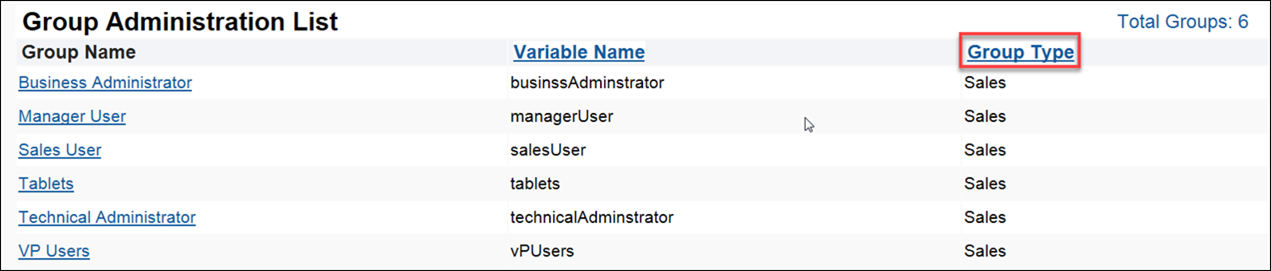
Administrators can add or edit user groups from the Group Administration List page. The Group Administration List page contains a Group Type column, which displays the group type (Sales or Administrator) associated with each group. By clicking the Group Type column header, users can sort the groups on the page based on group type.
When the Administrator Groups feature is first enabled, all existing groups are automatically categorized as Sales groups.
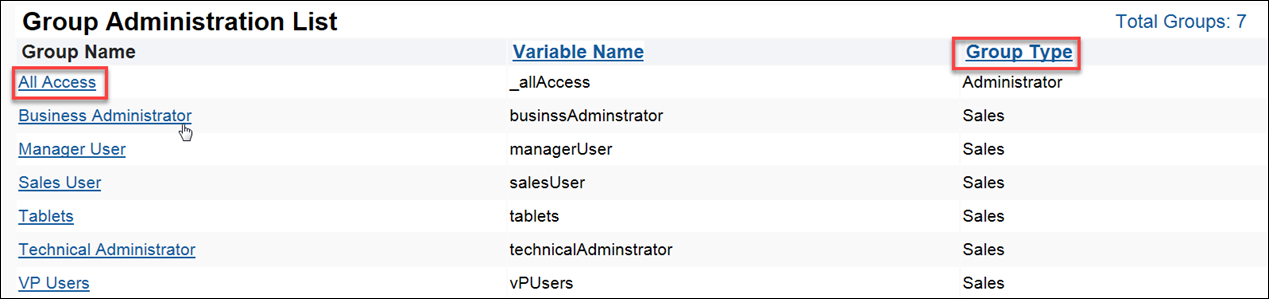
When the Administrator Groups feature is first enabled, a new “All Access” Administrator Group is automatically created. This is a special system group that cannot be edited. When first enabled, all existing Full Access users are members of this group. The “All Access” group has access to all administrative features. To restrict access for a user, first remove them from the “All Access” group.
Create and Edit Administrator Groups
Oracle CPQ includes the ability to create a Group Type called Administrator groups. Administrator groups are used to create groups of Full Access users who have access to a subset of all Oracle CPQ administrator features. Only Access Administrators can create and edit Administrator groups.
The Group Administration page contains the following sections:
- Type: Use to designate a group type: Sales or Administrator. Once defined, users cannot modify the group type. The Administrator value for the Type field is shown on the Group Administration page only when the Enable Administrator Groups option is turned on.
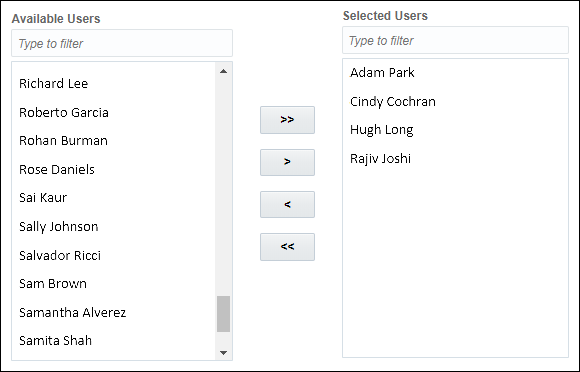
- Available Users: Provides a list of users that can be assigned to an administrator group.
- Selected Users: Lists users that are members of the administrator group.
- Access Selector: Use to define the administrative features to which member users have access. The Access Selector is only available for Administrator groups and supports bulk selection of administrative features. In the Access Selector, all Admin Home page links are grouped under their respective segment names.
To create and edit Administrator groups, perform the following steps:
- Open the Admin Home page.
- Under Users, select Groups.
The Group Administration List page opens.
- To edit an existing Administrator group, click its Group Name to open the Group Administration page.
- To create a new Administrator group, click Add to open the Group Administration page.
- Populate the fields, as desired.
-
From the Type drop-down, select Administrator.

- Define the users who are members of the Administrator group.
- To add users to the group, move user names from the list of Available Users to the list of Selected Users.
- To remove users from the group, move user names from the list of Selected Users to the list of Available Users.
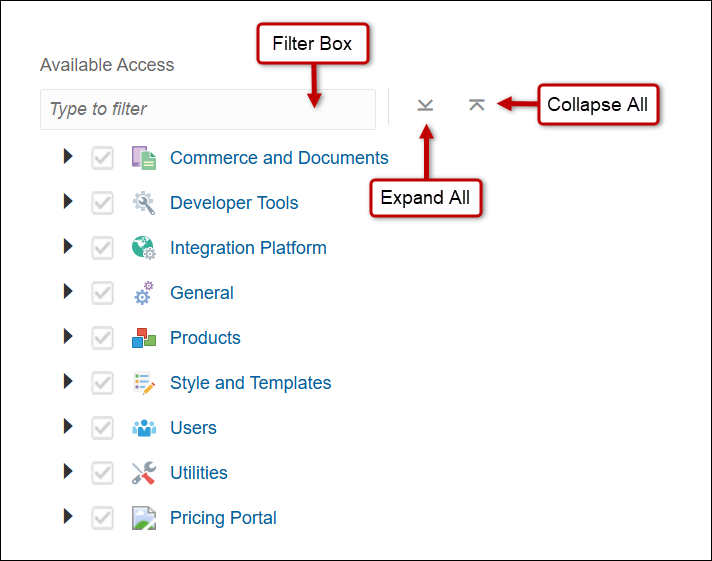
- Use Available Access to define the administrative features to which member users have access.
Assign access to objects using the Access Selector, which uses a hierarchical structure that allows independent selection of parent and child items.
The Access Selector select checkboxes provide a visual indication to show the status of parent objects. Parent objects have three states: Selected, Partially Selected, and Unselected.
Selected 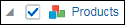
When the parent object is in the Selected state, all child objects are selected, authorized administrators are able to create and delete child objects, and authorized administrators inherit access to newly created child objects.
- When the top-level Data Tables object is selected, authorized administrators can create, modify, import, and delete Data Tables.
- When the top-level Product Family folder is selected, authorized administrators can add new Product Families and administer all Product objects.
Partially Selected 
When the parent object is in the Partially Selected state, access is only granted for selected child objects and access for newly created child objects is not automatically granted. Administrators are only able to add, edit, and delete children of selected objects.
- When the top-level Data Tables folder is partially selected, administrators can only add new Data Tables, modify, import, and delete Data Tables in selected Data Table folders.
- When the top-level Product Family folder is partially selected, administrators can not add new Product Families and they can only provide support for the selected Product Families.
Unselected 
When the parent object is unselected, all child objects are unselected and access for all existing and newly created child objects is unauthorized. Unauthorized administrators are only able to view child objects under the unselected parent object.
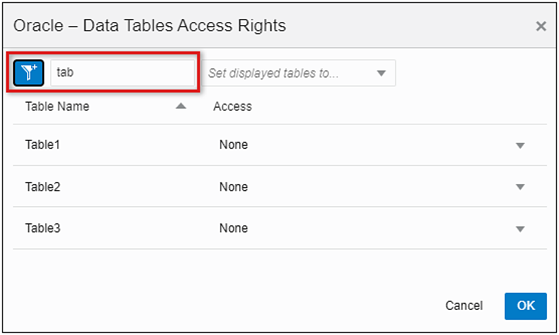
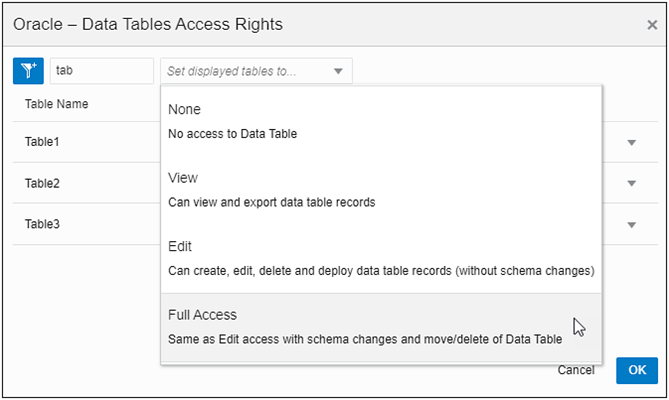
- Use the Filter Box to filter available access by keyword.
- Expand and collapse the Available Access hierarchy.
Assign Administrator Group Data Table Access Rights
Administrator Group Access Levels for Data Tables
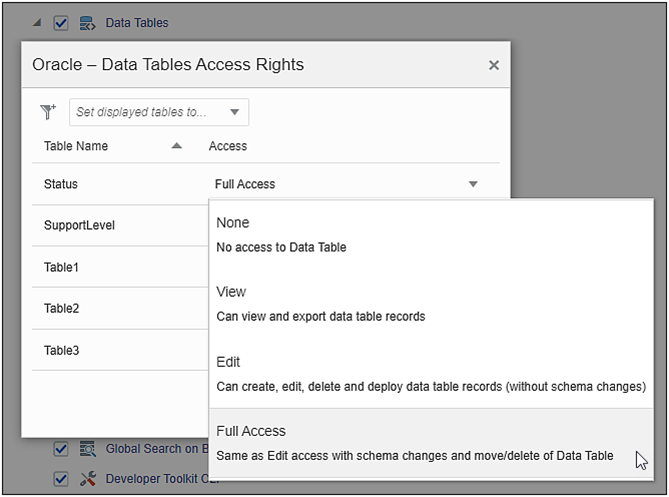
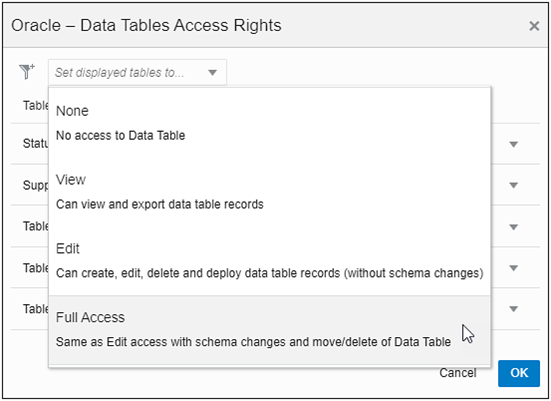
Administrator group functionality provides administrator group access rights at the data table level. In addition to providing access at the data table level, administrators can now employ administrator groups to assign View, Edit, and Full Access permissions. The following administrator group access levels are now available for data tables:
No Access: Members of this group have no access to the data table.
When a new administrator group is added, the group is assigned No Access to all existing data tables.
- View Access: Members of this group are only able to view the contents of the table.
- They don't have the ability to edit, delete, or deploy the data table.
- They can export data records, but can't import data records or make any changes to the schema.
- Edit Access: Members of this group can view, add rows, and edit the contents of the data table.
- They can add new rows to the data table and modify content.
- They can deploy the data table changes.
- They can import new rows if there are no schema changes
- They can't modify data table schema or delete an existing data table.
- Full Access: Members can read, edit, and delete existing records and data tables. They can also make changes to the data table schema.
- They can add new rows into the data table.
- They can view, modify, and delete records of an existing data table.
- They can make changes to the data table schema.
- They can deploy the data table changes, including data table schema changes.
- They can import new rows, including row with schema changes.
- They can delete existing data tables.
- This is the default access level when assigning access rights to an existing administrator group.
Perform the following steps to assign administrator group data table access rights.
- Click Save.
- Only Access Administrators can create Administrator groups. All other users can only choose the Sales group type.
- Access Administrators and Full Access users can use the Group Administration page to create and edit Sales groups. When the Enable Administrator Groups option is turned off, only Sales groups can be created.
- The Access Selector allows for the granular selection of Data Table folders and Product Families. Granular selection of BML Library folders is not supported. Administrator groups can have access to either all BML Libraries or no BML Libraries.
Create and Edit Sales Groups
Oracle CPQ includes the ability to create a new Group Type called Sales group.
The Group Administration page contains the following:
- Type field: Use to designate a group type: Sales or Administrator. Once defined, users cannot modify the group type. The Administrator value for the Type field is shown on the Group Administration page only when the Enable Administrator Groups option is turned on.
- Access Selector: Use to define the administrative features to which member users have access. The Access Selector is only available for Administrator groups and supports bulk selection of administrative features. In the Access Selector, all Admin Home page links are grouped under their respective segment names.
To create and edit Sales groups, perform the following steps:
- Open the Admin Home page.
- Under Users, select Groups.
The Group Administration List page opens.
- To edit an existing Sales group, click its Group Name to open the Group Administration page.
- To create a new Sales group, click Add to open the Group Administration page.
- Populate the fields, as desired.
-
From the Type drop-down, select Sales.

- Define the users who are members of the Sales group.
- To add users to the group, move user names from the list of Available Users to the list of Selected Users.
- To remove users from the group, move user names from the list of Selected Users to the list of Available Users.
- Click Save.
• Only Access Administrators can create Administrator groups. All other users can only choose the Sales group type.
• Access Administrators and Full Access users can use the Group Administration page to create and edit Sales groups. When the Enable Administrator Groups option is turned off, only Sales groups can be created.
Add Users to Administrator Groups from the User Administration Page
In addition to adding a user to an Administrator group from the Group Administration page, Access Administrators can also add a user to an Administrator group from the Groups tab on the Users page.
To add users to Administrator groups, perform the following steps:
- Open the Admin Home page.
- Under Users, select Internal Users.
The Users page opens.
- Select the user Login link for an Access Administrator.
The User Detail page opens.
- Select the Groups tab.
- Under Associations, use the Administrator Groups shuttle to specify the Administrator groups to which the user has access:
- To add the user to Administrator groups, move administrator group names from the Administrator Group List to the Selected Administrator Groups list.
- To remove the user from Administrator groups, move administrator group names from the Selected Administrator Groups list to the Administrator Group List.
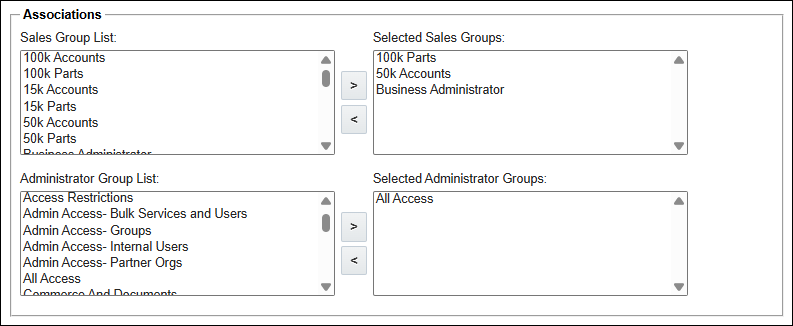
The Administrator Group List is only shown for Full Access user profiles. Other user types will only see a Sales Group List. Only Access Administrators can edit this list.
Inactivate a Group
Oracle CPQ 23D and later supports the ability for administrators to deactivate user groups. The Group Administration List page displays active and inactive groups. Once a group is deactivated, it will no longer be allowed access permissions nor will it be selectable for access to Commerce and Configuration properties. Administrators can grant different access to groups of users (using Participant Profiles) and different user-experiences in Commerce. By deactivating groups, administrators can better manage their implementation of user groups. For example, administrators may deactivate a user group to further segment the group or to address changes in business processes.
To deactivate a user group, perform the following steps:
-
Click Groups in the Users section of the Admin Home page. The Group Administration List page displays showing the active and inactive group lists.

-
To inactivate an existing group, click its Group Name to open the Group Administration page.
-
Click Inactivate.

The selected user group is moved to the Inactive Groups List and the group is no longer allowed access permissions nor is selectable for access to Commerce and Configuration properties.

• A dependency error message displays while deactivating a group if it has any Administration, Commerce, or Configuration dependency. You must remove all dependencies before a Group can be deactivated.
• If the group variable name is used in BML scripts, a dependency error message does not display. Administrators can manually search BML scripts for the group variable and modify the logic before deactivating the group.
• All Access Administration Group cannot be deactivated.
• Both Host Company and Prtner Organization Groups can be deactivated.
• The Get User Group REST API response result will only provide active groups
Notes
The Users page lists all users. If the logged in user is not a User Administrator they will be able to see other user's detail pages in read-only mode. They can edit their own details by clicking their login in this list or by opening their My Profile page from the navigation bar or header. To restrict access to the Users list create an Admin Group which excludes access to that feature.
Admin Access Control does not impact the user side. A FullAccess user who is restricted from a Product Family on the admin side can still interact with the Product Family on the user side, unless access to the Product Family is restricted for that user through the Home Page. For more information, see the topic
Home Page.
Groups can not be deleted once they are added. Oracle CPQ supports the ability for administrators to deactivate user groups. Refer to Inactivate a Group. Prior to Oracle CPQ 23D if you no longer need a group, you can choose to rename the group to indicate that the group is no longer being used.
Related Topics
See Also